Friday, April 30, 2010

Homemade Rootbeer.....

When I was really young, we used to go visit my Great-Grandmother in Murray, UT.  Every once in a while, a loud "pop" would be heard.  It startled my sisters and I until we learned what it was.  One of Grandma's homemade Rootbeer bottles' lids had popped off.  She would make it in real soda bottles and would cap them.  They looked like the type you would buy out of the machine to me.

Just as a reminder, one of our target items this week is Yeast.  I discovered the following recipe from Dr. David Fankhauser's website.  I love his site, he teaches anyone how to do so many things....like make Root Beer!  The following recipe and steps are from his site.


You will need the following equipment
  • A clean 2 liter plastic soft drink bottle with cap.  (Dr. Fankhauser does not recommend glass bottles because of the risk of explosive shards of glass),
  • funnel,  
  • 1 cup measuring cup,  
  • 1/4 tsp measuring spoon,
  • 1 Tbl measuring spoon. 
You can see my laptop.  I am using it to follow the recipe so I don't have to print it out and have to find a place to store an additional piece of paper!

Here is a list of ingredients: 
  • 1 cup table sugar,  
  • 1 Tablespoon of Root Beer Extract (He recommends Zatarains's, but I found another brand locally.  We often make Dry Ice Rootbeer, and I just had this particular bottle in the cupboard). 
  • 1/4 teaspoon of Powdered Baker's yeast. 
  • Cold fresh water.  (I found several discussions on-line that recommend that you use as little chlorinated water as possible as the chlorine reportedly can kill the yeast. So, I chose to use our water filter pitcher for the fresh water).


Pour in the sugar through the funnel.


Add your yeast via the funnel.

 
You can see the yeast on the sugar.
 
 
Shake the bottle and mix the yeast and the sugar. Swirl the mixture around in the bottle to create a small well or a concave surface in the mixture.  This will receive the Extract.
 
 
Add the Root Beer Extract via the funnel.
 
 
You can see that most of the Extract is in the middle of the mixture.
 
 
Pour water over the spoon to get all the Extract off the spoon and use the water to clean the funnel to get all the yeast and sugar particles inside of the bottle.   Fill the bottle and leave an inch of head space. 
 
 
I found that I initially needed to shake the mixture as sugar settled into the bottom of the bottle.  I had to go back about an hour later and do the same thing again.  The directions state that you need leave the bottle at room-temperature for about 3-4 days. When the bottle feels "Rock hard", place it into the refrigerator to chill. Before serving  (within 24 hours), crack the lid of the thoroughly chilled bottle to release some of the pressure.
 
Now, the LRH did research this, and found that some folks reported that their bottles did blow their top which left quite a mess to clean-up.  I thought about putting it into the garage, but it is too cold right now to let the yeast activate.  So, I am giving myself a "fail-safe" just in case.
 
 
I am enclosing the bottle inside of a garbage bag.  That way, if something unforseen does occur, it will all be contained inside of the trash bag.  Watch for the results of this project very soon!

It's a matter of Flavored Vinegars...


(Image Courtesy of Southernliving.com)

Aren't they beautiful?  I have received beautiful vinegars like these as gifts.  But, I was too hesitant to use them because they were so beautiful.  However, I have learned that they are very simple to make, and you don't have to have a gorgeous bottle to put them in....althought that would be  nice.

I decided to make a Citrus Vinegar,  Here is the process:

Bring 1 Quart of White Vinegar to a boil.


The recipe calls for you to slice the citrus (a lemon, or orange, into 6 slices, or 2 limes cut into quarters). Well, I have citrus fruit that I dehydrated.  I usually float them in water at a meal time to add flavor to the water.  So, I tried to experiment.


The directions state to "thread lengthwise onto bamboo skewer and insert into a 1-quart bottle".  I threaded these lime slices on a skewer.  However, later when I added the vinegar...they all floated to the top!


The recipe then suggests that you add a little food coloring.  I like the orange, but when I added green to the limes, I should have only put in one drop because I do not like the color.  I capped the bottles and stood them in a cool dark place.  The recipe states that you need to allow 10 days to infuse before using.  (Addendum, a day later, the Orange slices began to float throughout the bottle).

The recipe comes from the University of California Cooperative Extension (UCCE).  El Darado County Office 311 Fair Lane Placerville, CA.  The Author's suggest that you could use this when preparing seafood, cucumber slices, greens or homemade mayonnaise.  It makes 1 quart.

There are also Herb Vinegars that you can make.  Here is a basic recipe:

Basic Herb Vinegar (UCCE)

Use fresh herbs whenever possible, but you can use dried herbs.  If you do, it is nice to put a sprig or pieces of the fresh herbs in the bottles after it has infused.  To do this. strain out the dried herbs before bottling and then add the fresh ones in the bottle or container.  This makes a very attractive presentation.  Makes about 1 quart.

1 Quart Vinegar of your choice
1 cup fresh Herbs or 1/2 Cup Dried Herbs.

Bring to a simmer, Let cool, combine ingredients in your glass or plastic jars or containers.  Cap and seal.  Let stand in warm area for about 10 days to infuse. 

Now you can do that!

Thursday, April 29, 2010

Dig out that Breadmaker....you know where it is!


I realize I am about date myself.....but do you remember when everyone just had to have a Breadmaker....machine?  All the hype about having homemade bread when you woke up in the morning to having fresh bread for dinner?  For me, I told myself that I could use my food storage staples more readily if I had one.  Well, I did use it, and burned out my first machine.  This is my second one.....and this one has seen more of the inside of the cupboard than the countertop.  I don't have a really good reason why.

Well, since we are focusing on Yeast, I knew I had to dig this beast out of the darkness of my cupboard, so I did.  When I got home from work, I had a quick dinner, but knew the Rooster of the house would be coming home in a couple of hours.  I decided to either make bread....or something from the dough.  I decided upon scones....which are very easy.  I only had to use the "dough" cycle.

In case you have never done this, pull out the manual to your machine and find the recipe for bread. You can use white or wheat bread recipes.  Mix it, and allow it to rise, again on the dough cycle.

Heat ~2 inches of vegetable oil on the stove.  Have a dish nearby with a lid to put the hot scones in.  I place a folded paper towel at the bottom of the dish to catch any excess oil.


Pull a small amount of dough from the ball.  Flatten it.


Place it in the hot oil.


Turn it over when golden brown.

Retrieve the scone with tongs and allow the excess oil to drip off into the pan.

I set a place for the Rooster complete with butter, syrup, powdered sugar, and two types of Jam.   I'll bet my son, who didn't want "anything", will surface to help his Dad eat all of these scones!

Now, it didn't take me any real time to put the ingredients into the Bread Machine....and the machine did all the work.  I cooked a few scones, which took about 10 minutes, and it was all ready!  Since today turned out to be a snowy day outside .....and it is the end of April, this seems liked an appropriate hot meal to be having in celebration of our wacky weather!

Remember how delicious scones are?  Try them soon!

7 Ways to Prevent Foodborne Illness..........

I recieved this information from Brother C W who graciously shared it with all of us.  My thanks to him for thinking of us all!  This comes from FoodSafety.gov.


Start at the Store: 7 Ways to Prevent Foodborne Illness

Posted April 26, 2010

By Doriliz De Leon, Consumer Safety Officer in FDA’s Center for Food Safety and Applied Nutrition (CFSAN)


I think it is very important for consumers to realize that protecting your family against foodborne illnesses begins not at home, but at the supermarket, grocery store, or any other place where you buy food that you plan to store and serve. According to the CDC, foodborne ailments cause about 325,000 hospitalizations and 5,200 deaths nationwide each year. So, here are some simple things that you can do while you are shopping for food to safeguard you and your family:


1.Check for cleanliness

Buy from a retailer who follows proper food handling practices. This helps assure that the food is safe. Ask yourself: What is my general impression of this facility? Does it look and smell clean?

2.Keep certain foods separated

Separate raw meat, poultry, and seafood from other foods in your grocery shopping cart. Place these foods in plastic bags to prevent their juices from dripping on other foods. It is also best to separate these foods from other foods at checkout and in your grocery bags.


3.Inspect cans and jars

Don't buy food in cans that are bulging or dented. Also, don't buy food in jars that are cracked or have loose or bulging lids. A bulging can or jar lid may mean the food was under-processed and is contaminated. Don't buy a food product whose seal seems tampered with or damaged.


4.Inspect frozen food packaging

Don't buy frozen food if the package is damaged. Packages should not be open, torn or crushed on the edges. Also, avoid packages that are above the frost line in the store's freezer. If the package cover is transparent, look for signs of frost or ice crystals. This could mean that the food in the package has either been stored for a long time or thawed and refrozen.


5.Select frozen foods and perishables last

And, meat, poultry, fish and eggs should be the last items placed in your shopping cart. Always put these products in separate plastic bags so that drippings don't contaminate other foods.


6.Choose fresh eggs carefully

Before putting eggs in your cart, open the carton and make sure that the eggs are clean and none is cracked. Buy only refrigerated eggs and follow the "Safe Handling Instructions" on the carton.


7.Be mindful of time and temperature

It's important to refrigerate perishable products as soon as possible after grocery shopping. Food safety experts stress the "2-hour rule"—because harmful bacteria can multiply in the "danger zone" (between 40° and 140° F), perishable foods should not be left at room temperature longer than 2 hours. Modify that rule to 1 hour when temperatures are above 90° F, as they often are in cars that have been parked in the sun.

If it will take more than an hour to get your groceries home, use an ice chest to keep frozen and perishable foods cold. Also, when the weather is warm and you are using your car's air conditioner, keep your groceries in the passenger compartment, not the trunk.

Combating foodborne illnesses is a top priority at the FDA – we hope it will be for you too!


Sunday, April 25, 2010

Does Making Multi-Grain Bread Intimidate you?


Oooooo....I love Multi-Grain Bread...don't you?  However, the thought of using my Grain Mill to grind several different types of flour just doesn't appeal to me.  So, wouldn't it be nice if there was a slick way to do it?  Well, look at this!


There is "Fungus Amoung--us"

Yeast is essentially a fungus that we used to help our baked goods rise.  Yes, you actually ate Fungus when you ate the warm bread that had just come out of the oven!

Here is a little video explaining different types of Yeast so that you can make a decision as to the type of Yeast you would like to store.

My Sunday Dinner...

I mentioned previously that I have had the most incredibly busy week this past week.  As such, not a lot of planning went into Sunday Dinner.  So, this morning....I had to come up with a plan.  Here is what I chose, and it features one of our target foods this week....Vinegar!

I pulled out all the supplies.  Since I didn't start this last night, I used the attachment that goes with my Food Saver to Marinade.  This is not a necessary step, I just wanted to have the meat ready when we came home from Church.  Believe me, I have made this plenty of times using a Zip-lock bag, a glass dish with Plastic Wrap....etc.


I am making a marinade, so I put all the ingredients directly in the container.  I began with Soy Sauce.


The recipe calls for Vegetable oil, but I love Olive Oil and choose to use it instead.


Then I put in the focus item.... Vinegar.  This is Red Wine Vinegar.


Next came the Oregano, Sweet Basil, Garlic Powder and the Pepper.


Stir all the ingredients together.


I had thawed this Turkey in the Microwave while I was making the Marinade.  Place your meat into the Marinade.    Again, you can do this in a bag etc. 


I put the lid on and gave shook it to spread the Marinade over all the surfaces of the Turkey.


With the Food Saver, you can create a vacuum to open the Cells on the meat and draw in the Marinade.  However, if you put all of this in a bag or dish and Marinaded it overnight, it would be just the same.


This is how it hooks up to the Food Saver.


When I came home from Church, it was time to Grill the Turkey.


I wish you could smell the wonderful aroma.  You can use the residual marinade to brush on your meat while you are grilling. 


After about 20-25 minutes the Turkey was ready to eat!


We added a Salad and some fruit and we were ready to go.  This meal took about 30 minutes to prepare and it didn't last long.

Discussion:  Why am I showing you how to make the Marinade?  Because all of these things are considered part of my Food Storage.  I had it all on hand.  I added the fresh vegetables and fruit as I had them in the Refrigerator.  Consider what you could put together if you had staples at your fingertips!

Would you like the recipe?  Here it is:

Chicken Marinade II

1/2 Cup Soy Sauce
1/4 Cup Vegetable Oil (I chose to use Olive Oil)
1/4 Cup Red Wine Vinegar
1 Teaspoon Oregano
1/2 Teaspoon Sweet Basil
1/2 Teaspoon Garlic Powder
1/4 Teaspoon Pepper

Combine all ingredients:  pour over chicken pieces in non-metal dish.  Cover and refrigerate overnight, turn occasionally.  Use marinade to baste chicken while cooking.  Great for Grilling.  (Recipe courtesy of http://www.cooks.com/)


It's Week #4, and the focus items are......

Hi Food Storage Enthusiasts!  I hope you are well on your way to stocking for your Long-Term Storage.  Last week, we had Oats as the focus item.  Can I just say, I couldn't get to all the wonderful things Oats can be used for....time just wasn't on my side.  However, I may stick some of them in as we go along this year.

(Image is coutesy of www.aprtmenttherapy.com)

Yeast is one of our target items this week.  Yeast is a one-celled fungus that converts sugar and starch into carbon dioxide bubbles and alcohol. Bread is made with baker's yeast, which creates lots of bubbles that become trapped in the dough, making the bread rise so it's light and airy when baked. A small amount of alcohol is also produced, but this burns off as the bread bakes. This information and more information on the different types of Yeast comes from http://www.foodsubs.com/LeavenYeast.html.  It is well done and has great pictures!


(Image courtesy of newlywejourney.files.wordpress.com)

Vinegar is the other target item for the week. This is a very, very versatile staple to have not only for cooking, but also cleaning.  Here is are two short segments to introduce you to the cleaning aspects of Vinegar.


Saturday, April 24, 2010

The Best Oatmeal Cookies.....

(Image courtesy of www.mygormetconnection.com)

Growing up, we had this very sweet neighbor that lived next door.  She made wonderful Oatmeal Cookies.  When we moved out of state, my mother secured the recipe...and it has been a family favorite ever since.  I would like to share, in my humble opinion, the very best Oatmeal Cookie recipe...by Ann Potter.  You really need to try these...they are delish!


Ann Potter's Oatmeal Cookies

3/4 Cup Brown Sugar
1 Teaspoon Soda
3/4 Cup White Sugar
1/2 Teaspoon Salt
1 Cup Shortening
1 1/2 C flour
2 Eggs
2 Cups Rolled Oats
1 Teaspoon Vanilla

Mix and bake at 350 to 375 de3grees for 10-15 minutes.  A single batch makes about 6 dozen cookies.  When doubling the recipe, add about 1/2 to 3/4 Cup additional Flour.

Different types of Oats..........

Photo courtesyof Anson Mills


(Image coutesyof http://blog.heathlyeats.com)

There are several types of Oats that ou can purchase from the store.  Do you know the difference?  Let's look into it!


(Image courtesy of www.wheatmontana.com)

Rolled Oats:   These look like little flakes.  They are whole oats that have been pre-steamed, rolled, and then flaked so that they will cook in a shorter time period. The average cooking time for these is about five to ten minutes. These are also referred to as Old-Fashioned Oatmeal.


Steel Cut Oats:  These look like chopped up rice.  Steel-cut oats are hulled, toasted, oat grains that have been coarsely chopped into chunks about the size of a sesame seed. Stone-ground oats are the same thing, only ground into smaller pieces, closer to the size of a poppy seed

(Image courtesy of http://www.foodsubs.com)

Quick Oats: which have been processed to greatly decrease the total cooking time required in their preparation. They are not the same as instant oats, oats which have been precooked, so that all they require is a quick heating.


Sources: http://coachlevi.com/nutrition/rolled-oats-steel-cut-oats-difference/, http://hubpages.com/hub/Deciphering-The-Difference-Between-Oats, http://blog.nutritiondata.com/ndblog/2010/01/more-on-oats-rolled-vs-steel-cut-vs-stone-ground.html, http://www.wisegeek.com/what-are-quick-oats.htm,

Friday, April 23, 2010

Some nice recipes....

(Image courtesy of http://www.ansonmills.com/)

Well, can I just tell you this has been one of the busiest weeks of my life!  I had all these things I wanted to share with you about Oats....and I literally have not had time.  However, here is a great website with wonderful ideas and recipes for your oats.   "It's not just for breakfast anymore".  Go and see how versatile this Food Storage Staple is..... here.

Check it out!

Sunday, April 18, 2010

It's a Quick Morning Meal......


What in the world do you think I will be doing with all of this? You can see that I have our focus item, Oats. I also have Peaches and Strawberries that I had dehydrated, baggies, labels, a hand blender and a bowl. What can be made with these? How about Instant Oatmeal Packets!

I don't know about your home, but around here the mornings get very hectic. So, a quick bowl of Oatmeal from the microwave is very welcome. I want to show you how easy this is to do and that you can make these from your Food Storage Staples.


The recipe calls for blending a 1/2C of Quick cooking oats in your Blender.  By now, you hopefully know that the LRH tries to do things as simply as possible.  So, I pulled out my hand blender.  But, it started making a big mess! 


So, I improvised and put a baggie around my mixer....no more mess!


This is the Oat Powder that you are trying to make. Now into each baggie, place 1/4 Cup un-powdered oats, 2 Tablespoons powdered Oats, and a scant 1/4 teaspoon of salt.
 

If you would like to "jazz" things up a bit, you can make variations of this. I like the "Fruit and Cream" Oatmeal, so I began to make that. I added Tablespoon of Dry milk.


I began to cut my Peaches into small pieces.  (You can see the Oatmeal mix in the baggie to the right).


Add 2 Tablespoons of fruit to your baggie.


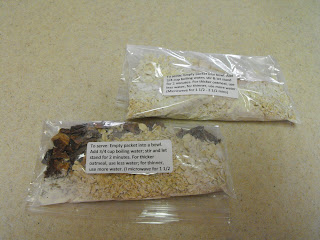
Place your "pre-printed" label on the package with the directions of how to prepare it.


I also made "Strawberries and Cream" by breaking the dehydrated Strawberries into small pieces before placing them into the bag.


And here are two types of Instant Oatmeal ready to eat on a busy morning.


Please know that there are several varieties of Instant Oatmeal you can make. Just look below the recipe. My thanks goes to www.heart4home.net/recipes/oatmealmix.htm  for the recipe. Also, I have found that if I Microwave the water on high for 1.5 to 2.5 minutes, it is boiling and makes this process go faster when I am ready for breakfast in the morning!).


Instant Oatmeal Packets


Check the cereal aisle for more flavor ideas. The possibilities are endless!


• 3 cups Quick-Cooking Oats


• Salt


• 8 Plastic Sandwich Bags


Put 1/2 cup oats in a blender and whirl at high speed until powdery; reserve in a small bowl and repeat procedure with an additional 1/2 cup oats. If you're using a food processor, powder the 1 cup of oats in one motion. Into each sandwich bag put 1/4 cup un-powdered oats, 2 tablespoons powdered oats, and a scant 1/4 teaspoon salt. Store in a box or airtight container.


To serve: Empty packet into a bowl. Add 3/4 cup boiling water; stir and let stand for 2 minutes. For thicker oatmeal, use less water; for thinner, use more water. (I microwave for 1 1/2 - 2 1/2 minutes or until done on high)


• Apple-Cinnamon Oatmeal: To each packet add 1 T. sugar, 1/4 t. cinnamon, and 2T. chopped dried apples.


• Cinnamon-Spice Oatmeal: To each packet add 1 T. sugar, 1/4 t. cinnamon, and a scant 1/8 t. nutmeg.


• Fruit and Cream: To each packet add 1T. dry milk and 2T dried fruit or fresh fruit after cooking or jam.


• Oatmeal with Raisins and Brown Sugar: To each packet add 1 T. packed brown sugar and 1 T. raisins.


• Sweetened Oatmeal: To each packet add 1 T. sugar


• Wheat Germ Oatmeal: To each packet add 2 T. any kind of wheat germ
01 09 10