
Showing posts with label Easter. Show all posts
Showing posts with label Easter. Show all posts
Sunday, March 27, 2016
Sunday, April 5, 2015
Because He is Risen....
On this beloved Easter Morning, I am very well aware of the great blessing that only the Savior of the World can give. May we all live worthy of this most eternal gift...
Saturday, March 23, 2013
Chocolate-Peanut Butter Eggs...from your Food Storage...a sweet Easter Treat!!

I look forward to Easter every year for many reasons. Certainly the Resurrection is the primary reason. The treats are secondary. However, I find that I look for the Reeses Peanut Butter Eggs each year....they just are a favorite of mine!
I came across several recipes to make your own copy-cat version....and I just had to try it. Here is the "play-by-play" account.

I love this recipe because it is made from Food Storage Staples that I would think anyone would have on hand. For the filling, you need unsalted butter, Brown Sugar, Creamy Peanut Butter, and Powdered Sugar.

Put the above ingredients into a pan and combine on Medium Heat. Take off the heat when the mixture begins to bubble.

Place the pan on a a hot pad and get a 1/4 Cup measure for the Powdered Sugar.

Pour in 1/4 Cup of Powdered Sugar into the mixture.

Continue combining 1/4 Cup of powdered sugar until 1 and 1/4 Cups have been incorporated.

This is what it will look like when all the Powdered Sugar is incorporated. Cool the mixture (I put mine in the Refrigerator). When it is firm enough, roll out the dough on wax or parchment paper.

Use Powdered Sugar to dust the rolling pin if needed. I used an Egg Cookie Cutter to cut the shapes out.s

I placed the 'eggs' on a cookie sheet lined with parchment paper. I then put them into the Freezer while I made the chocolate mixture. This allows the peanut butter centers to become very hard.

Put the Chocolate chips and Shortening in a microwave bowl. Place into the Microwave for 30 seconds at a time and stir. Continue this until a smooth liquid chocolate is made.

Dip the frozen eggs into the chocolate. Lift out of the chocolate with a fork. Shake off the excess chocolate. Push the egg off the fork on to Parchment paper with a spoon.

If the eggs soften, place the cookie sheet back into freezer for a few minutes and then continue the task.

How did they taste? I had some of my adult children visiting. Let's just say not all of them remained at our house.
Take-away points:
- This is a delightful treat that is very simple to make.
- I used Food Storage Staples exclusively to make these treats.
- I think that the next time I make these, I will take a little more time with the chocolate. I may even use the microwave to melt it again intermittently as the Peanut Butter centers are so cold that the chocolate set up quickly in the bowl.
Recipe: (Brown Eye Baker-Home Made Peanut Butter Eggs).
- 1 Cup Creamy peanut Butter
- 1/4 Cup Unsalted Butter
- 1/4 Cup light Brown Sugar
- 1 1/4 Cups Powdered Sugar
- 2 Cups milk Chocolate Chips (or 12 ounces milk chocolate, chopped)
- 2 Tablespoons Vegetable Shortening.
Directions:
- Line a baking sheet with wax paper or parchment paper, set aside.
- IN a medium saucepan, combine the peanut butter, butter, and brown sugar over medium heat. Heat until completely melted and starting to bubble a little, stirring constantly. Remove from the heat. add the powdered sugar and 1/4 cup at a time, stirring until completely combined with the peanut butter mixture after each addition. Set aside and let cool to room temperature.
- Using a medium cookie scoop or a heaping tablespoon, scoop out peanut butter mixture and shape into eggs. (I used a cookie cutter). Refrigerate to allow the peanut butter eggs to set, about 30 minutes.
- Once the peanut butter eggs are set, melt the chocolate chips and shortening together in the microwave on 50% power in 30-seconds increments, stirring after each, until completely melted. One at a time, dip a peanut butter egg into the chocolate and using a fork, flip it over so it is completely covered. Remove it from the bowl, letting any excess chocolate drip off. Return it to the baking sheet, and repeat with all of the peanut butter eggs. Sprinkle with decorations, if desired. Return the chocolate covered peanut butter eggs to the refrigerator to allow the chocolate to set, about 30 minutes Store in the refrigerator in an airtight container until ready to serve.
Sunday, April 8, 2012
He is Risen!
“As one of His special witnesses on earth today, this glorious Easter Sunday, I declare that this is true, in His sacred name—even the name of Jesus Christ, our Savior—amen.”
—President Thomas S. Monson
—President Thomas S. Monson
Elder Joseph B Wirthlin:
I think of how dark that Friday was when Christ was lifted up on the cross.
On that terrible Friday the earth shook and grew dark. Frightful storms lashed at the earth.
Those evil men who sought His life rejoiced. Now that Jesus was no more, surely those who followed Him would disperse. On that day they stood triumphant.
On that day the veil of the temple was rent in twain.
Mary Magdalene and Mary, the mother of Jesus, were both overcome with grief and despair. The superb man they had loved and honored hung lifeless upon the cross.
On that Friday the Apostles were devastated. Jesus, their Savior—the man who had walked on water and raised the dead—was Himself at the mercy of wicked men. They watched helplessly as He was overcome by His enemies.
On that Friday the Savior of mankind was humiliated and bruised, abused and reviled.
It was a Friday filled with devastating, consuming sorrow that gnawed at the souls of those who loved and honored the Son of God.
I think that of all the days since the beginning of this world’s history, that Friday was the darkest.
But the doom of that day did not endure.
The despair did not linger because on Sunday, the resurrected Lord burst the bonds of death. He ascended from the grave and appeared gloriously triumphant as the Savior of all mankind.
And in an instant the eyes that had been filled with ever-flowing tears dried. The lips that had whispered prayers of distress and grief now filled the air with wondrous praise, for Jesus the Christ, the Son of the living God, stood before them as the firstfruits of the Resurrection, the proof that death is merely the beginning of a new and wondrous existence.
Each of us will have our own Fridays—those days when the universe itself seems shattered and the shards of our world lie littered about us in pieces. We all will experience those broken times when it seems we can never be put together again. We will all have our Fridays.
But I testify to you in the name of the One who conquered death—Sunday will come. In the darkness of our sorrow, Sunday will come.
No matter our desperation, no matter our grief, Sunday will come. In this life or the next, Sunday will come.
Sunday will come!
Monday, March 26, 2012
New Video's From the Church of Jesus Christ of Latter-day Saints....just in time for Easter.

The Church of Jesus Christ of Latter-day Saints continues to produce high quality videos for personal use and instructional use. The above is entitled "Jesus is condemned before Pilate". To view, please follow this link.

This video is entitled "Jesus is Scourged and Crucified". To view this video, please use this link.
Use these in your personal Family Home Evening lessons or in lessons you may be preparing for church. You will find them very moving.
Saturday, April 23, 2011
A New Easter Tradition In Our Family....

I came across this book when I was looking for a special book I had wanted at Christmas Time. It was suggested by Amazon, and I decided to take a chance. The book is entitled "The Story of the Resurrection Eggs, Benjamin's Box" written by Melody Carlson and Illustrated by Jack Stockman (1997). Essentially, it is a story told from a child's point of view about the time of the Crucifixion and Resurrection of Jesus Christ. I thought that this would be a fun thing to do with the little ones in our family....so I made my own Benjamin's Box.

Here is a picture of all of the items mentioned in the story.

You will need some plastic eggs. I bought these on clearance for about $.25 one year.

You do not have to do things this way, but I like "neat"! I printed off the numbers 1-11 on my labeler.

Then I affixed one number to each egg. You could write the number on the egg or just try to remember which item is in what color of egg.

Then put the correct item in the correctly numbered egg. Here, I have a bundle of Raffia that is supposed to represent some hay taken from the manger at the time of the Savior's birth.

I prepared a list to keep in the box from year to year. It has the items listed in the correct order in which they appear in the story, so you know what item goes into the accompanying numbered egg. This, of course, will be taken out before you read the story to the little ones.

You do not have to spend a lot of money to do this. I just used inexpensive items. Here, I cut off the medallion from these 'awards' to use as the coins. You may ask why I didn't use real coins? Well, in our house, the focus would be more on the real coin and who was going to get it instead of the real meaning for which it was intended in the story. The coins represent the wages Judas was paid to betray the Savior.

I bought a bag of miniature dishes to get a cup. I just didn't have any Barbie dishes around anymore!

If you have a Scout or a Scout Leader, you probably have some leather lacing round. This represents a piece of the whip used to beat the Savior.

For the crown of thorns, I was going to use pieces from my thorny bushes outside, but I worried about little fingers getting hurt as they opened the egg and then placing the item into the box. So, I found this leather 'barbed wire' item at the craft store. It still looks thorny, but is soft to the touch.

The Dollar Store had dice, which I included to represent the gambling the soldiers did for Jesus's personal effects.
The Donkey hair came from a new cat toy that I cut apart. The stone was from a vase with stones that I put flowers in, the cloth was a small piece from my sewing room, the twig really did come from my backyard, and the spike/nail is a Masonry nail that was small enough to fit into the egg.
Here is a list of each item (in order) that you will need if you wish to do this with your family (along with a Wooden box...easily obtained at a craft store or made if you are handy):
- Hay (Raffia)
- Donkey Hair (Faux Fur)
- Coin
- Cup
- Twig
- Leather Strip
- Thorns
- Nail/Spike
- Dice
- Cloth
- Stone
Now, here comes the fun part. We have given each of our adult children (with small children) a Benjamin's Box of their own. Grandpa and I will read the story to our grandchildren....spread across the country, tomorrow online. As we get to each item in the story, we will pause and let a grandchild find the correct egg and put the contents inside of their wooden box. We will be using DimDim (as we have an account with them and can record this to keep). DimDim also has a free service, but you cannot record it. You could also use Skype if you wished.
So, we are looking forward to tomorrow when we can share the story of the Resurrection with the youngest members of the family. Wish us luck!
Mom! Can you help me with.....

I love Easter....don't you? Not only for the timeless message of our Savior's Resurrection, but also for the memorable family traditions tied to the holiday. Well, our young Roosters and Chicks have said that they might be too grown up for many of the family traditions this year...so I wasn't planning on doing some of them. However, last night, in a loud voice, Rooster Jr. stated that he wanted to dye Easter Eggs with his friend...and Little Chick said she wanted to do that too. So, the question loudly yelled across the house was "Mom, Can you help me dye some eggs?" And I could...

Since I was asked to make Deviled Eggs for our Extended Family Easter Dinner, I had several dozen in the refrigerator. Here is how we boil them. Put some salt (to your liking) into a pan of water. Drop in your eggs carefully to avoid cracking. Bring to a rolling boil, then turn the heat off (with the lid on of course) and set the timer for 20 minutes. After the timer goes off, pour out the boiling water and submerge the eggs with cold water. I find that I need to do this twice to make sure the eggs are cool enough to handle.

Next, boil some water (I do it in a glass measuring cup in the microwave), and fill disposable cups halfway full. Place at least 1Tablespoon of Vinegar in each cup. Place food coloring....to your liking into each cup and stir.

Because I like to protect my nice counter, we line it with newspaper and place the cups of dye...with spoons on the counter.

Next, go to your office or crafting supplies and pull out crayons, markers, stamps....etc. Decorate the eggs in any manner you wish!

Carefully place the eggs into the dye with a spoon and check every once in a while to see if the color is the intensity you are looking for.

When your eggs are to your liking...place them back into the egg carton for safe keeping.

Now look what some basic supplies that you probably have in your home right now can do! Rooster Jr (and friend) and Chick Jr. did a great job! I will really hate to crack these open tomorrow to make Deviled Eggs...
Make some memories today.....use the simple things that you already have in your food storage and pantry.
There is no need to buy specific dye packs/pills to accomplish some little works of art! Enjoy!
Sunday, April 4, 2010
He lives, Testimonies of Jesus Christ
On this glorious Easter Morning, may we remember the event that changed the world. Enjoy the Testimonies of our Prophet and Apostles.
Saturday, April 3, 2010
Celebrate Easter...with a simple treat

I like to offer a recipe to try during the General Conference weekend that is made from Food Storage Staples or supplies. Since Sunday is not only General Conference, it is also Easter. So, in the spirit of Easter, here is a recipe for Marshmallow eggs.
Now hold on there....I know some of you too well....there is probably a little "freaking out" or outright "loud laughter". But let me just remind you, the LRH does not do anything that is hard! So, let's take a look at how it is done. When we are done, I would bet that if I could hear your comments....it would be something to the effect of "That doesn't look so hard". However, the results look "awesome".

A couple of months ago, we were using Gelatine (non-flavored) to make Gummy Treats. Well, I just pulled out the box because I had it on hand. Pour the Gelatine powder into 6 Tablespoons of water.

Next, mix 1 1/2 Cups of Sugar into a 1/2 Cup of water. Bring to a boil. Then, add gelatine mixture and stir until dissolved.

While the mixture is cooling, pour flour into a 9x13 pan. The flour needs to be an inch deep. Rap the pan on the counter to even out the flour.

Take a hard-boiled egg and press it into the flour to make an impression. The impression will be the mold for the marshmallow mixture.

I could only get 12/pan. You can see at the top of the egg my fingerprint. Try as I might, I could not do this without that additional impression, but in the end it did not make a difference with the egg mixture..thank goodness. I learned that you need 3 pans prepared to handle the marshmallow in a timely manner.

When the mixture was barely warm, place into a mixing bowl. Add the Vanilla and beat with an electric beater for about 5 minutes.

The mixture will look like whipped cream when it is ready. If you wished to color the Marshmallow put in a drop of food coloring now.

Spoon the Marshmallow mixture into the "molds" you made with the egg.

Place the pan into the refrigerator for a few minutes.

Gently lift the egg from the mold. You will learn to try to roll it (flour side down) into your hand so that the sticky marshmellow will not adhere to your fingers.

After shaking off the flour, drop the Marshmellow egg into powdered sugar and coat it.

Then dip the marshmallow egg into dipping chocolate. I chose to use white but you could use dark chocolate. I learned to scoop the egg out of the chocolate with a fork. Tap the fork (with the egg resting on the prongs) on the side of the bowl to smooth out the appearance of the chocolate. Then scrape the bottom of the fork along the edge of the bowl. This action removes the residual amount of chocolate. And just in case you are thinking it.....I do have dipping chocolate on hand...for fun projects like this:).
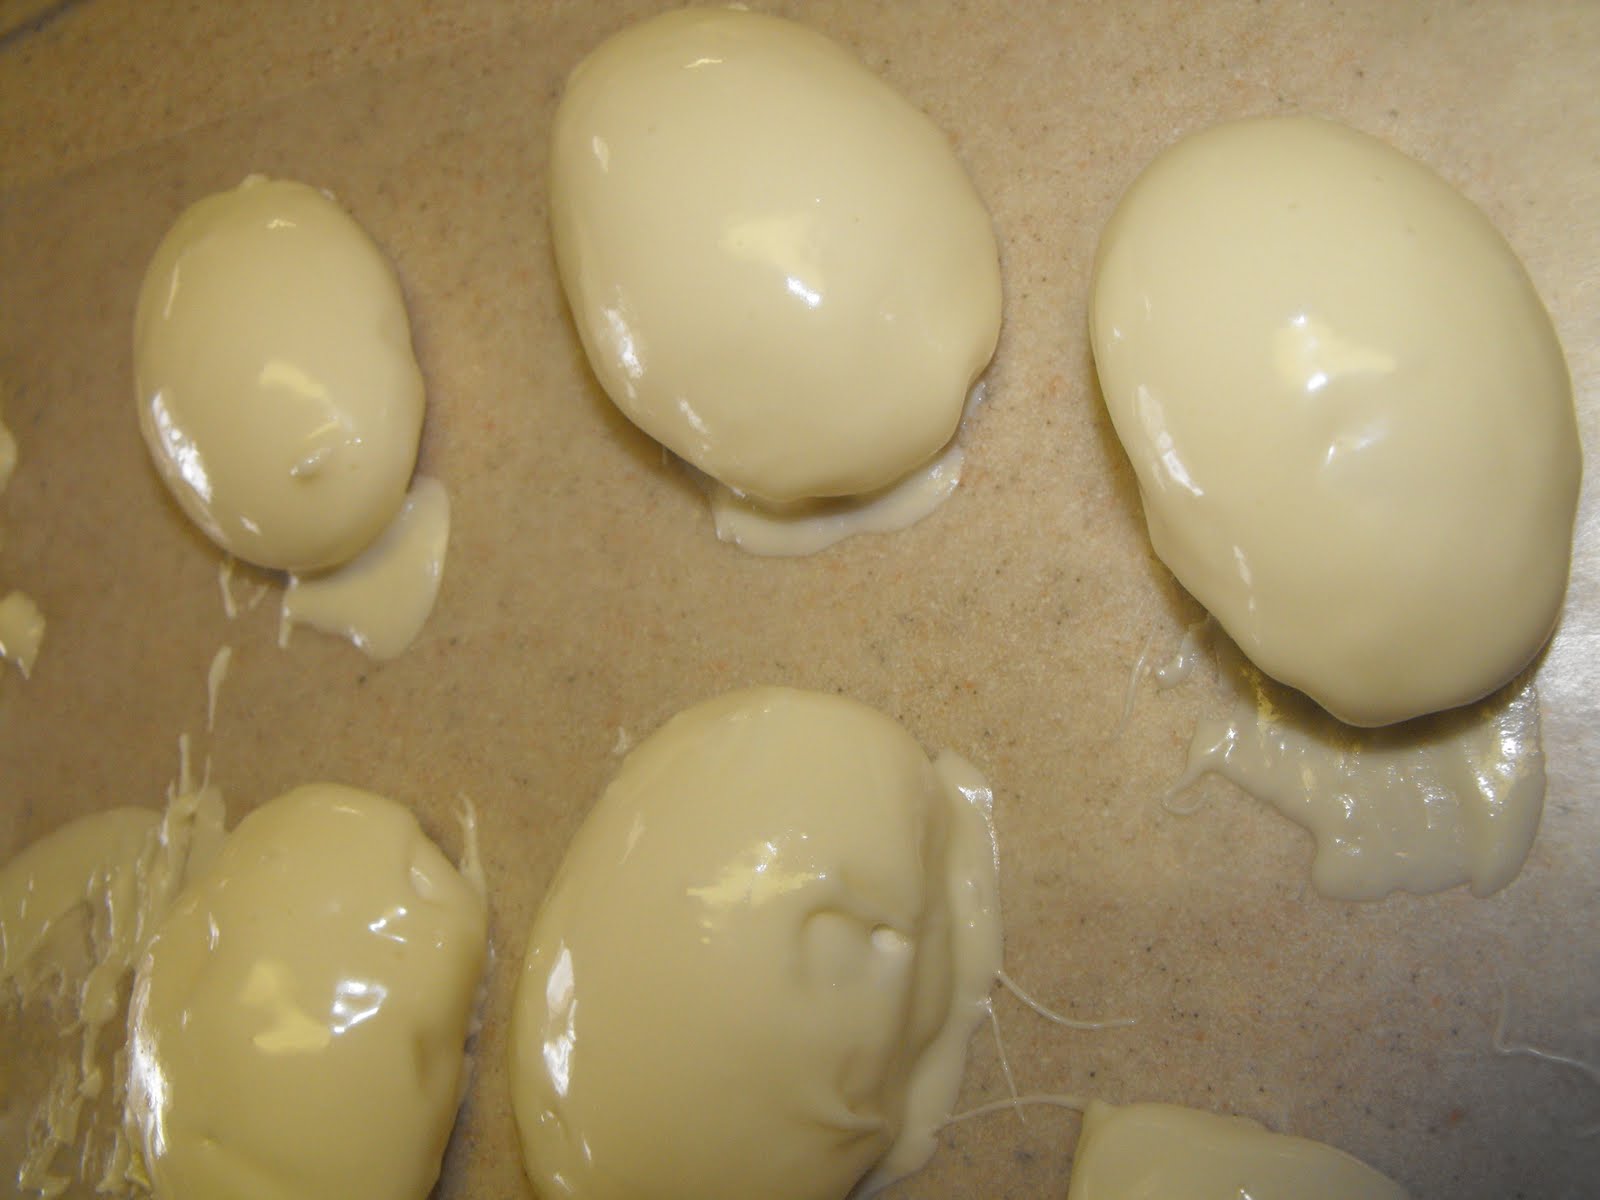
I realize that this looks like a mess, but I need to tell you why. I initially put the chocolate covered eggs on a cooling rack thinking that the chocolate could drip off. There is a lesson to be learned here...the fresh Marshmallow began to sink through the slats and cut itself into 3 segments. I quickly moved the other eggs on to a sheet of wax paper. Thus, you can see my fingerprints on some of the eggs. Luckily, I hadn't dipped all of the eggs.
I choose to color the remaining chocolate pink. I dipped a fork into the pink mixture and waved it across the eggs. Let the chocolate set up. Have the bowl of powdered sugar ready as you lift the eggs off the waxed paper. Some of the chocolate wanted to adhere to the wax paper, so when the bottom of the egg was dipped in to the powdered sugar, it was no longer sticky to the touch.
Now, that wasn't too terrifying...was it!
Here is the recipe. I found it in one of those wonderful little recipe books that you pick up at Homemaking meetings. This one is from the Dutch Fork Ward in Irmo South Carolina. Little Did Sister Sheri Z know that years after she taught us this class, her "published work" would be on the world-wide web.

Marshmallow Easter Eggs
6 Tblsp cold water
2 Packages of plain Gelatine (Knox)
1/2 Cup Water
1 1/2 Cup Sugar
1 tsp vanilla
Dipping Chocolate or Coconut (and food coloring to color it)
Soften gelatine in the 6 Tablsp of cold water. Bring the 1/2 Cup water and sugar to a boil. Add gelatine and stir until dissolved. Let cool until just barely warm.
Add Vanilla and beat with an electric beater for about 5 minutes (The Mixture will look like whipped cream). You can add a drop of any color of food coloring to make marshmallow a light color.
Fill a large cake pan 1 inch deep with flour. (I found I needed 3 prepared). Make several egg shaped depressions by pressing a hard-boiled egg as deep as possible into the flour.
Heap each depression with the marshmallow mixture. Let eggs set in the fridge for a few minutes. Remove the pan out of the Refrigerator. Take the Marshmallow eggs out of the mold, shake off flour, & roll in powdered sugar. Dip in chocolate or coconut. You can color the coconut by adding just a drop of food coloring and shaking the coconut in a zip loc bag.
Subscribe to:
Posts (Atom)