I like to offer a recipe to try during the General Conference weekend that is made from Food Storage Staples or supplies. Since Sunday is not only General Conference, it is also Easter. So, in the spirit of Easter, here is a recipe for Marshmallow eggs.
Now hold on there....I know some of you too well....there is probably a little "freaking out" or outright "loud laughter". But let me just remind you, the LRH does not do anything that is hard! So, let's take a look at how it is done. When we are done, I would bet that if I could hear your comments....it would be something to the effect of "That doesn't look so hard". However, the results look "awesome".
A couple of months ago, we were using Gelatine (non-flavored) to make Gummy Treats. Well, I just pulled out the box because I had it on hand. Pour the Gelatine powder into 6 Tablespoons of water.
Next, mix 1 1/2 Cups of Sugar into a 1/2 Cup of water. Bring to a boil. Then, add gelatine mixture and stir until dissolved.
While the mixture is cooling, pour flour into a 9x13 pan. The flour needs to be an inch deep. Rap the pan on the counter to even out the flour.
Take a hard-boiled egg and press it into the flour to make an impression. The impression will be the mold for the marshmallow mixture.
I could only get 12/pan. You can see at the top of the egg my fingerprint. Try as I might, I could not do this without that additional impression, but in the end it did not make a difference with the egg mixture..thank goodness. I learned that you need 3 pans prepared to handle the marshmallow in a timely manner.
When the mixture was barely warm, place into a mixing bowl. Add the Vanilla and beat with an electric beater for about 5 minutes.
The mixture will look like whipped cream when it is ready. If you wished to color the Marshmallow put in a drop of food coloring now.
Spoon the Marshmallow mixture into the "molds" you made with the egg.
Place the pan into the refrigerator for a few minutes.
Gently lift the egg from the mold. You will learn to try to roll it (flour side down) into your hand so that the sticky marshmellow will not adhere to your fingers.
After shaking off the flour, drop the Marshmellow egg into powdered sugar and coat it.
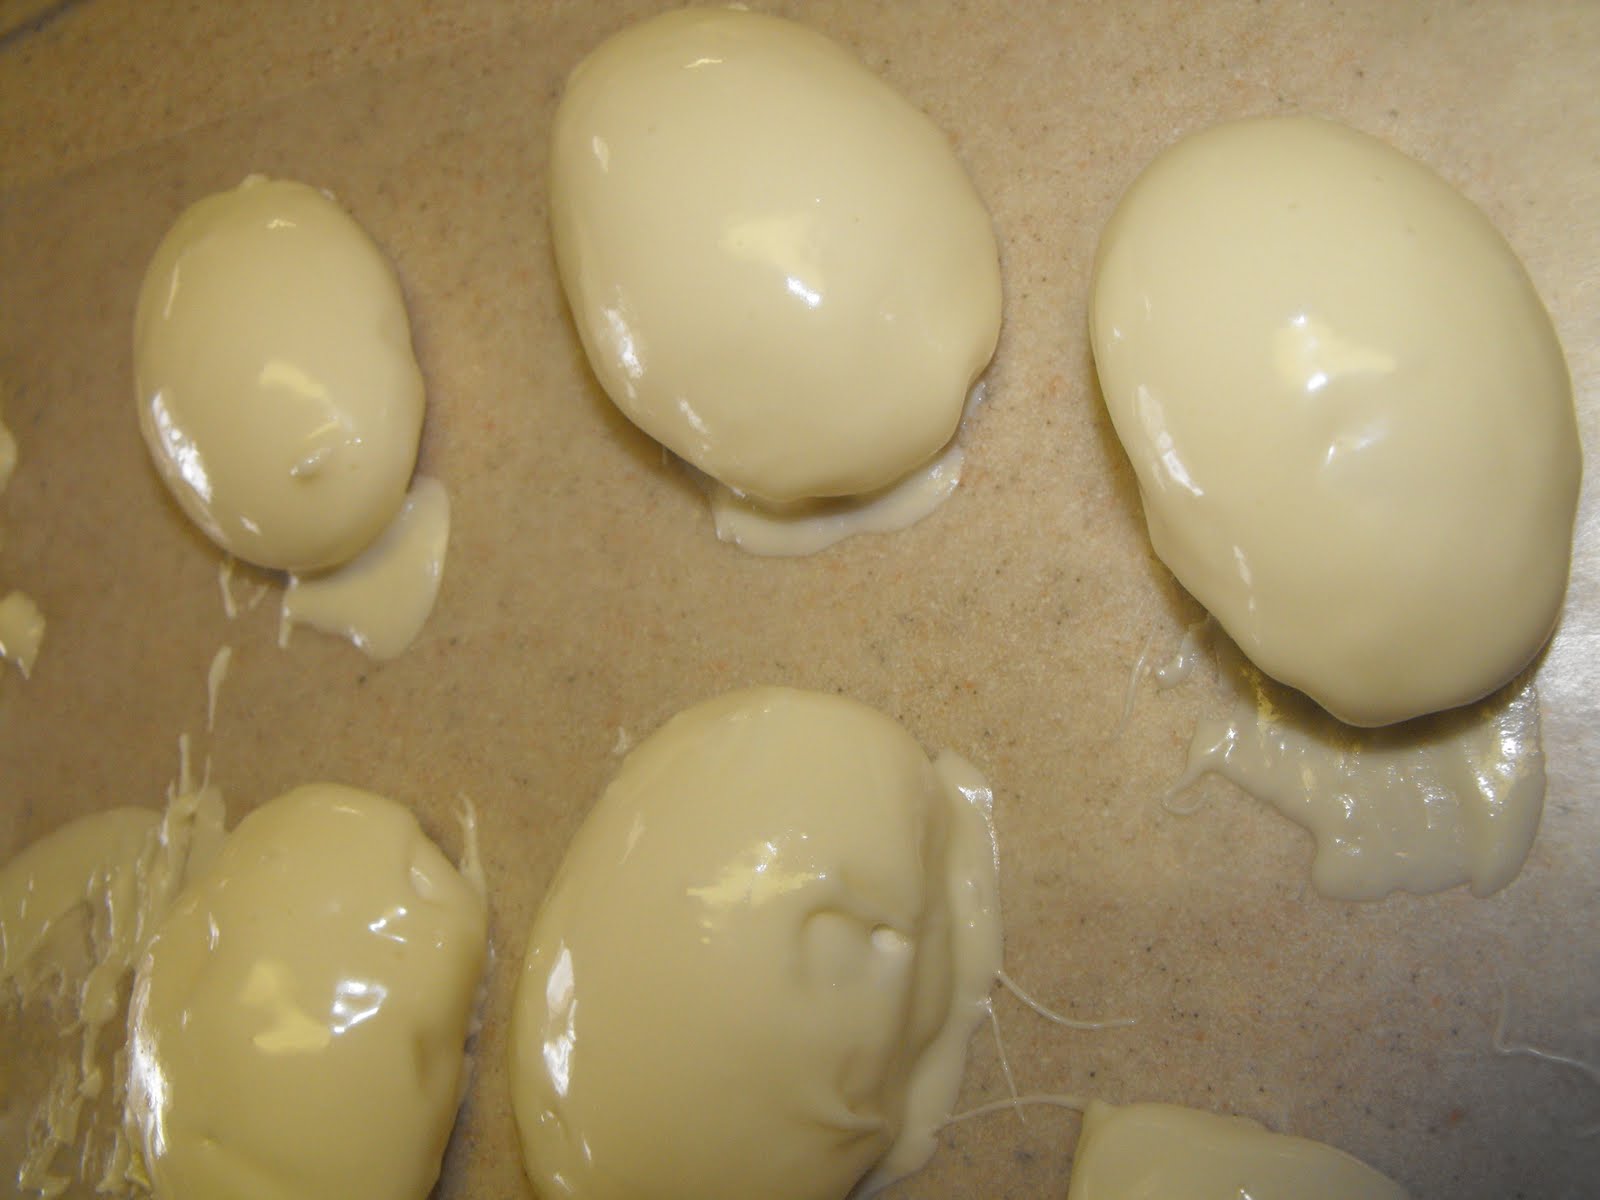
Then dip the marshmallow egg into dipping chocolate. I chose to use white but you could use dark chocolate. I learned to scoop the egg out of the chocolate with a fork. Tap the fork (with the egg resting on the prongs) on the side of the bowl to smooth out the appearance of the chocolate. Then scrape the bottom of the fork along the edge of the bowl. This action removes the residual amount of chocolate. And just in case you are thinking it.....I do have dipping chocolate on hand...for fun projects like this:).
I realize that this looks like a mess, but I need to tell you why. I initially put the chocolate covered eggs on a cooling rack thinking that the chocolate could drip off. There is a lesson to be learned here...the fresh Marshmallow began to sink through the slats and cut itself into 3 segments. I quickly moved the other eggs on to a sheet of wax paper. Thus, you can see my fingerprints on some of the eggs. Luckily, I hadn't dipped all of the eggs.
I choose to color the remaining chocolate pink. I dipped a fork into the pink mixture and waved it across the eggs. Let the chocolate set up. Have the bowl of powdered sugar ready as you lift the eggs off the waxed paper. Some of the chocolate wanted to adhere to the wax paper, so when the bottom of the egg was dipped in to the powdered sugar, it was no longer sticky to the touch.
Now, that wasn't too terrifying...was it!
Here is the recipe. I found it in one of those wonderful little recipe books that you pick up at Homemaking meetings. This one is from the Dutch Fork Ward in Irmo South Carolina. Little Did Sister Sheri Z know that years after she taught us this class, her "published work" would be on the world-wide web.
Marshmallow Easter Eggs
6 Tblsp cold water
2 Packages of plain Gelatine (Knox)
1/2 Cup Water
1 1/2 Cup Sugar
1 tsp vanilla
Dipping Chocolate or Coconut (and food coloring to color it)
Soften gelatine in the 6 Tablsp of cold water. Bring the 1/2 Cup water and sugar to a boil. Add gelatine and stir until dissolved. Let cool until just barely warm.
Add Vanilla and beat with an electric beater for about 5 minutes (The Mixture will look like whipped cream). You can add a drop of any color of food coloring to make marshmallow a light color.
Fill a large cake pan 1 inch deep with flour. (I found I needed 3 prepared). Make several egg shaped depressions by pressing a hard-boiled egg as deep as possible into the flour.
Heap each depression with the marshmallow mixture. Let eggs set in the fridge for a few minutes. Remove the pan out of the Refrigerator. Take the Marshmallow eggs out of the mold, shake off flour, & roll in powdered sugar. Dip in chocolate or coconut. You can color the coconut by adding just a drop of food coloring and shaking the coconut in a zip loc bag.