Showing posts with label Spices. Show all posts

Monday, May 27, 2013

Texas Roadhouse Pulled Pork.....


What do you have to feed a "Texas-sized" appetite for a recently returned Missionary from Houston?  What about some Texas Roadhouse Pulled Pork (Copy Cat)?  Our son has been home a few days now.  As is the custom in the "Church of Jesus Christ of Latter-day Saints", the returned Missionary speaks in church on an assigned topic.  Family and friends often come to welcome the missionary home and to hear about his/her experiences.  This was the case yesterday.  We invited family members over to our home following the block of meetings.  As it was Sunday, I decided that I wanted something that would feed a crowd without requiring a lot of effort.


I needed some "Pork Seasoning Mix" to use as a rub on the Pork Shoulder Roasts.  So, I opened my spice cabinet.


Using the spices and some of my own dehydrated herbs, I made the Pork Seasoning Mix in minutes.


Next, I rubbed it into all the surfaces of the roasts (I made 2).  I do use gloves when handling raw meat.


I had planned to use my Roaster Oven as I could put it on my buffet for cooking and for serving.  The recipe instructs you to put the Roast on a rack in a Roasting Pan and over with foil.  I went to get my foil...and I had 6 inches on the roll.  I didn't even consider getting more foil on Saturday.  So, I had to improvise....and I really love how it turned out!  I had one Turkey Cooking Magic bag.  I put the rack inside of the bag and put both roasts on it.  I then put the water with the liquid smoke (called for in the recipe) in the bag and closed it up.


I placed the entire 'thing' into the roaster and turned it on 250 degrees F.  It cooked for about 7 hours.

I also made the Texas Roadhouse Barbecue Sauce (copy cat- I also doubled the recipe) in a small crock pot that also cooked just as long as the meat.  When it came time to serve, I poked a small hole in the bag and drained the juices into a bowl.  I put the roasts back into the oven and used 2 forks to pull the meat apart.  I then poured the sauce into the meat and stirred.

How did it turn out?  Take a look!


It is delicious on a bun or just by itself.  I will do this again for a family gathering.  Just a little prep time and a great result.

Texas Roadhouse Pulled Pork Ingredients (From Copycat Recipe Guide)

§ 6 pounds pork shoulder

•  2/3 cup pork seasoning salt

•  1 tablespoon. black pepper

•  1 cup water

•  2 tablespoons hickory liquid smoke

•  3 cups Texas Roadhouse BBQ sauce

Texas Roadhouse Pulled Pork Equipment

§  Roasting pan

•  Roasting grate

•  Aluminum foil

•  Small mixing bowl

Texas Roadhouse Pulled Pork Recipe

1.   Preheat oven to 225 degrees Fahrenheit.

2.   Place a large piece of aluminum foil on your counter.

3.   Place the pork shoulder in the middle of the aluminum foil with the fat side up.

4.   Mix the seasoning salt and black pepper together in a small mixing bowl.

5.   Take some of the seasoning mix and rub it into the meat. Continue rubbing the seasoning over the top and sides of the meat. Be sure to rub in the mixture, not just sprinkle it

6.   Place a a grate in the bottom of the roasting pan.

7.   Add one cup of water to the roasting pan.

8.   Pour hickory liquid smoke into the water mixture.

9.   Place seasoned pork shoulder onto the grate in the pan with the fat side up.

10. Place aluminum foil over the top of the pan and seal well around the edges.

11. Cook the meat for about 5 to 6 hours.

12.  Take the meat from the oven and pull it apart into about 3 sections.

13.   Allow the pork to cool slightly for about 15 minutes.

14.   Shred the meat into long strips with your fingers or with a long tinned fork.

15.    Heat the barbeque sauce until warm.

16.    Mix in the barbeque sauce and stir until all pieces are evenly covered.


Texas Roadhouse Barbecue Sauce Ingredients (From Copycat Recipe Guide)

§  2 tbsp. canola oil

•  1/2 cup vinegar

•  1 1/2 cups water

•  1/2 cup tomato paste

•  1/2 cup sugar

•  1 tbsp. onion powder

•  1 1/2 tablespoons molasses

•  2 tbsp. honey

•  1 tbsp. worcestershire sauce

•  2 tsp. salt

•  2 tsp. vanilla extract

•  1 tsp. liquid smoke

•  1/8 tsp. paprika

•  1/4 tsp. garlic powder

•  1/4 tsp. pepper

1.   Place canola oil in a medium pan and turn on medium high heat.

2.   Add vinegar, water, Worcestershire sauce, honey and sugar. Stir until sugar dissolves.

3.   Measure and add onion powder, liquid smoke, paprika, garlic powder, black pepper, vanilla and tomato paste.

4.   Bring mixture to a boil, stirring constantly.

5.   Reduce to a simmer and cook for about an hour uncovered until the sauce thickens.

6.   Remove from heat and allow the sauce to cool, unless you will use it immediately.

7.   Put sauce in a jar or squeezable container once sauce is cool.

8.   Place container in refrigerator overnight to enhance flavor if possible.

Enjoy!


Saturday, March 2, 2013

Why lies behind these doors...revisited


These are my actual cabinets.  A few years ago, I showed you what I had behind them. You can see the 'before' here.  It worked functionally, but as with my pantry (that I posted about a few days ago) it became frustrating as 'certain folks' would stick things...wherever they felt like it.  I decided today is the day to address this space, so I picked up a few things to help me.


I let my fingers do the walking....on my computer.  I purchased these 'clips' to hold my small spice containers.  I liked how you could put up a whole strip or just cut them individually to fit your space.  You may note that one clip is not filled...this is by design.  I actually put a red "X" in it so that 'certain folks' would not put a container in that space.  There is a real reason, which I will provide to you later in the post.


I used these same clips on another door to hold these bottles.  Most of these are plastic bottles, but surprisingly, the glass bottles are also held securely with these clips as well.  I had to shuffle some of them to allow for the cabinet closure.  Can you see the space between rows 2 and 3?  this is to allow for the shelf when the doors are closed.


For this section, I used 'stair step racks'.  I am using two types.  Two of them I already had, but the third (clear) rack I ordered here.    Please note the labels that I put on the lids and I arranged these bottles in alphabetical order so that I can easily locate what I am looking for.  As you can see, there is some space under the wire racks, so I put my Popsicle sticks, toothpicks, and food colors underneath them.  


Put my big square (plastic) bottles on their sides and labeled their contents.  I got tired of pulling bottles out of the cabinet and looking for the spices I needed.  This way, I can see what I have and easily pull it off the shelf.  Most of these containers are square, but 2 have sides that are angled.  They will work even if they are not perfectly square!


On the top shelf, I used the baskets that I took out of the Pantry when I reorganized it.  They are filled with duplicates spices that I found that I had.


Here is one side of the cabinet.


And, here is the other side.  I did keep one lazy-susan for the miscellaneous items that I need. Remember that 'clip' that I put an 'x' on? Well, if I put a spice jar in that slot, the jar will hit the top edge of the lazy-susan and the door will not close.  I think I can live with that!  You can also see some of the spines of my bit cookbooks peeking through from the next compartment:).


Here's the finished product.  I absolutely love it!  I look forward to making 'anything' now that I can easily find things both in my Pantry and my spice cabinet.  

See what you can do to make your kitchen easier to function in!

Thursday, September 15, 2011

Queso Blanco....


We recently had a large number of Young Single Adults at our home.  Why?......because we have a new chapter of our lives that has just begun.  Rooster Senior has been called into the Bishopric of a Young Single Adult Ward.....and our Sunday's and some weekday evenings sure look a lot different than they used to.

What does this have to do with Queso Blanco?  Well, read on.  I recently attended a Cheese making class taught by Raylene from Mama Rae's Cheesemaking Supply.  As I sat in this class, I could see the possibilities of this unique cheese and decided to try this application that I will show you below.  First, let's see what you need to have.


I decided to make Cheese logs for this gathering of Young Single Adults.  In the class, Raylene had many different types of flavored vinegars and Spices she purchased from a Latino Food Store. She said the spices that you purchase in these establishments are a lot fresher and less expensive.  I'm all for that.  So, I purchased a couple from her list, along with Malt Vinegar.  I already had Balsamic and White Vinegar.  You will also need Kosher Salt flakes.  (These are so much less expensive than the Cheese Salts that you see advertised.  It is not iodized, which is needed for cheese making according to Raylene).


Simple things are needed for this.  Following Raylene's lead, I used my Hot Water Bath Canner (with the rack at the bottom) and my largest Stock pot.  This makes a large double boiler.  One thing I would do differently, I would heat the water a lot initially, then put in the stock pot in preparation for the milk. This would significantly cut down on the time needed to make heat up the milk.


Pour your milk into your double boiler.  I used 2 gallons of Whole milk.  You cannot use UltraPasturized Milk...FYI.  Read your labels.  (For those of you thinking about your powdered milk, wait until the end of the post).


You will need an actual Dairy Thermometer as the increments are smaller.  A traditional candy thermometer is not as accurate.  Mama Rae's sells this for $7.00.  Heat the milk to 190 degrees Fahrenheit. 


Once you reach 190 degrees, reduce your heat to keep the milk at that temperature.  Now, this next part is not an exact science......which I really appreciate!  Scoop out several cups of hot milk into a bowl.  I started with 5 cups, but quickly increased it to much more on the second and third tries....and you will see why in a minute.


I decided to use a Malt Vinegar....which is readily found at grocery stores.  Now, remember the "not an exact science" part?  Well...do this slowly.  Pour in a little bit of vinegar and stir.  Do this in small increments until you see curds form and separate from the whey.


This is what it looks like when they separate.


According to Raylene, you need a sturdy cloth for hard cheeses, and she used one for this cheese.  Notice that I only put a corner of the cloth in my colander.  Pour the contents of the bowl into your cheesecloth-lined strainer. You can capture the whey and use it for other purposes by placing a bowl underneath your colander.


Remember the "use a corner of the cloth" comment?  Well, here is why.  Use another corner of the cloth to help you twist the cheese in the cloth to drain the whey.  It is a bit warm, and the corner makes the heat manageable to touch as you twist the ball.


On this step, again....do it slowly and use a little bit of salt at a time.  Sprinkle some on your cheese, then knead it. Taste it to see if it has the amount of salt you prefer.  If not, sprinkle in some more.  You can always add salt, but you cannot take it away in this process.


Here is the cheese made from 5 cups of milk.....not a grand enough amount for a cheese log. So, feeling a bit more confident, I used more milk on the subsequent attempts at this same process.  If you choose to use herbs to flavor your cheese, put them in as your milk warms up.  If you choose to use spices, put them in a little at a time before you add white vinegar to curdle the milk. 


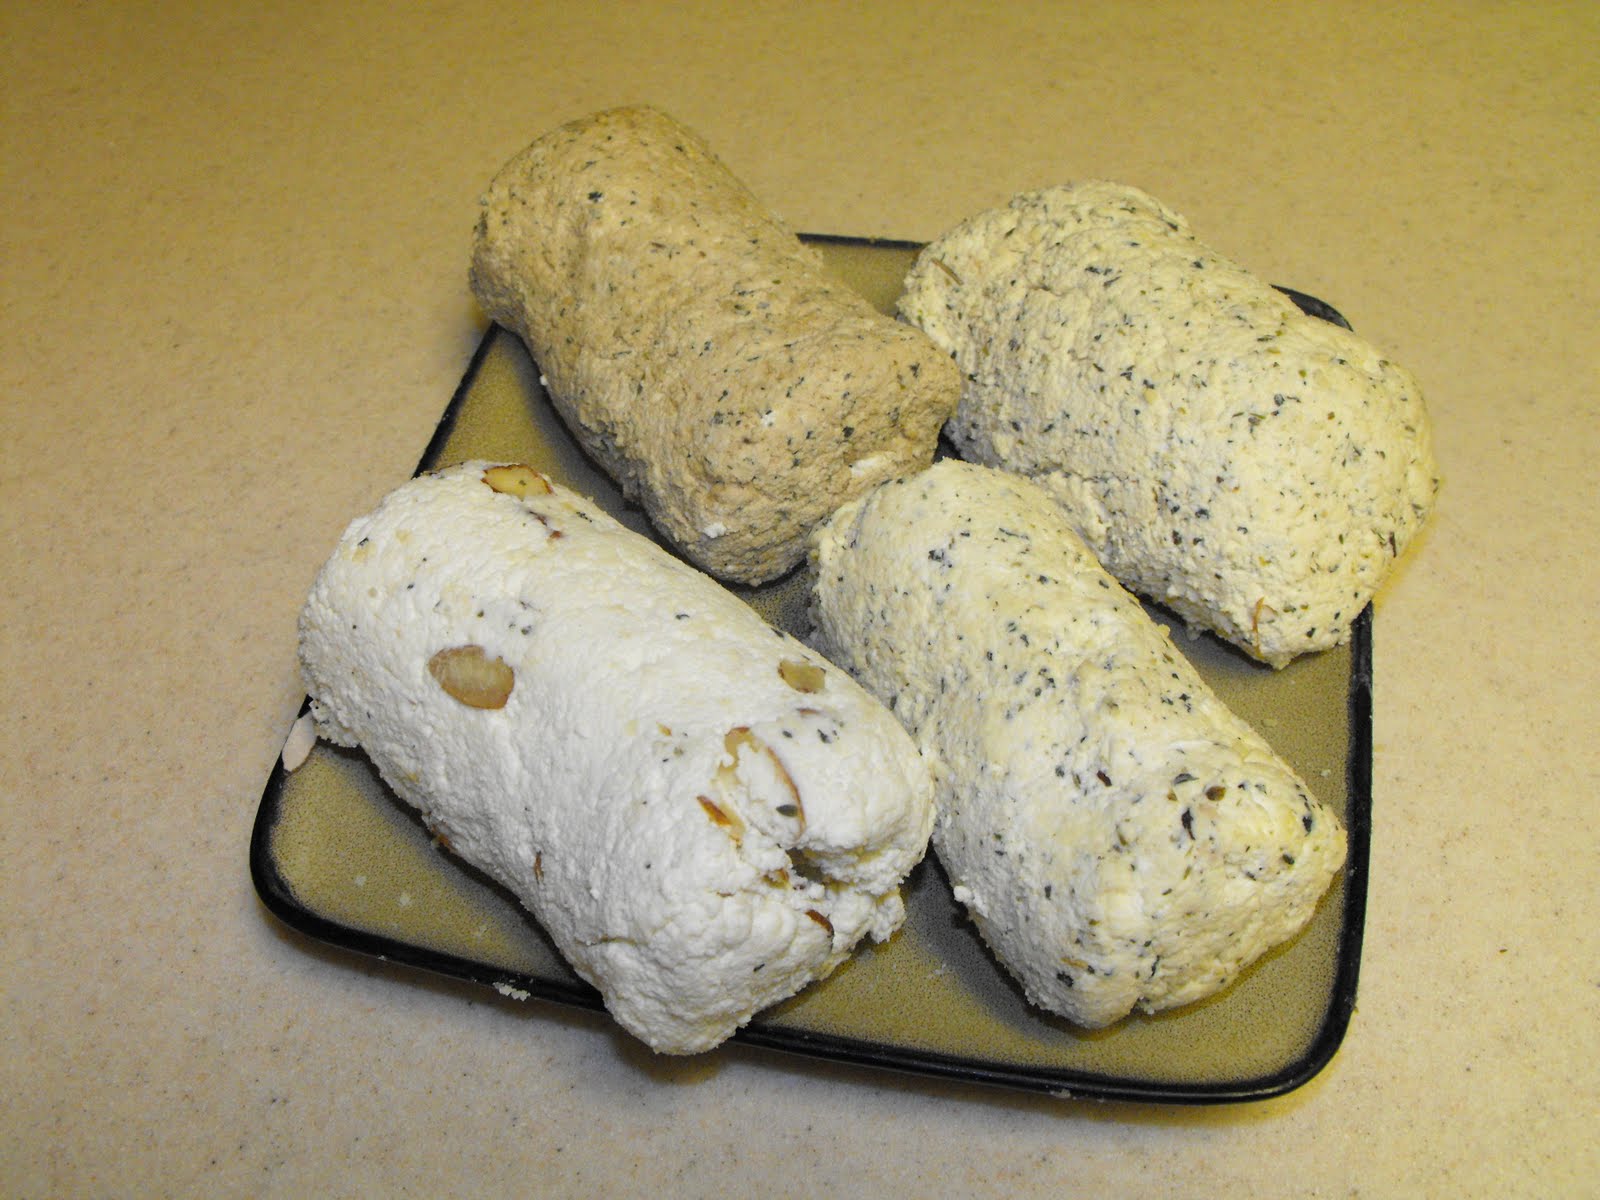
When I formed the first cheese log and tried some, it had more texture to it than I was used to.  So, I added a half package of cream cheese to each log.  Two gallons of milk made 4 logs.  Each was a different flavor.  Here there is Malt flavored cheese (my personal favorite), Balsamic flavored cheese (darker color), Italian spice flavored cheese, and finally Italian spice and Red wine vinegar flavor (I got creative).  I found that I had to put these in the refrigerator to set for at least 30 minutes.


Next, I took a plate and covered it with plastic wrap.  I then sprinkled some sliced Almonds on the plastic wrap.


I then rolled the cheese log into the almonds and pressed the nuts into the cheese.  I wrapped the log tightly.


Here are the final products.  I left them in the refrigerator over night.


I placed them on trays with a variety of crackers. 

What was the result?

  • The Malt and Italian with red wine vinegar went first.
  • The Balsamic was not preferred initially, however the guys took all the leftovers home with them....including crackers!
Now for the powdered milk comment.  Raylene stated that you could use Powdered milk....but it cannot be Ultra-Pasteurized or Aspic.  If you used Non-fat milk, you would need to add cream to increase the fat content.  I have shelf stable Cream that I may try if and when I do this again.

So, try it!  It is really quite easy.  You may find yourself saying the same thing I did...."Is that all there is to it?"

Addendum (9/17/11): I had a cheese log left in the refrigerator....that I neglected to put out.  It stayed in the refrigerator for a couple of days.  My husband said that it really tasted great!  I tried it as well......and the flavors were really good.  They were fine the night of our event.....but having them sit a couple of days really enhanced the taste.  FYI.

Sunday, October 24, 2010

It's week #4 in October....and our focus item is... Spices!

 (Image courtesy of ttohotmomas.net)

What would cooking be like without spices?  I had a family member whose family lived off from their Food Storage for over a year.  What did she say she missed the most?  Spices! 

One question that I get often is "What is the shelf life of........?".  Just as with other items that we store, spices do not last for eternity.  The following information is from the McCormick's website:

  • Ground spices 2-3 years
  • Whole spices 4 years
  • Herbs 1-3 years   
  • Seeds  (except poppy seeds and sesame seeds which last for 2 years) 4 years
  • Seasoning Blends 1-2 years
  • Extracts (except vanilla extract which lasts indefinitely) 4 years
One other wonderful thing about this site is that you can check your own McCormick spices to see how old they may be by going to this link.


Storage Containers:  Now, how do you store your spices long term?  Here is some information from this site (Suite101.com):

Canning Jars

Another excellent container to use for storing larger amounts of herbs are pint size and quart size glass canning jars. Used canning jars can sometimes be found at local thrift stores. New seals and rings for the canning jars can be found at many grocery stores.
Metal Tins

Small metal tins may also be used to store herbs and spices. Make sure to label the tins as the contents can't be seen once the lids are closed. Metal tins can impart a metallic scent or taste to dried herb leaves, but they work okay for storing seeds and roots.
Ceramic Containers

Glazed ceramic containers can also be used for storing herbs and spices. Unglazed ceramic containers will cause the volatile essential oils present in the herbs to evaporate in a very short time.

Plastic Containers

The use of plastic containers is not recommended for the long term storage of dried materials as the herbs seem to absorb some of the odor of the plastic making them rather unpleasant to use. Plastic containers or resealable plastic bags can be used for the short term storage of fresh herbs in the refrigerator or freezer.

Wood Containers

Wood containers are not recommended for the storage of your herbs and spices. Wood is a permeable container and since it is not airtight it will quickly cause the materials to dry out and become stale. Wood containers also have a tendency to absorb the odor of any aromatic substances that are placed within them.


Stock up! 
01 09 10