Isn't it a beautiful setting? Wouldn't you like to spend a few relaxing days or weeks here? Perhaps you could view this in a different light, perhaps this might be a destination not for relaxation, but to seek shelter in light of an emergency. I believe that we all would like to think that we could quickly seek shelter in such a wonderful cabin, but in reality this may not be an option.
Many different things in life can happen, and too many are unforeseen. Although we cannot always know what the future holds, we can take steps to be prepared for the unforeseen not only for ourselves individually, but also for those we love and care for. Take a minute to look at this video and see if any of it sound familiar.
Having had to live through several natural and man-made disasters, I have learned to appreciate the peace of mind that comes from having Emergency Kits. Today, I will touch on a few for you. The purpose of this article is to get you thinking and to get you to spring into action. When you are in the throws of a challenging situation, trying to locate all the parts and pieces is nearly impossible. We will start with 'doable' and then I will suggest 'suggested items' that you may want to consider and gather over time. (The lists that I provide overall will be from a public source that allows sharing without violating copyright laws).
72 hour kit:
Hopefully you have heard of a "72 hour kit". The premise behind this kit is to have the supplies to survive for up to 3 days while waiting or seeking additional help from private or public resources. These kits can be purchased from commercial suppliers, but you may be surprised at how easy they are to put together and customize for yourself.
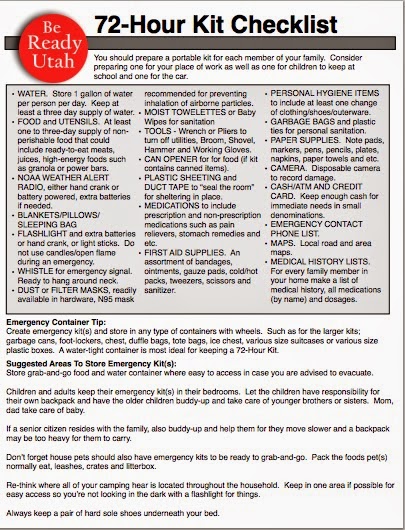
The following list is a good, but basic list that comes from
"Be Ready Utah"
Note that there are suggested items for food, water, clothing, hygiene, and shelter. As you look at the list, I am guessing that you may be pleasantly surprised that you have many of these items around the house. Although the suggested containers to hold the kit vary in this list, I would encourage you to consider using a container that is easy to carry and move. For example, if you use a chest to store your items, how difficult will this be to move and carry by foot if you cannot drive.
I am going to show you some of the items I have included in our 72-hour kits that you may want to consider.
First of all, we have ours in individual Backpacks for each family member. Hopefully you can see that we keep these in our pantry, which is near our garage door. In an emergency, we can quickly grab our kits and go. They are ready and we do not have to spend extra time looking for needed items. Would you like to see some of the things we have inside?
In an outside pocket, we have many hygiene items. In the green container, we have a toothbrush that comes with toothpaste on the bristles. We have enough for 3 days. See the razor? There are wipes as well. See the small zippered pocket on the upper right of this picture? Let me show you the contents:
These are travel sized soap and deodorant. They are small and fit very well into this small pocket.
Each kits contains medications etc. This kit has "Dental gum" which also can be used to 'brush' your teeth as well. It is a very small compartmented box traditionally used for small fishing lures. It works well for this purpose.
Although I preferred to use a wool blanket, I have included a Mylar blanket. The orange item is a small tent that can be set up for a basic shelter. It is small and easily fits inside the large compartment of the Backpack.
Because space is minimal, I have included
"Tooblite" in addition to a small flashlight. These tubes absorb light during the day and glow all night. They can be used over and over again. See the chain, I can hang the tube on the outside of my Backpack to allow it to 'charge' during the day as I move along.
I have included this
Fresnel lens, which is essentially a large but flexible magnifying glass. This can be used for a variety of uses including starting fires. Matches are important as are lighters, but they require fuel to work. This device can be used again and again to start a fire in the daylight hours.
Each 72-hour kit has a small military type stove. This is light-weight fuel that can easily be carried and is dry. If you are traveling during the rain or snow, finding dry fuel may be very difficult.
I am including these photos of the
"Universal Portable Urinal Unisex". Although unpleasant to think about, you really need to think of the hygiene aspects of the 72-hour kit. The red part is for males. The bottom picture shows the attachment that you would place on top of the red part of the device for females to use. Also, don't forget to include toilet paper and or baby wipes.
You will need copies of your important documents. Although this information from
"Be Ready Utah" suggests paper copies, I have chosen to use a Memory Stick/Flash Drive to keep these important documents. Remember, space is at a premium. You will also need cash, in small bills and some change. Remember, in the case of an emergency no one is going to have lots of change. If you have large bills, you may have to trade the bill for a needed items and loose the change you normally would get back. You should also consider maps and a First Aid/Emergency Preparedness book such as a Boy Scout book.
Finally, you cannot be to careful about water. Our 72-hour kits do have water, but carrying 72 hours worth (1-2 gallons a day) is impractical. We have two items in our kits. This is a type of water-bottle with a filter. We also have
"Life Straws" which are compact, light-weight and can filter some pretty nasty water.
Car Kits:
There will be times that you won't be home....just think about your daily routine. Few of us are able to be home all day. This is why having a Car Kit is very important. Here is a list from
Be Ready Car Survival and Emergency Kit.
Again, notice that there are items for emergencies of all types, including car related emergencies. As stated above, this list is a good starting point and you most likely have many of the items on the list. I would like to highlight a few items for you to consider:
I have a number of things in my car kit. It is contained in one container and I often have a wool blanket that covers the top.
I have 2 very small 72-hour kits in the boxes, water, a tent, life straw, wipes, whistle with matches, paper, pen, and shoes with socks in this side of the kit. I often wear heels to work, and walking miles in them does not appeal to me.
The back section has a Battery Charger, jumper cables, oil, a foldable shovel, "Fix a Flat", WD-40, an air pump and other items. I plan to add a container of light-weight Kitty Litter to help me during the winter should I need it.
Sanitation Kit:
If you have the luxury of traveling in a car, or don't mind hauling yet another item, consider a Sanitation Kit.

This is the
"Waterless Gotta Go Toilet". It collapses into this flat container and has 7 bags to catch the 'waste'. The green circular item behind it is a pop-up tent for this item to provide privacy. Again, it is light-weight and could be carried if desired. There are other options as well such as the
"Luggable Loo", but it is a bit more awkward to carry if you are on foot.
Other items that you will need for Sanitation are a collapsable shovel to bury waste, toilet paper or baby wipes, bleach, Feminine hygiene products, hand sanitizer, and possibly paper towels.
School Kits:
It is that time of year again. Our children are going back to school. Students spend 6 hours or more a day at school and are away from their parents. Although schools are encouraged to have
emergency plans for various scenarios, it is still important to have individual emergency kits in your child's Backpack. These could be placed in a Zip Lock baggie. However, I would encourage you to seal the kit in a "Food Saver" type bag to hopefully deter inquiring minds from playing with the whistle, and getting the funds you may put in there for emergencies.
Here is a list form Be Ready Utah:
- 1 7" x 8" size zip lock bag to place emergency items in
- 1 emergency (Mylar) blanket
- 1 emergency poncho (one size fits all and children's sizes also available at any stores with a camping section)
- 1 or more hand/body warmer (usually comes 2 per packet at any stores in the camping section)
- Trial size tooth paste and toot brush (great to use if you are checking them out of school and going to the dentist!)
- Trial size hand/body moisture lotions.
- 4 moist hand wipes/small package of baby wipes
- 4 sterile alcohol swabs to clean wounds or cuts
- variety size band aids
- 2 pocket size facial tissues
- Various sized safety pins (in case you pop a button or a broken zipper)
- 1 blow whistle with lanyard to hand on Backpack).
I would add, some food items like granola bars, and a few dollars in cash.

So, take the challenge to get started today. Gather items that you may have around your home already and begin to put your 72-hour kit together first. Teach your family members not only to help put these kits together, but also when to use them.
The time to prepare....is now! Good Luck!

Thanks for joining the Prepared Bloggers as we work our way through 30 Days of Preparedness. September is National Preparedness Month so you will find everything you need to get your preparedness knowledge and skills into shape.
Take one post each day, learn as much as you can about the topic and make it a part of your preparedness plan.
Day 1 - Ready, Set, Get Prepared! Welcome to 30 Days of Preparedness from PreparednessMama
Day 2 -
The Family Meeting Place and Escape from Laughingbear Adventures
Day 3 -
I'm Safe! How to Communicate with Family in an Emergency from PreparednessMama
Day 4 -
Does Your Family Have a Fire Escape Plan? from Home Ready Home
Day 5 -
Preparedness For Pets from The Busy B Homemaker
Day 6 -
The Escape Exercise from Laughingbear Adventures
Day 7 -
It all Falls Apart Without Mental Preparedness from PreparednessMama
Day 8 -
It's a Matter of Emergency Kits from A Matter of Preparedness
Day 9 -
Nine Great Emergency Light Sources Other Than Flashlights from Food Storage & Survival
Day 10 -
Cooking Without Power from Mama Kautz
Day 11 -
The Importance of a Shelter & Staying Warm and Dry from Trayer Wilderness
Day 12 -
The Importance of Having The Right Tools In Your Pack from Trayer Wilderness
Day 13 -
Practice Living Without Electricity from Food Storage Made Easy
Day 14 -
How We Choose The Right Gear - (including the MultiFlame Tool) from Trayer Wilderness
Day 15 -
Water Storage & Purification from The Busy B Homemaker
Day 16 -
Food and Water for a 72 Hour "Go Bag" from Homestead Dreamer
Day 17 -
8 Foods You Should Be Storing and How from Melissa K Norris
Day 18 -
Planning Your Pantry from The Organic Prepper
Day 19 -
Stocking Up on Non-Food Items from Living in Rural Iowa
Day 20 -
Dutch Oven Cooking: Off-Grid Before Off-Grid Was Cool from The Backyard Pioneer
Day 21 -
Pressure Canning the Harvest from Timber Creek Farm
Day 22 -
Personal Protection & Awareness from Living in Rural Iowa
Day 23 -
KISS First Aid from Herbal Prepper
Day 24 -
Mommy, I have to go Potty! from Mom With a Prep
Day 25 -
Fire Starting 101: The Why and How of Lighting a Fire for Survival from Food Storage & Survival
Day 26 -
How to Filter and Purify Water from Prepared Housewives
Day 27 -
How To Make A Shelter from Trayer Wilderness
Day 28 -
Put Your Preps to the Test with 24 Hours Unplugged from The Organic Prepper
Day 29 -
What Is Char and Why You Should Have It To Start A Fire from Trayer Wilderness
Day 30 -
How To Utilize Bushcraft Skills and Forage From The Wild from Trayer Wilderness