Showing posts with label Dehydrating. Show all posts

Sunday, November 22, 2015

It's a Matter of Dehydrating Parsley from your Garden


Well, the frost is definitely on the pumpkin around here.  The summer garden is finished. This was the last survivor until I harvested it.  It is my "Parsley tree".  

No, Parsley really isn't a tree, but this one turned into one.  What is really amazing is that it grew this well in drought conditions!

Dehydrating Your Own Parsley:


This is one portion of the 'tree'.  Just know that 2.5 feet of this plant is in the sink and not shown in this photo.  This plant had 2 stems that were very similar like that.


I rinsed the parsley in the sink. Use a salad spinner to get as much of the moisture off the plant as possible.


 I then started cutting/breaking off stems of the Parsley plant. Next, I stripped each stem and put the smaller pieces of parsley on the mesh inlays on each tray.


I had several trays full.  I dehydrated them overnight outside.  It really smelled delicious!


Remember that full tray of Parsley above?  This is what it looked like after it was dehydrated.


I had 8 trays of dried parsley when I was finished.


Remember the Mesh inlays?  I lifted each one up carefully held the to middle edges together making a type if a cone/funnel.


An carefully tapped the parsley into the container.  I ended up flipping my fingers on the mesh to help it dislodge and fall into the funnel.


I put a piece of paper-towel under the container to catch 'stray pieces' of Parsley. Next, I took the clean handle of one of my rubber spatula and started compressing the parsley. This helps it break into the small pieces that you traditionally see when you purchase dehydrated parsley.


Intermittently I would roll the paper-towel and tap the escaped parsley into the funnel. How much parsley did the 8 trays produce for me?


Enough to refill this bottle I purchased years ago. I just keep filling it from Parsley that I grow in my garden.


Isn't this a thing of beauty?

Take Home Points:

  • I bought one Parsley plant for $1.50.  It produced the equivalent of a container of McCormick Gourmet Collection Parsley Flakes 2oz which sells for $11.80 on Amazon.  This means that I saved 87% on this item.
  • It smells so fresh every time you open the container.
  • You know if you put pesticides on your plant or not if you grow them yourself.  I didn't use any and this plant still flourished. 
  • You know how old your Parsley is. When you purchase herbs from the store, you do not know how long ago they were processed or how long they have been sitting on the shelf.  
  • Parsley is very easy to grow, and you get often get a good yield. This year, I planted my Parsley in  my raised bed instead of my little free-standing herb garden just outside my kitchen door.  I think this is what made the difference. I will be doing this again next year.

Try it!


Sunday, December 21, 2014

On The List......


Preparedness Websites:

I am a follower of many blogs and websites. I love to learn from those who share the same interests and concerns that I do. I am also grateful when good folks like you all take a few minutes of your precious time to read our blog. It is my hope that you find something of use, a nugget or two to use in your busy daily lives. Every once-in-a-while, I am touched by the kindness of others.  I have fortunate to be mentioned on various lists as a site to visit.  Just to be included on the same lists as other's who are notable is really a great honor.

I have never been at the top of the lists, but I am really just fine with that. I will continue to look and learn, search and find, and experiment and share in my efforts to help you be as self-sufficient as can be on a daily basis.  I do this not because I am preaching a doomsday philosophy. Rather, it is a 'real-life' philosophy.  My husband's business tends to be cyclical.  We have used our food storage, and DIY skills for years.....and have always been fine.

No one knows when they may need to call upon their preparations either in skills or with food or 'stuff.  One thing is for sure, if the day hasn't come to you yet, it most likely will.  I would encourage you not to put your head in the sand.....invest in yourself and your family.  Live with more peace, live with more confidence, live with the opportunity to share and serve others because you have taken the time and interest to become more self-sufficient.

Now, if you want to see where I landed....it was down on the list...but yet still on the list(s). Thank you to those who considered me and those who took a moment to vote.  While looking on the list, please visit the many experts listed!  You will be amazed and hopefully curious to learn more!


It's the end of another year.  It is the time that many reflect and make goals for the future.  Make a list, make a plan, learn!

Consider it!

Monday, September 8, 2014

Have you ever wondered what to do with older bottled fruit?


What to do with Old Bottled Fruit....

It's that time of year again.  I am referring to Canning Season, which is in full swing!  I was recently was reorganizing my storage room.  I had several bottles of "fruit somethings".  My family's tastes and preferences seemed to have morphed over the past few years.  It was very evident because of the bottles of fruit that were left behind.  I needed the space for this years harvest, so I decided to 'morph' these older bottles of fruit.


In particular, I had peaches and Apple Pie Filling.  I decided to try to make fruit leather from them.  I poured the contents of the bottles into the blender.


A quick whirl of the blend made a beautiful puree.


I poured the contents on to fruit leather trays (which are sprayed with a cooking spray).


I decided to add some variety to these leathers.  Here I added sesame seeds.


On this Peach leather tray, I added some cinnamon.  


Into the dehydrator it all went!


Once the fruit was properly dehydrated, I needed to repack it.  I cut a sheet of wax paper.


I removed the leather from the tray and placed it on the wax paper.


I cut the leather into sections.  Initially I cut the leather into fourths, but later decided on eighths.


It is important to work with the leather when it is warm.  I rolled the leather in the wax paper.


I then wrapped it into plastic wrap.

This is easy to do, just take the rolled fruit and roll it on an angle into the plastic wrap.  Tuck the edges along the length of the rolled fruit.


I needed to label the jars, but I hate removing adhesive from jars. So, I just printed off these 'labels' which are actually pieces of paper.


I laid the jar on its side, placed a paper label on the bottom of the jar and started to place the rolled leather into the jar.


Using my Food Saver, I vacuum-sealed each jar.


These jars of fruit leather are equivalent to 9 jars of canned fruit.  

Take home message:

  • What I like about this system is that you can take out one jar at a time and eat the leather.  
  • Or, you can take out a piece of different leathers from their respective jars and vacuum-seal them again.  
  • Also, you are using your old fruit in a new way.  Around here, leather does not last too long.
  • You can also embellish your fruit with seeds, flavor, and things like granola to make it more appealing.
  • This leather was essentially free to me as I had everything already.
  • Rethinking your bottle fruit and making it into something new is a frugal choice for your family.
  • The Apple-Pie-Filling was very scrumptious.  The added crunch of the seeds is a pleasant surprise as well.
  • I can take pureed fruit and add Jello to it to add new flavor to the leather and increase the variety of the leathers I have.  

Try it!


Monday, February 4, 2013

It's a matter of making your own...Minute Rice!

Courtesy of Minute Rice

This is a favorite for many families in America.  A good tasting product that is quick to make. What is not to like here?

Well, after feeding the Young Single Adults yesterday, I came home to a full Rice Cooker.  I had neglected to take the Rice with me. So, I had a lot of rice and not many mouths here who would eat it.  Just and FYI, Rooster Senior will not eat rice without a sauce etc.  

Well, here is my solution, and it is important to know that this was very, very easy.


I pulled out my dehydrator. I put the inserts that I use to make fruit leather on the tray to hold the rice.  


I spread the rice on into one layer on the insert.  I left it on overnight because it needs to be very dry...so leaving it overnight would not harm it.  It would also ensure that it was very, very dry.   I had 7 trays that I filled.


Here is what the dehydrated rice looked like when I opened the Dehydrator.


This is a close-up of the dried rice.  It is really crunchy!


I 'dumped' the rice onto paper towels.  This helped me to keep it in one place as well as scoop the rice from the towel into a jar.  When I had only a few grains of rice left, I lifted the paper towel by the long edges and poured the remaining grains into the container. 


I decided to put my new "minute rice" into jars and seal them with my Food Saver.  

I plan to use the following Directions directly from the Minute Rice web page:


Cooking Directions

collapse -

Measurements

ServingsRICE (cups)Water (cups)
211
422
633
1/2 cup uncooked rice = 1 serving (About 1 cup cooked rice)


Isn't this great?  I little 'mistake' has turned out to be a time saver for me in the future.

Try it!


Sunday, March 18, 2012

Dehydrating Peppers, and making Pepper flakes!

Pepper Flakes!

Well, I was in the grocery store yesterday, and I saw the really big Bell Peppers were on sale for a screaming deal.   I was low on Dehydrated peppers, so I purchased Red and Green Bell Peppers. I felt the yellow ones were too pricey to buy this time. 


I donned my disposable gloves as I didn't want to smell like Peppers all day. I cut off the top, and then pulled out the core and seeds.


Next, I sliced them in half. (See these really are quite big).


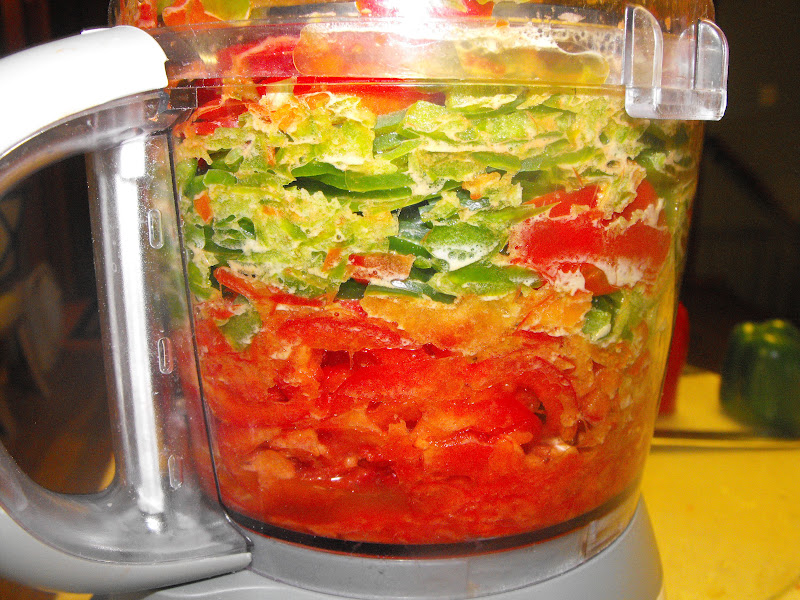
Next, I sliced them with my food processor...this literally took seconds to do.  I wanted them sliced very thin. 


This is 8 large sliced bell peppers.


I placed my screen inside the Dehydrator trays.  This is because the slices will become very fragile and thin.  They could fall through the traditional tray.


The next step is to layer the pepper slices on each tray.


Place your trays in your dehydrator.  Since Peppers are very 'aromatic', I put them outside on my patio table.


This is what the weather was like outside....a bit nippy!


After about 6 hours, they were done.  Look at the significant size difference from the freshly sliced peppers. See how delicate they are?  I just picked up the screen, rolled the peppers off the screen on to a paper towel.  I then rolled the paper towel together and crushed the peppers.


An Voila! Fresh Pepper flakes to use as I wish.  Aren't they pretty?  Eight bell peppers made 3 oz of Dehydrated Peppers.  

It is important to note that you can Dehydrate year round.  When you see a good deal on produce, even in the winter, take advantage of the price, take it home, and dehydrate it.  It really is that simple!
01 09 10