Showing posts with label Pasta. Show all posts

Sunday, August 17, 2014

Making Ravioli from Food Storage Staples.....


I got a bit adventurous today.  I actually (all by myself), made.....Ravioli!


Last fall, I bought this Ravioli Form when I went shopping in an Amish Community.  I have looked at this device over and over again, but today just decided to get it out and try it.  


I made the dough from scratch.  The directions were to place 3 cups of flour either on a board or in a bowl.  I decided to play it safe and put it in a bowl.  I made a well in the middle of the flour to accept the eggs.


Next, I placed 3 eggs (at room temperature) in the well.


I slowly began to incorporate the flour and the egg mixture together.


The mixture gets to the point that you have to begin to use your hands to knead the flour in.  The recipe calls for up to 1/2 Cup of water if needed.


I put most of the water in and made this lovely ball of dough.  Let the dough rest in a covered bowl for 30 minutes.  If you push your finger into the dough, it should return relatively quickly after the 30 minute time period.  


Slice the dough ball.


Begin using your pasta roller.  Start at the widest setting and gradually reduce it down with each pass of the dough.  Notice how I am catching the dough with the back of my hand. This helps prevent tearing.  If you grasp it with fingers, there is a higher probability that the dough will get rips or tears.


Flour the metal part of the form very generously.


Although this sheet isn't 'lovely', it is functional.  Cover the metal part of the form.


Take the plastic part of the form and gently press indentions into the dough.  Remove the plastic tray.


Because there is a certain 3-year-old that will not eat meat at the moment, I decided to add Mozzarella Cheese.  I decided to make it easy on me and cut string cheese sticks into small disks. 


I put 2 small disks and a little spaghetti sauce into each indention.


Next I put a second sheet of pasta on the tip.


Use a Rolling Pin and roll in many directions across the top of the form.  You can see the 'zig-zag' of the metal form emerge as you use the rolling pin.


Again, not lovely but functional. Turn the form over. If you floured the metal form well, the Ravioli's should fall out.  You may have to coax a few though.


Put the fresh Ravioli pouches into boiling water.  When they float, they are finished.


Add the sauce, garnish with Parmesan Cheese ( I grated it myself!), and add a sprig of Parsley if you like (it was straight out of my herb garden!).  

What was the verdict?  Everyone from the 3-year-old to the Silver Fox liked it. The Silver Fox said he couldn't taste the meat.....I had to inform him that there wasn't any this time.  I will try different fillings in the future.

Take Home Message:

  • This device costs less than going out to dinner to a sit-down restaurant.  It is called a Grandpa Dante's Ravioli Form.  This one costs just under $15.00.
  • I literally made this entire dish out of food storage (with the exception being the Mozzarella Cheese.  However, I often have this type of cheese in my freezer, so it could have been totally made from food storage staples).
  • I need to practice this again. I know I can get faster each time I do this.
  • I can put in a variety of fillings.  If you have meat left over from a meal, dice it into small pieces and combine it with cheese or sauce.  That way, one meal help make a second meal.
  • It gives my family a variety.  I can make pasta noodles, but the Ravioli is a nice change.
  • It costs very little to make this pasta.  

Try it !


Monday, June 6, 2011

Summertime Salad....anytime!

Not long ago, my son left for his mission.  We had a luncheon at our home after he spoke in our Ward/Church.  Since it had been a very busy weekend (Wedding, reception, baby shower, family, missionary....) I decided to make things that were good, but easy.  Here is one.  This is a Tortellini Salad that I like to make....from my food storage items. It is really delicious!


It went to my storage room and got Olives and a bottle of Vinaigrette.


I cut up dehydrated pepper slices (that I dried a few months ago) and soaked them in hot water (total time was about 20-30 minutes)


This is a 7 ounce box of dried Tortellini.  It's empty because I neglected to take the picture of if when it was full!


Cook the Tortellini according to the package directions


Strain the Tortellini in a colander.


Add sliced Olives and the re-hydrated peppers.


Place ingredients in a gallon Zip-loc bag and pour in Vinaigrette.


Place in your refrigerator for at least 2-3 hours, or overnight.

I would show you a finished product in a pretty bowl but when the company came, my helpful family members placed the salad in a bowl and served it quickly.  When I thought about taking a picture...well there was really nothing left! 

A variation that you could add would be sliced Pepperoni, which I also have in my food storage.  This is an easy and delicious salad to make from shelf-stable foods that you can store.

Consider giving it a try!

Friday, September 10, 2010

What different types of Pasta are there?


(Image courtesy of justforkids.com)

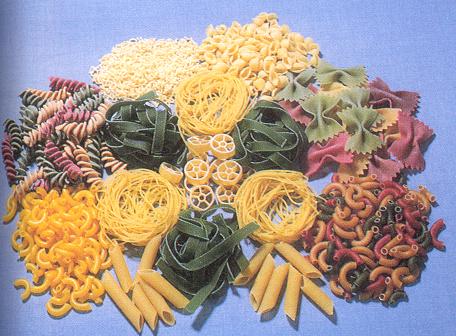
Another question that has surfaced regarding Pasta is "What types of Pasta are there?"  Oh my goodness!  There are many, many different types.  I found a wonderful site that list lots of different types of Pasta from A-Z

Check it out!

How to Store Pasta, Dry Pack Canning.

(Image courtesy of seattlemet.com)

There are so many fun types of pasta that can be obtained.  Look at all the fun shapes and sizes in the beautiful image above (courtesy of seattlemet.com). 

I have been asked by more than one person the following question, "how do you store dry pasta?"  Well, depending upon who you read, the answer varies.  If you choose to store it in it's original package, some manufacturers state 1-2 years.  Certainly you should protect it from light, humidity, heat, and vermin.

However, if properly packed, it can last  up to 8 years.  This is according to Provident Living.org.  This can be accomplished by using Dry Pack Canning.  If you live near a Family Home Storage Center, or if your local Ward or Stake has a Dry Pack Canner, you can do this easily.  Be sure to include Oxygen Absorbers as well.    

Although the Family Home Storage Centers are run by the Church of Jesus Christ of Latter-day Saints, nearly anyone may have the opportunity to use these facilities.  To learn each center's location and contact information to answer this question about the local requirements to use the facility and other questions, please see this Link.  

If you are interested to know what it looks like and what serving in a Family Home Storage Center is like, please see this very 'home grown' video below.  I really like the Brother who is teaching the family.  He is kind and very patient!.


Sunday, September 5, 2010

It's Week #2 in September, and our focus item is...Pasta!


(Image courtesy of  learncooking.co.uk)

Last week, our target item was Wheat.....and I had all these great plans of things to share with you....and then life got in the way.  But, it is my hope that you looked at your stores and obtained more, or enough wheat and grains to continue your journey to stock up on your long-term supplies. 


This week, our target item is one of my favorites.......Pasta.  There are endless types of pasta and they can be used in main dishes, in side dishes, salads, and let's not forget the occasional Kindergarten craft.

Is there a proper way to cook Pasta? 


I discovered that there is.  I located a wonderful video that gives specifics.  Who knew that the type of pan you cook pasta in really matters?  As it does not have an embed code that I can find, please follow this link


Look at your supplies, examine what recipes you want to use, calculate your needs, and stock up. 


This is an inexpensive one to get!

Wednesday, June 2, 2010

It's a matter of making Pasta....


As we are focusing on White flour this week, I thought I would try my hand at making pasta using this wonderful food storage staple.

In a previous post, I alluded to how ridiculous it was that I have acquired so many "gadgets" over the past few years because I was thinking that "I just might need it"!  Well, I just might!  The gadgets today fall within that category.  I have a Kitchen Aid mixer.  One day I was browsing the clearance area of a large store and saw that the price of the pasta attachment was really significantly reduced.  My "I just might need it" thinking started to to come to the forefront, and I purchased the needed items.  I promptly put them in my cupboard and forgot about them for about a year.  So, I felt it was time to try them as we are focusing on White flour this week.  This is another way to use this staple as well.

I am making a Basic Pasta Dough without eggs as I may not use all the pasta that I am making right now.  If I did incorporate eggs, I could not store the pasta because of the threat of salmonella.


I decided to try the "old school method" and try to do it by hand....you never know when you might have to do it that way.  The instructions for the recipe I used state that you need to make a well in the flour.  Some hard-core pasta makers make a mound of flour right on the counter with the well in the middle and start mixing from there.  I am not so trusting.


Next add your water to the well.


If you don't recognize the "EVOO", this is a throw-back to Rachel Ray's nick name for Extra Virgin Olive Oil.


Add your olive oil as well


Begin to mix the wet and dry ingredients together very slowly with a fork.  Only incorporate a little flour at a time so that it mixes smoothly and evenly. 


After a while, the fork was not longer effective, so it was time to use come clean hands to assist in the matter.


Eventually I made this ball, and it looks a little sorry...but remember I am just learning here!


The instructions said to cover the dough and let it rest for about 30 minutes.  This really did make a difference as the dough did soften become more pliable after I did this.  The instructions also say to repeat this a couple of times....which adds to the overall time spent doing this.  Now, do you see why I choose to not make egg noodles...after all this work, I wanted to keep the left over pasta and not discard it.


Yes, it is another ridiculous item that I picked up "just in case I needed it".  However, you need to know that the LRH has what I call a "birth defect".  Are you ready to know what it is?  Well,  I just can't pay full price for anything without a significant amount of pain....and this is my "defect".  So, please know that this item was on clearance...somewhere.  It is a pasta stand.  You do not need to have one of these.  I have read that you can use a towel on the back of a chair to place your pasta, and even a cloth-covered broom handle that is propped between 2 chairs.  Please don't think you have to acquire this....although it was fun to use.


So, it was time to try my pasta attachment.  These are the "screens" that come with it.  It can make Macaroni, Angel Hair, Spaghetti, Egg, and Lasagna noodles. This is a pretty nice selection huh?


My son choose Angel Hair Pasta, so I put that screen on the attachment.


This is how it looks when it is coming out of the machine.


I hung the pasta on the stand, however the pasta came out so quickly that I didn't successfully separate it well.  I need to work on that particular skill.  The young Rooster of the house ate and ate and ate the pasta...but I have enough to make a pasta dish...when my life slows down a little bit this week!


Finally, I want to show you a non-electrical model that I acquired and have used in the past.  Believe it or not, I got this a a closeout store for very little money at the time.  It has several attachments that you can get and attaches to your counter to stabilize it.  So, if I really didn't have power, I could mix by hand and shape the pasta without power.  And....you can use a knife to cut your pasta if you choose to roll it out on your counter with a rolling pin.  I have also done that many times as well.  You don't have to get ridiculous with the gadget acquisition process as I seem to have done.


Lessons learned!

  1. I will mix the dough in my Kitchen Aid or in my Food Processor next time.....I am always in a hurry!
  2. I will let the dough rest before forming the pasta....it really makes a difference.
  3. I will try other ways to take the pasta off my machine without clumping it all together.  I have some ideas and will attempt to try them and hopefully share them with you later.
  4. I will try to make vegetable pasta with other food storage staples.  You can use Tomato Sauce or puree your dehydrated vegetables (and you wondered if you would ever use these in a unique way!).
  5. Don't give up.....it tasted delicious and is another wonderful way to use your flour.
01 09 10