Showing posts with label Storage. Show all posts

Sunday, February 1, 2015

Reclaiming Our Domain.....Function from something "Free"!


In our family, our adult children have  been in a bit of a transition.  Some coming and others going.  It has been a very fun roller coaster over the past few months. Sometimes we would come home to some type of surprise.  In this case....it was a really big surprise.


Our Son saw this Armoire sitting on the side of the road with a "Free" sign attached to it. He was pretty excited about this find, so he got it into the back of his truck.....and of course brought it home.  He was planning to move out and move on to the next chapter of his life.  His plan was to 'fix it up' and take it with him.  Alas, he married, moved and left this very large piece of furniture here. When we asked what he planned to do with it, he told us he didn't want it and we could do whatever we wanted with it.  Translation...."I don't want it Mom and Dad, you can figure out what you are going to do about it".  I have to admit, this abandoned item was easier to care for than the little dog that was left behind by another child.....alas, that is another story for another time.

When our son left, he wanted the desk that I had been using while he was gone on his mission.  I packed up everything into bags/boxes and off the desk went.  It was really fun having everything you are used to finding in a drawer....now in a bag.


So, I started look at this monstrosity and it had good bones.  The doors slide back into the unit and essentially disappear. There was a lot of room in this section of the unit.


This is the bottom section, and yes that door kept falling through...a lot.  I was excited to see the lock....but alas it had no key.  I need to remember that this unit was "Free".  When the doors were opened, it had a lot of space in there as well.

I happened to be married to the most talented Trim Carpenter on the planet.  I told him that I had this wild idea.  To his credit, he only blinked once.  What was the crazy idea?  I wanted to turn this Armoire into my desk.

Transforming an Armoire into a Desk....


My sweet husband looked at it as I described what I wanted to do.  Initially, I wanted him to remove the area that most likely housed the VCR or DVD player. As he looked at the unit, he said it would have been a structural problem to remove it.  However, he said he still could insert a shelf to hold all the binders that I use on a regular basis.  So, using scraps from the garage (I love that part), he built and attached this shelf to the upper shelf.


I asked him to build a flat surface that could be slid out to be used as a working surface.  I also asked him to put a board at a 90 degree angle at the back of the sliding surface. He said no problem and made it happen.  He stated that the hardware to do this cost about $20.00.  He also attached a powerstrip on the side to plug in all my devices.  I had this powerstrip already. The amount of money spent for that was 0 dollars.


I also had this file cabinet that was also free from a neighbor who had to move quickly.  Unfortunately, when I used to try to fill my own printer cartridges....you can see I had an accident!  I used the sanding block to sand all the surfaces, and that dark spot was still very prominent.


I started painting the file cabinet and the new pieces within the Armoire. The cost of the amount of paint I used was about $10.00.

The outcome.....


Here is the Armoire and the File Cabinet. Don't they look great!!!!! This is how the Armoire looks when it is closed.  I like the fact that I can just shut the doors and hide whatever project I am working on.


Looking inside, you can see my laptop, and my files behind it.  These units keep the files I am using in a standing position.  The black unit has boxes in the front of it where I put pens/pencils, scissors, lotion, White-Out, etc.  The other unit on the left behind my computer just holds files.  The cost for these was....0 dollars!


Here is the other file unit.  I put my Ipad in there to recharge.  It saves valuable real-estate.


Here is another view.  Even with the items I have placed in there, I still have a space for things I am working on that is to the right of the computer. I have put open binders there, papers, etc.

See how nice this sliding surface is?  Having that perpendicular piece of wood keeps my file units secure when the surface is moving.  This slider also lets me work while being seated.


See this little light?  It was something I already had as well.  I have used it to light up my Nativity sets on a certain shelf....but I haven't used it really in a couple of years.  So, it now has a new home.  The cost of having a lighted surface?  As before  0 dollars!


Here is how I am using the former VCR/DVD space and the new shelf.  I am so thrilled that all of my binders fit on this shelf....I could fit every one of them in. In the former VCR/DVD space, I have two organizers.  One holds card-stock and the other the myriad of labels that I use.  In the middle, I have blank greeting cards (thanks to the suggestion of my daughter) and behind them I have blank CD's  and DVD stacks.


I asked Rooster Senior to install these sheets of metal inside both doors.  I have included little containers that hold staples, paperclips, etc.  I also have a magnetic clip to hold the notes of 'to-do' items that I need to take care.  On the other side, I have put photos of my family.  If you recall, these doors can slide back inside of the unit so that they are out of the way if I want.  

The cost of 2 metal sheets was $8.00, the cost of the small metal storage containers ($12.25 for 6 of them).  My husband had magnetic stripping that could have been adhered to them to hold them on the door.  However, I had a Magnetic strip I had purchased for another project.  However,  I decided to use it for this project at a cost of $13.99.  I want to point out I could have done this for free, but decided not to.  


Here is a more global view of the upper part of the Armoire.  I cannot stress enough how roomy this unit is.  However, there is more to show in the bottom of the unit.  


Here is the bottom unit.  It holds A LOT!


I put nearly a whole box of paper paper in here initially.  Yea, I got rid of that ugly box that was an eyesore in the office!


This is opposite from the paper on the bottom shelf.  I have boxes of file folders, envelopes, Stationary, etc.  In the white container (which actually says 'popcorn' on one side of it) I have small some eclectic and odd shaped items that needed a home.  I purchased all 3 of these 'popcorn' containers (now stacked together) from the Dollar Store.  A whopping $3.00 invested.


On the upper shelf (in the bottom of the Armoire), I have containers that hold many things. Items such as my labeler, glue/gluestick, ink cartridges, index cards and the red container holds pens/pencils.  I also got these containers at the Dollar Store.  Total investment here $10.00.


Opposite of the containers noted above, I have 3 organizers that hold items like glossy paper, CD covers, and the little bit of scrap book paper that I have.  I also have a box of plastic sleeves.  I had the organizers already, so the cost for those is 0 dollars again.  

Can you see how much I was able to store in this unit?


So here you see the Armoire and part of the File Cabinet that I painted.  Guess what is behind the photos on the File Cabinet? The Router and Modem.  Next to the photos is my printer.

Take Home Message for "Reclaiming my Domain"....

  • Up until a couple of weeks ago, my daughter was using this space as a Beauty Salon.  I'm not kidding.  She is in the process of purchasing a home and is no longer needing to use our 'Domain'.  I now have an office, a real office for all my needs.  Please understand that I was glad to share with her, but I like the thought of having a place for everything. Had I finished this unit while she was here (just know it would have been hard for a variety of reasons), both of us would have been able to work in there. 
  • It cost me $77.24 to create this beautiful office space.  I could have done it for $63.25 if I chose not to use the Magnetic Strip.  
  • I love that I had most of the items needed to transform this unit.  I love the styling of it and with the matching file cabinet it looks really great in my office.
  • I have a great deal of storage and can also close it all away if I need to as my office is located by my front door.
  • I "Upcycled" this unit. It went from being unwanted to being a beautiful and functional piece of furniture.  Because of the size of the TV it used to house, it is large and spacious.  I can see myself using this for a long time to come.
As our journey to reorganize and 'upcycle' continues, I will share our finished projects as when we complete them.

Don't you just love it?


Sunday, February 24, 2013

I See RED.....In my Pantry!!!!


What a mess!  This was really my pantry just a few days ago.  It didn't get this crazy all by itself, but I have been crazy busy and people just put things down without really finding a place for them to go.  Also, Rooster Senior thinks that jackets, several of his 'glues' (for woodworking), and a bucket of "something" needed to be inside during the cold weather.  (Of course they had to go in the pantry, not in his office or downstairs in the laundry room....go figure.  It's a good thing that I love this crazy guy).

I was so frustrated by all the 'stuff' that had been place on the floor and all around that I decided to tackle this project.


See the jackets....I guess Rooster Senior also thinks the coat closet is a few too many steps away.  


I had a collection of #10 cans of various food stuffs on the top shelf...and they were not in any sort of order. They were also just stacked on top of each other.


My original storage with square gallon containers still was in place...but other things had encroached on this space as well.  Also, several big buckets were all around the perimeter of the floor...again in no particular order.

It was a big mess!!!!!!!  So, I decided to rectify it.  So, I went to, of all places, the Dollar Store.  I decided to visually make the pantry look uniform as much as possible.  So, I purchased several different red containers as I already had a few red containers in the pantry.  I bought 2 types of red bins, red oblong containers and red baskets.  I spent about $30.00.  Want to see how it came out?  Okay!

Here is the result!


The coats are gone!  The 72 hour kits are hanging on hooks ready to go.  Just below the 72 hour kits are 4 appliances.....that are plugged in.  (When Rooster Senior built the shelving for me, I asked him to provide an outlet so that I could have appliances ready to go. I hate to pull out equipment just to grind my wheat or seal my Food Saver bags).  I have 2 grain mills.  One is my beloved Nutramill and the other is an old Magic Mill.  The Nutrimill always has wheat in it so that I can grind what I need in a moment's notice.  The Magic Mill is used to grind bean flour or corn meal. This is just a convenience thing for me that I have two.  I also have my 2 Food Saver machines on the shelf as well. The flat one is better for sealing Mylar bags than the upright model.


I reorganized my gallon containers and other containers.  I put them into categories.  The top shelf of containers has cooking and baking supplies like flour and sugar etc.  The second shelves gallon containers have beans, rice, etc. The third shelf has dehydrated fruits and vegetables.  In the smaller containers, I have some of the mixes that I have made for things like Ranch Dressing etc.


I moved the Dehydrator with its extras to the top shelf along with my scale, and other items that I don't use frequently.


I re-labeled each container so that all the labels are at the same level so that I could easily read what the container holds.


The Sprouting Seeds are in the tub, basket, and the plastic bucket so that they are all easily accessed.  Again, they are all labeled.


I used bins for pastas, spices, my CHOCOLATE, and packaged side dishes.  The small stackable bins hold things like Jello, pudding, and envelopes of soups and sauces....all labeled so that they are easy to find and also fill when the time comes.


Notice the bins with little holes in them.  I used them to put lots of different snacks in so that they could be seen.  There is an oblong container just adjacent to the 'holey' bins that holds bags of chips.  The bins on the bottom hold other items such as drink mixes.  These mixes are adjacent to #10 cans of drink mixes that I use often.


Remember my shelf with plugged in appliances? Well, here are the shelves below them.  The big bins and shelves on the left hold disposable utensils, cups and napkins.  The "Red Basket" is used to hold plates and silverware when I am having a picnic or a little gathering.  The red bin has napkins, which sit next to two types of plates. (I work with the Young Single Adults and we are always serving food somewhere!) The Shelving to the right has 2  big bins with Food Saver supplies/accessories.   The other big bin holds garbage bags and ziploc bags.  On the floor, is my beloved vegetable bin and a couple of appliances that I need on occasion.  


This was the "before" picture of my # 10 cans.  Again, just a big mess!  To get one can down, I had to move, slide, transfer, a can or cans from one pile to the other.  Because of this, I had no real idea what I had up there for sure.


Here is the "after".  I don't know if you can readily see, but I used shelving to separate and provide 'shelves' for the cans.  They are also categorized (Meats, Vegetables, Fruits, Special items etc).  I can easily slide cans in and out as I need them.


I used these large stacking shelves with foldable legs. If you look at the 'after' pictures, you can see that they easily clear the height of the #10 cans.  I could get 6 cans under one (as the legs could flare) and 5 on the top of the shelf.  (I did not purchase these at the Dollar store, but I most likely purchased them at a Big Box Store a few months ago...I just don't remember).


One very big and expensive lesson to take away from all of this is the amount of  food I had to throw away.  I had duplicate cans of items open, I had expired items stored up high on that shelf.  I threw away quite a few things.  Instead of putting the contents of the #10 can into jars and sealing them with my Food Saver attachment, I just quickly put the cans away and always thought that I would get to dry sealing with my Food Saver at a later time.  Well, it's later and it was too late for a significant amount of food.


I am now allowing space for jars on this top of this shelf of this picture so that I can safely store the contents of open #10 cans in sealed jars.  Things like Egg Powder etc will be put into jars and will be sealed with my Food Saver.  Also, you can see that I am using a Lazy-Susan device in the corner to make sure that I can see and access items easily.


I used another shelf to house 4 bins. Three of the bins hold Cheese-making, Pickling, and Canning supplies. The other 2 bins stacked together are extra's for when I need to add something else...which we all knows will happen.


I used to store these heavy Canners on the top shelf.  I won't elaborate on how challenging it was to get them down every time I was going to can something.  Having them on the floor makes so much more sense!


I also cut down on the number of buckets I am keeping in my Pantry. Right now, there are only four. They contain wheat, flour, sugar, and rice. Also, each bucket has a Mylar liner and a Gamma Lid to cut down on the possibility of little 'friends' trying to live in my food as these buckets can let light shine through.


Here is a view of the finished product, including my step stool that helps me easily access...anything!  I just love looking in my Pantry now.  I have had it this way for a few days to make sure that it is working for me.  I love to "see red" now because I can also find anything I need!

Not bad for a few bucks!

Friday, January 18, 2013

Where am I going to put ......


Have you ever asked yourself "Where am I going to put this?"   It happens often to me, and to many others who are making the decision to become more self reliant.  I have shared several ideas with you over the years. Here are some of my 'favs':

  1. Freezer Organization.  I still use this method and it helps me know what I have and don't have in a very short period of time.  It helps me build my shopping or gardening list.
  2. Organizing "Food Storage Style".  This is really how my sister lives.  I could live there too!
  3. Organizing "Food Storage Style" in a Storage Room.  This is a real food storage room that they build/organized themselves.  As crazy as this sounds, it is a thing of beauty.
  4. Inexpensive Can Organizer.  This is great for those who are on a budget.
  5. One of my "all-time favorites" is this post on under-the-bed-storage.  It's amazing how much you can store under a bed!
  6. I just love my little "Root Cellar" that I keep in my Pantry.  
  7. I love how much I can fit into my pantry using method.  It's easy to find what you are looking for as you can alphabetize or use categories to quickly find what you are looking for. 
However, today I just want to suggest that you think 'up'.  You may have cabinets that have a top shelf that you do not use on a daily basis.  If you are stuck looking for a place to store items that you need on occasion.....look up.


The goal is not to put your canned or dry goods out of reach.  The goal is to find places that you can put them and have them available to you when you need them.  Instead of old cookie jars, vases from flower bouquets from days-gone-by, consider putting food items that have a longer shelf-life 'up there'.  In this particular case....you will still see them every time you set the table!

Consider it!

Monday, April 9, 2012

It's a Matter of a Root Vegetable Storage Bin....


What do you think this might be? I was intrigued when I first came across this idea.  It is a Root Vegetable Storage Bin (from www.Gardeners.com). Now, you may wonder why I find this idea a good one.  I live in an area that is full of big rocks.  I mean, when they dug out our basement when we built our home, the pile of rocks looked like somewhere that Fred and Wilma would be right at home.  As such, I knew I couldn't have a traditional root cellar. So, when I saw this item, I was excited.  I do have a dark, cool room in the basement that would be perfect for this 'mini-root-vegetable-cellar'.  I ordered this item on-line.....and it arrived today! 


This is what it looked like when I took the package out of the box.


Here is what came with the package.  The wire basket, the burlap insert, coils, and the directions.


Cut the plastic strip holding the flat wire basket together.


Open the basket and lay it flat.


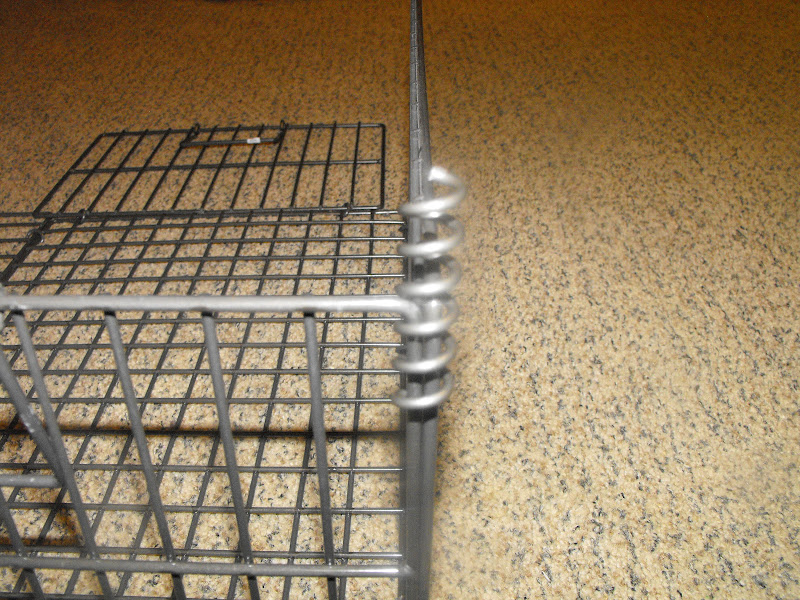
There are 8 metal coils.


Put two sides of the basket together and twist the coil around both edges.


Put 2 on each corner.


Here is the completed basket.


The instructions to say to insert the burlap liner and tie the back to the basket.  I didn't like how the front corners were not secure.


So, I sewed some left over Gross-grain ribbon to the front two corners and tied them to the front part of the basket.


Here, the flap is laid over the top of the unit. I also placed the handles on the burlap so that you can see them.


The unit comes with suggested temperatures and humidity for various vegetables. For the most part, you can place the vegetables in the unit without adding soil.  However, they suggest damp sawdust for carrots.  I am going to try this for a while, and if it works, I may get several for the winter.  This is a great solution for someone like me that cannot have a root cellar where they live.  The price as of today is $34.95 without shipping.

Consider it!


01 09 10