Sunday, August 28, 2011

It's 'Hot'.....for your kitchen!


I had a family friend come over yesterday.  She wanted help making an apron to take with her when she moved away for college. She loves the colors Orange and Green, thus the apron she made (which was reversible....Orange on one side and Green on the other), had these colors.  There were scraps left over, so I helped make 2 hot pads for her to take with her.  They were, of course, Orange and Green.  I learned how to do this from a colleague of mine, Melanie F.  Here is how you can do the same.  This is a simple project and is not time consuming.  It also uses the scraps you have on hand.


First, layout your scraps on a flat surface. These scraps are just a cotton/polyester mix. Choose a bowl that is just wider than the width of your hand with fingers spread.  Lay the bowl with the lip directly on top of the fabric.


Trace the perimeter of the bowl on to the fabric with a pencil or marking pencil.


The inside of the hot pad is made from scraps of flannel.  These are flannel scraps left over from a pajama project I had last fall.  As before, trace around the bowl.  You will need  between 4-6 layers of flannel inside the pad.


Because I love short-cuts, I just pinned the first set of circles on to the fabric and cut them out. This way, I didn't have to retrace the bowl each time.


Next, cut strips of fabric on the bias.  I used strips that were ~3 Inches in width. Cutting on the bias allows the fabric to stretch when needed.


After cutting all of these out, you should have the outside fabric circles, the flannel circles, and the bias strips of fabric to finish off the edges.


Stack the circles with one of the outside fabrics at the bottom (facing toward the table surface), the flannel in the middle, and the other outside circle on top.  Here I turned the flannel circles wrong-side out to place just under the outside circles.  If I hadn't done this, you would have seen the plaid pattern show through. Pin along the outside edge.


I then pressed the circles in half and then quarters.  This gave me guidelines to stitch across the circle. I first stitched the circles in half, then quarters, and then eighths. 


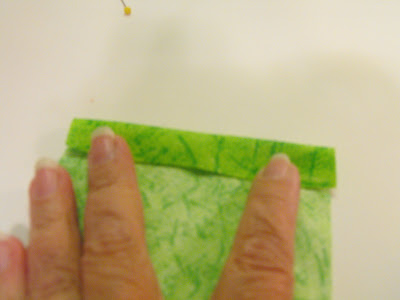
Next, press the bias tape in half.


Press the edge under about a 1/2 of an inch.


Pin the bias tape around the outside edge of the circle.


Pin the raw edge of the bias tape to the raw edge of  the circle.  Stitch with about a 1/2" seam all around. Then unpin the tape.  Pull it over the raw edge, pin again, and top stitch the folded edge to the opposite side. 


Press the hot pad flat with your iron.


Here is the hot pad with the finished apron.  It's fun, easy, and very functional.  And, it's "matchy-matchy" which our young friend seemed to like.

Try it!

Saturday, August 27, 2011

Look out Houston.....my son may be coming to your door!!!!

Some of you may know that Rooster Jr is serving in the Houston area as a missionary for the Church of Jesus Christ of Latter-day Saints.  I recently saw this video that was posted by my niece.  Watch out Houston.....it could be my son coming to your door!  I hope you dare to listen!

Friday, August 19, 2011

Visiting Teaching has gone high tech......

Wow, I'm not sure whether this is helpful or not.  However, it is interesting.  See what you think....

Too much Zucchini?


Bountiful harvest of.....Zucchini?  Tried to use it in several different dishes? Still have lots left over?


Get out your food processor (or a grater if you want to try the manual method).  For your food processor, cut into spears and begin grating.


The Food Processor makes quick work on everything!


Isn't it pretty?


I placed 2 cups worth in each quart-sized bag.  Then I labeled and dated each bag. Now they are ready for the Freezer!

Later this winter, when I want to bake something with Zucchini....it will be very easy!

Wednesday, August 17, 2011

It's Zucchini Time.....


May gardeners are experiencing an abundance of Zucchini and Squash now.   The old jokes about Zucchini (i.e...lock your car....or you might find someone has placed Zucchini inside) are floating around again.    I have several of each.  So, I thought I would try something new.


I cubed a Zucchini and a Squash.  I prepared a marinade and placed the vegetables in a bag.  I put it in the refrigerator for several hours.


I had also marinated some chicken breasts.  My husband put the chicken on to grill ahead of the vegetables.  Here, he is heating up the basket made for grilling foods that are small or in pieces. 


Here, the vegetables and the chicken are grilling.  I used Olive Oil in the marinade to help it grill.


Here is the final product.


And here is my dinner.  (Gosh, my preference for symmetry is very apparent here isn't it?)

What is the take-away?" Try grilling these delicious vegetables....they are quite good!

Tuesday, August 16, 2011

Keeping your Brown Sugar.....Moist!


I bought this recently. I have eyed them for a few years now, but just haven't taken the step to purchase one.  I have been using the heels of bread to keep the Brown Sugar moist in my container after I had opened the bag.  This one is made by http://www.brownsugardiscs.com/.  It's a cute little bear....so my grandchildren should like it!


The instructions state that you should "soak (the) disc in water for 15 minutes, then pat dry. Place your disc in with your brown sugar.  Your disc will keep your brown sugar soft for up to 3 months.  When your sugar begins to harden, re-soak and re-use disc". 


I filled a small container with water.


Then soaked the disc in water.


After drying it with a paper towel, I dropped it into my Brown Sugar container.


Here is the disc.  I have wondered if a broken piece of a pot could work after it had been cleaned.  However, since I now have this cute disc......I will use it.

It will be nice to having to change the heel of bread every once-in-a-while.  I am glad I finally took the plunge. Now I will have moist brown sugar......without bread crumbs!

Monday, August 15, 2011

Notice from Food Saver...


Courtesy of Jarden Consumer Solutions
A few weeks ago, Food Saver launched a Facebook campaign.  Supposedly, if they reached so many 'likes', they were going to post a code to receive a 75% of coupon on 4 select models of their Food Saver Machines.  Well, it was a rare day that I was working from home....so I decided to 'bite'.  The result was that they hit their benchmark without any problem.  However, their system online was so overloaded that they could not post the code until 4 hours after the supposed deadline to post it.  At the time, you could call and receive 50% of selected models or gamble that you would be lucky enough to get the code and put it in before they ran out of stock.  I decided to get myself a machine using the phone method as the online situation was really not time efficient for me.

Food Saver learned a lot that day.  But they seem to be up for it again.  Here is a notice that I received from them.  Check it out if you are in the market for a new machine...

We're offering you another progressive coupon deal this week on our FoodSaver® MealSaver™! Here are the total Likes we would like to achieve by Wednesday, August 17 at 2pmEST in order to offer you a great deal on one of these five-star rated products: http://on.fb.me/r2WPyH

30,000 Likes: 40 % Off ($41.99 +free shipping!)

40,000 Likes: 60 % Off ($27.99 +free shipping!)

50,000 Likes: 80 % Off ($14.00 +free shipping!)

http://on.fb.me/r2WPyH

Sunday, August 14, 2011

Baking...In My Grill.....Really!

Well, I have been fortunate enough to have double ovens in my home.  They are really great when you are trying to feed an army or two.  However, they have decided to die....and I feel like I have lost a dear friend. 

I have been a bit frustrated by this.  We do plan to replace them.....but I will be paying in cash and need a few more weeks to have the funds saved.  So, I decided to see this as an opportunity. 

A couple of years ago, I featured a post on emergency baking.  So, I decided to experiment on the word....that I had posted.

The Information is from the "Preparedness Pantry".    I re-read it and tried it.  I made a favorite Whole Wheat Bread recipe in my Breadmaker (yes....I am that 'lazy'). 


One of my big complaints is that when I bake any breads is that the bottom doesn't always want to willingly come out of the pan.  So, I now help myself by placing a liner of parchment paper at the bottom of the bread pan. Here, you can see that I traced the pan onto parchment paper. I cut the liners out with my scissors. 


As the paper curls from being on a roll, I sprayed the bottom of the pan with a vegetable oil spray.  It acted as a type of adhesive for the liner.  I then sprayed the sides of the pan as well.


Using my new tool (that I bought recently), I divided the dough into to two pieces.


I shaped the bread into two loaves and put them into my mini loaf pans.  I covered them with a towel and let the dough rise.


After the dough had risen, I preheated my grill to 350 degrees.


I placed the loaf pans inside another pan.  According to the instructions from Preparedness Pantry, the 2nd pan helps protect the bottom of the bread from burning.  I placed the loaves on the 2nd shelf away from the flames.  As you might imagine, when I opened the grill there was heat loss.  I adjusted the burners to bring the heat back to 350 degrees.  I turned down the burners when we achieved that level and watched for several minutes to try to ensure that the temperature was maintained.


After 30 minutes (the cooking time recommended for my recipe), I went to get the bread.  Here is an important lesson that I learned, the heat rose to over 400 degrees by then, so the loaves were a bit scorched on the outside.  I will check the temperature more often when I try this again. 


I took the bread out of the pans and placed them on the cooling racks. I sprayed the loaves with the vegetable oil spray and covered them with a towel to cool.   I retrieved the parchment paper from the bottoms of the loaves.  Here is what one looked like.


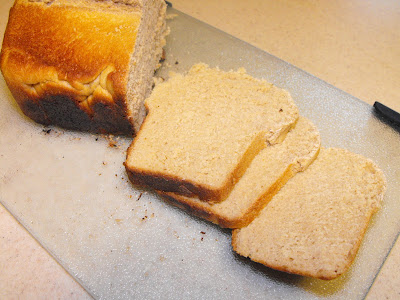
After the bread cooled, I sliced one of the loaves.  The bread was moist and cooked all the way through. I quickly took some photos because I wanted to try a slice.  The butter melted quickly and the taste....was fabulous.

I certainly would do this again.  It is not difficult, but I realize that I will need to do some baby-sitting with the temperature when I repeat this procedure.  The application of this procedure should not be lost on you:

  • This is a fun thing to do with your family...and certainly is not hard.
  • In an emergency, you could bake with your grill....and it would be delicious and comforting.
  • It is also something that you could do in the summer time if you don't want to heat up your kitchen.
  • Finally, you can use any recipe that requires baking in this manner. Can you see the possibilities?
Now, Try It!!!!  You Can Do It!!!!

Sunday, August 7, 2011

01 09 10