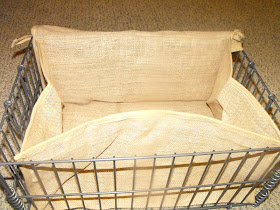
What do you think this might be? I was intrigued when I first came across this idea. It is a Root Vegetable Storage Bin (from www.Gardeners.com). Now, you may wonder why I find this idea a good one. I live in an area that is full of big rocks. I mean, when they dug out our basement when we built our home, the pile of rocks looked like somewhere that Fred and Wilma would be right at home. As such, I knew I couldn't have a traditional root cellar. So, when I saw this item, I was excited. I do have a dark, cool room in the basement that would be perfect for this 'mini-root-vegetable-cellar'. I ordered this item on-line.....and it arrived today!
This is what it looked like when I took the package out of the box.
Here is what came with the package. The wire basket, the burlap insert, coils, and the directions.
Cut the plastic strip holding the flat wire basket together.
Open the basket and lay it flat.
There are 8 metal coils.
Put two sides of the basket together and twist the coil around both edges.
Put 2 on each corner.
Here is the completed basket.
The instructions to say to insert the burlap liner and tie the back to the basket. I didn't like how the front corners were not secure.
So, I sewed some left over Gross-grain ribbon to the front two corners and tied them to the front part of the basket.
Here, the flap is laid over the top of the unit. I also placed the handles on the burlap so that you can see them.
The unit comes with suggested temperatures and humidity for various vegetables. For the most part, you can place the vegetables in the unit without adding soil. However, they suggest damp sawdust for carrots. I am going to try this for a while, and if it works, I may get several for the winter. This is a great solution for someone like me that cannot have a root cellar where they live. The price as of today is $34.95 without shipping.


Wouldn't a free milk crate with a $1.00 burlap sack from the feed store work just as well? That's what I use and they work wonderful for me.
ReplyDeleteThat seems pretty expensive to me for what you get. When I lived in Utah and had a garage that stayed cold but didn't freeze, I stored potatoes in a plastic garbage can. I lined it with wadded up newspapers, with more newspapers between layers of potatoes. Then I put a rolled up newspaper under the lid, to hold it ajar and let moisture escape. Carrots I put in a 5 gallon bucket with damp sand. Onions I put in pantyhose; I put in an onion, tied a knot, then another onion, tie another knot; hang the whole string of onions on a nail in the garage. Although I used my garage, a cool basement would work as well, just not keep the veggies as long. You could easily make a system similar to what you bought, using a square laundry basket and a few yards of burlap. I just moved to Texas and can't do things the same way, but I think I could get a few months out of veggies in a cool room. I had potatoes that kept until March just in a box in the pantry closet. I moved them with me from Utah in December.
ReplyDeleteVicki: I like the way you think. Thank you for those great ideas....I guess I get to try something new because of your great information.
ReplyDeleteLynda: I was trying to think of another way to do this as well, but in my space I needed to stack. I think I will consider this great option as well. It is much easier than having my husband try to build something similar.
ReplyDeleteBoth you and Vicki and really clever! Thank you!
How long do veggies last in a veggie bin? And what all kinds of veggies can you put in them? I know potatoes and onions, but anything else?
ReplyDeleteI put not only potatoes and onions, but sweet potatoes and garlic in this device. Because the device 'breathes', all of these have lasted months until I was ready to use them. Realize that I only put a few items in it at a time.
ReplyDeleteThank you for stopping by...