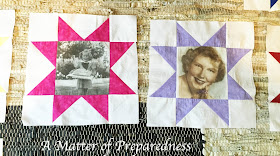
Isn't it cool? Just like the phrase in the old commercial...."I can't believe I ate the whole thing....", well I can truly say "I can't believe I made this thing!".
One of my family members had one of those "Landmark" Birthday's recently. I felt that I needed to make something special and memorable for her. About 10 years ago, I ventured out and made a memory quilt along with photo's for my In law's 50th Wedding anniversary. At that time, I had to trust my photo's to a little Mom and Pop shop and they transferred the pictures on to fabric. Fast Forward a few years and you now can do this yourself at home. Want to learn more? Let's do it!
How To Transfer Photo's onto Fabric at Home:
Before you begin, you will need to purchase 100% white cotton fabric, which needs to be pre-washed before you begin this process. I took over a bathroom in my house to do this. I set out a towel to protect my counter, got 2 containers that were not dear to me, and set out the supplies:
This is Bubble Jet Set 2000. I purchased mine from Amazon.
Soak the fabric squares in the solution.
Set up a place to hang your squares to dry. I was able to use yarn and rig this clothesline over a bathtub.
Once the squares are dry, press them flat, then press them onto Freezer Paper. Now, here is a quick trick that I learned. I used my paper cutter and cut several sheets of Freezer paper to an 8 x 11 inch size. I found that I could re-use each sheet of Freezer paper over and over.
Place your Cloth-Freezer Paper into your printer. I learned that I needed to slightly curl the edge of the Freezer paper (that was going into the printer) slightly upward so that the printer could grab it and feed it through.
If you don't do this, you get the mess on the right! It bunches up inside of your printer, or gets stuck. I have to say that I ruined too many pieces of fabric and freezer paper until I figured this out!
Next, you will need the Bubble Jet Rinse. FYI, here are the directions on the Bubble Jet set 2000 and they state the following:
"Print on treated Fabric and let sit 30 minutes. Take a flat pan or bowl with one gallon of cold water (add 4 caps of Bubble Jet Rinse/gallon). Wash printed fabric by hand for at least 2 minutes. Allow fabric to drip dry or lay flat on a towel"
See how colorful the printed fabric is?
After the squares were dry, I ironed them and made my quilting squares. Didn't they turn out wonderfully? "I can't believe I did the whole thing!".
Take Home Points:
- This can be easily done at home.
- It is very cost effective to do. When I took my photos to the Mom and Pop shop 10 years ago, it cost over $125.00 to do this. Also, 10 years ago, the printed fabric was only the size of the photo. With this system, I could re-size the photo and crop it to fit before printing on the fabric.
- Cut your Freezer Paper to an 8x11 size and reuse the sheets.
- I learned that cutting your fabric closer to the 8" width allowed you to cut the square to fit inside the quilt square in a way that looks the best.
- Sometimes photos that are in landscape are difficult to crop or resize. In that case, I left strips of 'white' above and below the photos after cutting it for my quilting square. It really looked fine in the finished product.
- It's just amazing!
- This project will hopefully bring joy to my family member for many years to come.


This "family member" is thrilled with the quilt. You did a marvelous job on it. Thanks for the directions. Maybe I'll get up enough nerve to try it some day.
ReplyDeleteSo glad for you! Printing photo's on fabric can be really fun and used in a variety of projects. Enjoy!
ReplyDelete