Wednesday, October 29, 2014

For Some of My Favorite Little Goblins.....


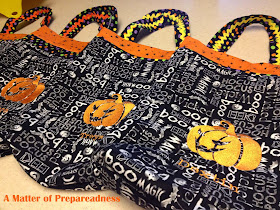
Trick-or-Treat Bags made with Machine Embroidery....Perfect for little Goblins this Halloween!


Look what I did.....last Saturday.....when I had this wild idea....and just a little time to execute it. 

I will be having a Halloween Party at my home tomorrow for a few little Goblins that I love to pieces.  These Goblins are local, and thus a last minute idea happens to work.

I created this pattern because other Trick or Treat bags that I have made were just as big if not bigger than the little Goblin who would try to carry it. So, I made these a bit smaller. They are not as wide, but they are super cute!


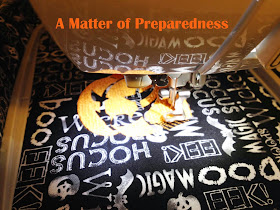
We have a little fabric store in my little town, so I decided to support it and bought some coordinating fabrics.  In the black, I cut 2 pieces 11" x 14".  I then downloaded this sweet Jack-o-Lantern design to program my Embroidery Machine. I loved that this design is....free!  I also embroidered the name of each little Goblin just under the Jack-o-Lantern.


I used some left over piping from another project and covered it with coordinating fabric.  Using my zipper foot, I stitched the new fabric closely to the piping.


For the little "Goblin-Princess", I made a ruffle.  The width of the ruffle is 3 inches and the length depends upon how tightly you want your ruffle to be.


See how great the Orange pumpkin stands out against the black. The downloaded pumpkin pattern turned out very well!


I made a 'cuff' from coordinating orange fabric that was ~5 inches x 11 inches.  Here you see that I am stacking several layers.  After sewing the sides of the bag (black fabric), I pinned the piping (or ruffle) and the cuff together and used a zipper foot to sew along side of the piping.


 The lining (same size as the black fabric) is also sewn along the same seam as the piping stack. I didn't sew all 4 layers together at once as the lining was slippery and I didn't want to unpick anything unless I had to.  Next, you can see that I pinned the seam together and sewed along the side and bottom. I serged all edges to finish them off.  In case you are asking why I finished the inside of the bag that way. Well.....let's just remember that it is a "Trick or Treat Bag"!  It is not a fashion bag!


Here is a bag with piping.  I made handles and sewed ric-rac on the handle for a sweet and funky look.


Here is a close-up of the ruffle embellishment.


I love how they turned out. However, the downside is my insanely busy schedule. I didn't think of doing this until a few days ago. That means that I didn't have enough time to make more for the other Goblins who live out-of-state. Sooooo, I will let the parents of these Goblins decide if they want me to make more for them next year.

I really need to plan ahead a bit, don't I?

Sunday, October 26, 2014

It's a Matter Of ....... A Little Halloween!


I have a few little goblins that will toddle through my house this year....and I love it!  I have always decorated and celebrated every holiday in my home.  I wanted my children to have fun and fond memories of our time together over the years.  

Now, I have another generation that I would 'spread the fun around' with.  So, I have plans for our party this year, and I would like to share some of the fun things that I will have at that family gathering.


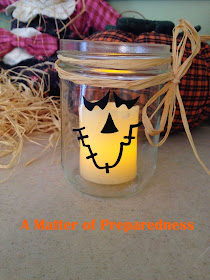
Halloween Jack-o-Lantern Jars....from Canning jars and Vinyl Cut-outs.  


Well, if you have been reading my blog for any time at all, you know that I can lots of different things. As such, I have jars...and jars...and jars in my storage room.  I decided to try a little project this year.


I cut out some fun faces using my Silhouette.  I put them on to transfer paper.  I then cut the individual faces apart.


I found a smooth side to my jar and rubbed the design/transfer paper on to the jar.


I initially had the plain jar and put in a flame-less candle.  You know the ones that are sold at Christmas time. They work just great for these, and little hands can be curious and not get burned if they try to touch them.


I decided to put on some raffia for fun!


Aren't they sweet?  I think all the little Goblins will love them when we 'party-hardy"....(well as much as you can with a 3-year old and younger party!).

Take Home Message:

  • I had all the materials to do this project.  I had the Vinyl from another project. The cost for me today was just my time.
  • The Canning Jars are from my storage...again I had these items on hand.
  • I used flame-less candles for safety.  I had used these candles in my Christmas decorating. They are perfect for this little project.

Simple, Easy, Cute, and Fun!  Who can ask for anything more?


Sunday, October 19, 2014

Super Little Singers.....At Home!


I have a number of sweet little Grandchildren....sprinkled all over the United States.  Yes, I really mean all over.  I kind of want to agree with my neighbor Vicki who says that "It should be against the law for Grandchildren to move far away from their Grandparents".  If only it could be like that....

Our little Grandchildren love music in many forms.  I love to hear their sweet voices when they talk and when they sing.  Being a Speech-Language Pathologist, little voices are very intriguing to me.

Family Home Evening, spending time together as a Family.

As a member of the Church of Jesus Christ of Latter-day Saints, we have a number of auxiliaries and programs that support the family. Today, I want to highlight "Family Home Evening".  This is an opportunity for the family to gather one night a week and spend time together in a variety of activities.  There may be nights with games or recreation, religious instruction, service to others, etc.  The purpose is to build strong families, understanding of our Father in Heaven and his Son Jesus Christ, and the Gospel.  It's a great idea isn't it...in fact it was inspired.  

As early as 1915, the Church of Jesus Christ encouraged families to set aside one evening a week to spend valuable time together.  In 1970, President Joseph Fielding Smith and the First Presidency designated Monday nights as Family Home Evening night and encouraged no other activities etc to be held that would interfere with this valued time with the family.  

Singing Songs and Hymns for Family Home Evening

One special aspect for me during our Family Home Evenings together is singing songs for fun and for worship.  As such, I have made binders for many of my adult children and their families.  I wanted to make it fun, so let me show you what I did and how I organized it.


Although these are not published by the Church of Jesus Christ of Latter-day Saints, I think the graphics are really fun for our Family Home Evening singing time.  You can purchase these in many areas, with Amazon being only one source.

I printed, cut and laminated the different graphics for various songs from the CD's.


Singing a Song is "Fun to Do"...


and, "Jesus wants me for a Sunbeam". There are many more that I have prepared in the same manner.

When you follow these links above, you will be directed to a screen like this one...


You can see the sheet music, can play the audio, learn about the composer and see this song in various languages.  However, what I was pleased to learn is that you can print the song as a "PDF". Look in the upper right hand corner of the screen and download the song.  I printed a copy of each song in color.

I put the graphics and the song into plastic sleeves.


I used a Sharpie to label each plastic sleeve and put them into a binder. Now, you have everything you need to add music to your home.....and your Family Home Evening.

Music adds such a positive element to our family. I hope you consider putting together a binder similar to this one to make your time together organized and fun!

Try it!

Sunday, October 5, 2014

A Fall-inspired Breakfast From My Food Storage


I am a member of the Church of Jesus Christ of Latter-day Saints.  As such, we have a world-wide series of meetings every 6 months called "General Conference".  Well, it is that time again and I love to hear what I consider inspired messages from our Prophet and Apostles.  Since it is world-wide, it is broadcast over television, radio, and the Internet.  We are watching in the comfort of our living room.

Every General Conference time, I publish a recipe that is made from Food Storage staples.  I think this is a perfect time to 'practice' and share the 'yumminess' with my family members.  Here is my current offering....pumpkin pancakes.  Doesn't the name alone conjure up delicious thoughts?

Making Pumpkin Pancakes from Food Storage items:


I have actually canned my own Pumpkin. Yes, I really did it.  It has been a great blessing over the past year and I have used it in so many of my recipes.  Today's recipe is no different.  I placed the golden chunks of canned pumpkin into a blender and made my puree. So quick and easy to do!


I got my bowls and spoons/cups out.  Did you know that they all come in one system and are stored inside of the green bowl?  I love this set!  


You start by adding the dry ingredients beginning with the flour.


...White Sugar


....add the Brown Sugar


.....don't forget the baking powder and cinnamon, pumpkin spice and the nutmeg!


Mix all the dry ingredients together.


In a separate bowl, begin to add your wet ingredients starting with an egg.


.....add the milk


...the Pumpkin puree


....and yummy Mexican Vanilla and Molasses


Mix the wet ingredients together.  Then add the wet and dry ingredients together.


Spray your favorite oil product onto a hot griddle.  Because these pancakes have a darker color already, they will be dark when they are finished cooking.  Just watch your heat and you will be fine.  At first, I thought I had burned them, but  that wasn't the case.


Don't they look yummy?  I used butter that I have stored in the freezer and syrup which I had in my pantry.  This is a surprisingly simple and delicious dish.  I plan to do this again. Why would you ask?


Because Rooster Senior said, "We should have these again".  That's good enough for me.

Take home message:

  • All the items were in my pantry, refrigerator, or freezer.  I did not have to purchase anything special for this.
  • Although I am not sure how I would calculate the cost of this meal, the most expensive ingredient would have been the pumpkin puree.  Well, last year I canned a large pumpkin that cost me $2.00 and another that was free.  I calculated that I canned an equivalent of the canned pumpkin (15 oz can) for $.28 versus the cost of a commercially priced can of over $3.00.  You can save money by preserving your own foods as well as know what had been added to the food.  
  • This is a filling and warm breakfast on a cool fall morning.
  • Time together with my family.....priceless!

Try it!


Here is the recipe from Averie Cooks:


1 cup + 2 tablespoons all-purpose flour
2 tablespoons granulated sugar
2 tablespoons light brown sugar, packed
2 teaspoons baking powder
2 teaspoons cinnamon
1 teaspoon baking soda
1 teaspoon pumpkin pie spice
1/2 teaspoon ground nutmeg
pinch salt, optional and to taste
1 large egg
3/4 cup Silk Unsweetened Vanilla Almond Milk (I used whole milk) 
3/4 cup pumpkin puree
2 tablespoons vegetable or canola oil
1 to 2 tablespoons molasses
2 teaspoons vanilla extract
maple syrup for serving, or your favorite topping (try Vanilla Maple Syrup or Ginger Molasses Maple Syrup)

DIRECTIONS:
In a large mixing bowl, whisk to combine the first 9 dry ingredients (through optional salt); set aside.
In a  small bowl, whisk to combine all remaining wet ingredients (except maple syrup for serving).
Pour wet mixture over dry, and stir gently until just combined; don't overmix.
Preheat a non-stick skillet over medium-high heat and spray with non-stick cooking spray.
Using a 1/4-cup measure or  large cookie scoop, scoop batter onto warm skillet. Cook for about 3 minutes, or until small bubbles form on the surface and pancakes are set enough to flip. I cook covered for better results, but cook the way you normally cook your pancakes.
Carefully flip over and cook for about 2 to 3 more minutes, or until done and cooked through.
Add more cooking spray to wiped skillet before starting next batch.