Sunday, August 24, 2014

It's a Matter of Space....Organizing DVD's


What a mess!  The sad part is that this is only a sample of the DVD's we were sorting through.  As it turns out, the DVD's and Videos (Yes we still have some) were taking up a great deal of space in one of our closets. It was getting to the point that we were having a difficult time trying to even see what movies we had.  So, my wonderful daughter took on the task. 


Here is another view of the mounds of cases. Just for perspective, these are the sweet feet of my three year old grandson.  He kept asking why we had towers of videos to knock over...and he did knock them over.


I had several 3-ring binders that were not being used.  I also had about 100 DVD Refill pages that each hold 8 CD's or DVD's.  We she separated the DVD's by category:  Church, Children's, Drama, Comedy, Documentary....and one of her final categories was.... "Old Geezer".  This is for my husband's shows and movies that....let's just say were from his childhood.  The one's that the Grandkids politely sit and watch with Grandpa because he asked them to.


In the 3-ring binder, you can see 8 different disks at a time.  


You can see that we used file folders (cut in half). I labeled them with my trusty labeler.  


Look at this!  These 2 trash bags are full of DVD cases and all the disks fit conveniently into thee 2 binders.  


Soooo, the next time someone wants to watch a movie, they don't have to wade through shelf after shelf to see what we have. They can conveniently flip a page.  Just for your information, these DVD's took up several shelves in  the closet. When I went to put these binders in the closet, they took about 8" of shelf space.  

Now we are deciding what we can do with all those DVD cases!  We have found some good ideas already.

Take Home Message:  
  • The DVD's and Blue-Ray's come in protective cases.  However, these cases take up a lot of valuable space.
  • Placing the disks into sleeves also protects them and takes up a fraction of the space.
  • You can easily see what you have rather than scavenging through shelf after shelf looking for the movie you wish to watch.
  • When you go traveling, these sleeves will take very little space in your vehicle or bag.
  • For me, this was all free because I already had the supplies already. However, if you wish to do this, I guesstimate that purchasing the supplies may be similar to the purchase price of your next movie!

Sunday, August 17, 2014

Making Ravioli from Food Storage Staples.....


I got a bit adventurous today.  I actually (all by myself), made.....Ravioli!


Last fall, I bought this Ravioli Form when I went shopping in an Amish Community.  I have looked at this device over and over again, but today just decided to get it out and try it.  


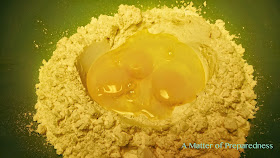
I made the dough from scratch.  The directions were to place 3 cups of flour either on a board or in a bowl.  I decided to play it safe and put it in a bowl.  I made a well in the middle of the flour to accept the eggs.


Next, I placed 3 eggs (at room temperature) in the well.


I slowly began to incorporate the flour and the egg mixture together.


The mixture gets to the point that you have to begin to use your hands to knead the flour in.  The recipe calls for up to 1/2 Cup of water if needed.


I put most of the water in and made this lovely ball of dough.  Let the dough rest in a covered bowl for 30 minutes.  If you push your finger into the dough, it should return relatively quickly after the 30 minute time period.  


Slice the dough ball.


Begin using your pasta roller.  Start at the widest setting and gradually reduce it down with each pass of the dough.  Notice how I am catching the dough with the back of my hand. This helps prevent tearing.  If you grasp it with fingers, there is a higher probability that the dough will get rips or tears.


Flour the metal part of the form very generously.


Although this sheet isn't 'lovely', it is functional.  Cover the metal part of the form.


Take the plastic part of the form and gently press indentions into the dough.  Remove the plastic tray.


Because there is a certain 3-year-old that will not eat meat at the moment, I decided to add Mozzarella Cheese.  I decided to make it easy on me and cut string cheese sticks into small disks. 


I put 2 small disks and a little spaghetti sauce into each indention.


Next I put a second sheet of pasta on the tip.


Use a Rolling Pin and roll in many directions across the top of the form.  You can see the 'zig-zag' of the metal form emerge as you use the rolling pin.


Again, not lovely but functional. Turn the form over. If you floured the metal form well, the Ravioli's should fall out.  You may have to coax a few though.


Put the fresh Ravioli pouches into boiling water.  When they float, they are finished.


Add the sauce, garnish with Parmesan Cheese ( I grated it myself!), and add a sprig of Parsley if you like (it was straight out of my herb garden!).  

What was the verdict?  Everyone from the 3-year-old to the Silver Fox liked it. The Silver Fox said he couldn't taste the meat.....I had to inform him that there wasn't any this time.  I will try different fillings in the future.

Take Home Message:

  • This device costs less than going out to dinner to a sit-down restaurant.  It is called a Grandpa Dante's Ravioli Form.  This one costs just under $15.00.
  • I literally made this entire dish out of food storage (with the exception being the Mozzarella Cheese.  However, I often have this type of cheese in my freezer, so it could have been totally made from food storage staples).
  • I need to practice this again. I know I can get faster each time I do this.
  • I can put in a variety of fillings.  If you have meat left over from a meal, dice it into small pieces and combine it with cheese or sauce.  That way, one meal help make a second meal.
  • It gives my family a variety.  I can make pasta noodles, but the Ravioli is a nice change.
  • It costs very little to make this pasta.  

Try it !


Friday, August 15, 2014

Using Jello to make Play Dough at home....for about 1/3rd the cost of the Brand name!


No, that is not the "Great Brain"...it's Play Dough that my little Grandson is playing with.  He is busy making monsters, cutting sea horses, and trying to keep his dog away because she likes to eat it!

Why did I make this Play Dough?  Because, a lesson that I taught to the 7-year-olds last Sunday called for some.  Soooo, I thought I would again use my Food Storage Staples and voila!  It turned out really great!


Start with 1 Cup of flour.


Add 1/2 Cup of Salt.


Add 2 Tablespoons of Oil and Cream of Tarter. Then add 1 Cup of Water.


Add a 3 ounce package of Jello. I decided to try Watermelon today....it smelled so good!


Heat over Medium Heat.


Until it begins to come together and pull away from the sides of the pan.


The instructions recommend you kneed the dough.  I decided to put it into a bag and kneed it in this way. I didn't want a 'mess' on my counter.


Let it cool...then make fun things!

Jello Play Dough comes from this recipe. 

What is the Take Home Message?
Cost:

  • Flour:  $.72
  • Salt:  $.84
  • Cream of Tarter: $1.44
  • Vegetable Oil: $0.7
  • Water:  Free!
  • Jello:  $1.45
Total cost is  $4.52 for  one pound of Play Dough!  On Amazon.com, it traditionally retails for $10.00 to $16.00 for one pound of Play Doh.  This home made version costs just under 30% of the national brand. It took minutes to make and uses staples from your Food Storage.

Try It!


Sunday, August 3, 2014

It's a Matter of Teriyaki Sauce....


It's summer grilling time.....  Don't you just love the casual aspect of grilling?  I sure do.  Here, you see that we had Teriyaki Shrimp on skewers.  They were delicious and were quickly gone.

Teriyaki sauce is nothing new, but I learned that I could easily make it and can it from Food Storage Staples.  I decided to 'experiment on the word' from the SB Canning Store.  I was amazed at how simple and delicious this recipe really is.


You will need 2 cups of Soy Sauce


Add 2 cups of light Brown Sugar.  Add 1 cup of white vinegar.   


Add 4 T of fresh ginger. (As I used ground ginger, I added half of this amount). Also add 2 Tablespoons of bottled lemon or lime juice.  Bring this mixture to a boil over medium-high heat.  Then lower the heat and allow the mixture to simmer for 20 minutes.


In the last 2 minutes, remove 2 Tablespoons of the mixture and add Clear Jell until it is well incorporated.


Add the Clear Jel to the boiling mixture.  Increase the heat to medium and whisk until the mixture gets thick.  Remove from the heat.


Sterilize your jars and lids.  Place a funnel in the jar to accept the Teriyaki  Sauce.


Place the jars in a hot water bath ensuring that the jars are immersed by at least 2 inches of water.  Process for 15 minutes, then turn off the heat.  Allow the jars to sit in the hot water bath for several more minutes.  Remove the jars and place on a dishtowel. Allow the jars to cool overnight. Do not touch or more them until the morning (~12 hours after processing).

So, how did it taste?


Delicious!

How much does it cost?

  • 2 Cups Soy Sauce:  $2.14
  • 2 Cups Brown Sugar:  $.99
  • 1 Cup White Vinegar: $.14
  • 2 Tablespoons of Ground Ginger:  $.32
  • 2 Tablespoons of bottled Lemon Juice:  $.12
  • 2 Tablespoons of Clear Jel:  $.62
(This recipe yields 2 jars of Teriyaki Sauce-1 Cup/jar)

Total cost for  pint (1 cup) jars of Teriyaki Sauce:   $2.17/jar

An equivalent of Kikkoman Teriyaki Marinade and Sauce (10 ounces which is the equivalent of 1.25 Cups) costs $6.49.

This means this home version costs one third of the cost of a commercially sold equivalent.

Consider it!


Teriyaki Sauce


2 cups soy sauce (There is a gluten free version that doesn't have wheat)
2 cups light brown sugar
1 cup white vinegar
4 T. fresh ginger, chopped finely or grated 
2 T. bottled lemon or lime juice
2 T. Clear Jel  


Preparation : Prepare 4 half pint lids, and rings. Sterilize the jars and keep them in the hot water till it’s time for processing. Make sure to fill your water bath canner and get the water to a simmer.

Cooking: In a stainless steel or enameled dutch oven combine soy, brown sugar,
teriyaki sauce made with Clear jel
lemon/lime juice, ginger, and vinegar. Bring to a boil over medium-high heat, then lower the heat to a simmer for 20 minutes. In the last two minutes remove 2 tablespoons of the mixture and the Clear jel and mix till it’s incorporated. Bring up the heat to medium and add to pot and whisk till the mixture gets thick. Remove from heat.  

Filling the jars:  Using your funnel in each jar ladle the mixture into the jars leaving 1/4" headspace. Taking a clean papertowel wet it with warm water and wipe the rims of the jars removing any food particles that would interfere with a good seal. Using your magic wand extract the lids from the hot water and place them on the now cleaned rims. Add your rings to the tops of each of the jars and turn to seal just "finger tight".

Processing: Place the jars in the water bath making sure that the water covers each of the jars by 1 to 2 inches. Add hot water to the canner if it doesn't measure up. Cover the pot and turn up the heat under the canner and wait for the water to start boiling. Once the water has come to a boil start your timer for 15 minutes. When complete turn off the heat and remove the cover and let the jars sit for another few minutes. Remove the jars and place them back on the dishtowel in a place that they will sit overnight to cool. Do not touch or move them till the next morning.


Sealing: Sometime in the next hour your jars will be making a "pinging" or "popping" noise. That is the glass cooling and the reaction of the lids being sucked into the jar for proper sealing. Some recipes may take overnight to seal. Check your lids and reprocess any jars that did not seal.

Labeling: Make sure to label your jars after they have cooled with the name of the recipe and the date canned. If you want to use the shrink labels in the picture you can order them Here!