Sunday, June 29, 2014

Beef Jerky...from your Food Storage


I love using my Dehydrator....year round.  This is one of the things I love to do, and they do no stay around long....I'm really not kidding about that!

My son loves Beef Jerky....I mean loves it.  He has asked me to pick some up at the big box store when we have been out....but has been very surprised at how little you get for the price.

I went to my local grocer and chose a Beef Roast that was on sale.  I asked the Butcher to cut it into slices, which they quickly did. The best part of this process is that there was no fee for the slicing.  Some of the big box stores do not have a Butcher on site, so if you want someone else to slice it, go to a neighborhood grocer.  It is important that you choose a roast with little fat in it. This is important because the fat can become rancid when you are making or storing your jerky.


I use the the "Food Saver Quick Marinading Canister" to which I add the beef slices and the marinade. I only let it marinade for about 2 hours in the refrigerator and it was ready to go. (Let's just say, I had errands to run, so it just marinaded away while I was gone!)

Now, lets talk about the marinade....you do not have to purchase a commercial marinade!  I have used a variety of recipes over the years to make Jerky.  Did you know that you do not have to use "Liquid Smoke" in your recipe?  You certainly can, but it is not necessary. You can use a variety of marinades to flavor your jerky?

I used this one:


2 pounds flank steak sliced thin
1/2 cup soy sauce
1/4 cup honey
6 cloves garlic minced
1 tablespoon ginger grated, heaping
1 1/2 tablespoon red pepper flakes
OR
30 grinds black pepper freshly ground
1 teaspoon sesame oil
1 teaspoon Worcestershire sauce
1 teaspoon onion powder
1/2 teaspoon liquid smoke flavoring

directions
Partially freeze steak to assist in slicing. Remove all extraneous fat, slice thinly (1/4 inch). Combine remaining ingredients, mix well, and marinate meat overnight. 

(Dehydrate according to the instructions of your device).


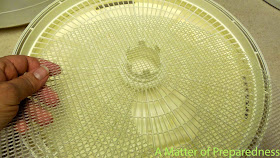
I used the Mesh screen inserts in my Dehydrator.  I like them for several reasons:  they make removal easy-just peel the screen from the jerky and they allow air to circulate around the food. The Mesh inserts and the trays clean up easily in the dishwasher.  I love that!


I placed the slices on the mesh inserts on your trays.


Here is one of the trays with the slices spaced with room around them. This is important so that the slices dehydrate more evenly.


Here in my desert climate, it takes about 4+ hours until the deliciousness is done! I would love to show you the final results.

BeefJerky

easel.ly

Take Home Message:

  • This is very simple to make.
  • I made just under 2 lb. of Jerky for under $8.00.  Commercially prepared Beef Jerky costs about $.90/ounce.  I calculate that this Jerky cost $.25/ounce. This costs varies up to about $.50/ounce depending on the roast I purchase.
  • You can make any flavor you choose, which gives you tremendous variety.
  • If I had the chance to store any (not likely around here), I would have sealed it either in jars or bags with my Food Saver.
  • I have purchased Roasts, had them sliced and frozen them in our Freezer. You can also leave the Roasts slightly frozen and slice them yourself. 
  • Items like this show just how convenient and delicious your Food Storage really can be!

Try it and let us know what you think!


Postscript:  You need to check your Dehydrator settings to determine the temperature and length of time it takes for your Jerky to be completely dehydrated.  In my case, my family likes it to be a bit pliable and not rock hard. As you can see, when I make Jerky, it does not last long enough for long-term storage.  However, if the intent was long-term storage, I would dehydrate it until it was essentially brittle.  

Sunday, June 22, 2014

Yummy, Delicious Focaccia Bread....from your Pantry!


I love to use my Food Storage Staples for a Sunday meal.  With the exception of the Fruit Salad, the rest truly did come from....my Pantry and my Freezer.  For this post, I would like to focus on making Focaccia Bread.  


I love making this, because the hard work is done in my Bread Maker.  I mixed up the Little Caesar's Pizza Dough recipe in my Bread Maker on Saturday night. I put the dough into a Ziploc bag and placed it in the refrigerator overnight.


The dough is very bubbly and light.  I lined a large cookie sheet with Parchment Paper.  


Next, brush a layer of Olive Oil on the Parchment Paper.  This keeps the bread from sticking to the paper.


Essentially, you dump the dough out of the bag on to the oiled parchment paper. With your fingers, stretch the dough out evenly. This amount of dough covers about 7/8 of the sheet.  Set her timer for 5 minutes to allow the dough to rest once you have stretched it in the pan.


Press your fingertips randomly into the dough.


Drizzle more Olive Oil on top of the dough and brush it all over the top.


Although this does not look beautiful, it is actually Italian Seasoning sprinkled all over the top of the dough.


Then, sprinkle Kosher Salt over the top as well.


Lastly, I shredded Parmesan Cheese over the top of the dough.  You can you the shredded type in the jar as well.  I just love the taste of freshly grated Parmesan Cheese.


Bake the bread in a pre-heated oven at 350 degrees.  Bake from between 15-20 minutes until it is done.


Remove the bread from the oven and allow it to cool.  Once it is cooled, slice it into generous squares.


For our meal today, I sliced the bread squares in half.


Today, I made Shredded Beef in my Crock pot. I placed some between the pieces of Fococcia Bread.....it looked great!


And with that, dinner was served.

What is the take-home message?

  • Food Storage staples do not need to be .....boring!!!!
  • I had all the ingredients for the Focaccia Bread in my Pantry of in my Freezer (yeast).
  • I made the process easy on myself by using the Bread machine.
  • You can make this bread for sandwiches or as a bread for any meal.
  • Cost comparison:  The flour cost just under a quarter, yeast is $1.28, Sugar is $.12, Honey is $.07, Olive Oil is $.23, Salt $.11 for the basic bread. Total cost is $1.81.  I had Cut enough squares for 15 Sandwiches which works out to $.12 per sandwich for the bread only.
  • You can use white flour or have white and half wheat which allows you to use your whole grains.
  • This is just for fun. I hosted a shower with a "Princess theme".  Look at how fun this was!  I cut the bread into Castle shapes!
     
Using your Food Storage Staples is convenient. I say this all the time, but I think it bears repeating. 

I encourage you to try it soon!  Let us know how it worked for you!


Friday, June 20, 2014

Would you know what to do?


It is second nature to go to the sink and get a glass of water.  It is just as easy to turn on the faucet to brush your teeth or get water to prepare a meal.  We do it without even thinking about it.  But, what if your water supply had been compromised?  Would you know what to do?  How would you keep your family from habitually going to the tap to get water? Here is what my brilliant Niece shared with her neighbors recently. She is exactly in this situation....right now. Out of her concern for her neighbors and friends, she shared the following information to help them.  

For those in the Greenville/Edwardsville area, a little more info on the water situation, and some tips on how to deal with it. Some routine samples were taken on Monday, and results on those samples came back Wednesday as positive for E Coli. They are taking more samples and waiting for the results on those. They are also looking for a source of the contamination. Officials are anticipating 6 days of being on boil order.
All water for drinking, cooking, and washing dishes with should be brought to a rolling boil for 1 full minute. You're dishwasher will sanitize dishes on it's own (it heats the water hot enough to sanitize), but all hand washed dishes should be washed with boiled water. It's safe to bathe in (don't get it in your mouth) and wash your clothes in. Make sure to use clean/boiled water to brush your teeth with.
In our house, we are putting signs on all the faucets saying not to use them. I'm having the kids bring their toothbrushes down to the kitchen so that it's different enough that they won't accidentally use the sink out of habit (lesson learned from last time). If a toothbrush does make it under the tap, just put it in boiling water for one minute to sanitize it again. Hand washing should be done with boiled water as well. It also doesn't hurt to have some hand sanitizer hanging around for use before eating and drinking, because sometimes contamination can make it through you're precautions;)
After the ban is lifted:
1. Flush your hot water tank twice
2. Run treated water through all your faucets for 15 minutes
3. Throw out the ice from your ice maker and sanitize the bin
4. Run a couple gallons of treated water through your refrigerator after you replace the water filter
5. Bleach the aerators in all your faucets
6. Scrub down all your sinks and bathtubs with a germ killing bath cleaner
She also shared this additional comment with me:

 I've got to go check on my elderly neighbor. She didn't have much water last night and we thought this was going to be short term.. I learned from you and mom to help myself, and then help those around me:)

Take Home Message:

  • Would you know what to do in this situation?  Would you know how to find out if the water in your area was compromised. For that matter, do you know how to find out about any possible emergency in your town or neighborhood?   Many cities have a website with wonderful information. Check out the resources in your area today so that you are not wasting valuable time if and when a compromised situation arises.  
  • Do you have the necessary supplies on hand? Not only do you need to boil water in this situation, but you need other things as well.  You should have water filters, bleach, containers to boil in, stored water, and fuel just in case you are without power as well.  
  • Knowing that your water is compromised, if you had to dispose of waste.....what would you plan be?  What are the requirements/codes in your are to deal with waste?  Are you allowed to bury it?  Do you know which of your plants you can safely put liquid waste on?  As a general rule, you should never put human waste on plants/trees that provide food for consumption. It is often fine for ornamental plants.
  • How would you keep your family members from habitually going to the faucet and getting a drink or brushing your teeth?  How would you alert little ones that cannot read?
  • What about your neighbors?  Do you have any neighbors or extended family members who may need your assistance during times like these? Do you have a plan in place for them?

Food for thought, don't you think?  


Sunday, June 15, 2014

Earthly Father, Heavenly Father

Today is Father's Day, and I hope you take a moment to express your love and gratitude to all the Father's in your life.  Happy Father's Day to my own Father, my Husband, Son's and Son-in-Law's, my Grandfathers, my Uncles, and my Brother-in-laws.  We are grateful for the positive contributions you make to our family.  And for us all, I am hopeful that you will join me in expressing love and appreciation to our Blessed Father-in-Heaven.


Saturday, June 14, 2014

"One Of These Things Is Not Like The Other...."


Remember that little song from Sesame Street..."One of these things is not like the other".  Well I want you to look at the picture above and figure out which is not like the others.  Is it the shape?  Is it the type of glass?  Have you figured it out yet?  

I love Apothecary jars, but I have shied away from purchasing them because I hate to pay the hefty price. I have found them starting from $25.00 to over $40.00 each.  I just couldn't make it myself pay those prices. I did, however, find one of these at Ross yesterday for $10.00. That didn't hurt as much....so I paid the price.  

But, I didn't want to pay it over 3 or 4 times.  I found this suggestion on-line. I love brilliant people like this and decided to give it a try.  The suggestion was related to making Apothecary jars from.....(are you ready for this?).....materials from the Dollar Store!  So, I went, I shopped and I brought things home to use!


I purchased all of these things (except the Loctite glass glue) from the Dollar Store.  I purchased 2 candlesticks, one goblet, a vase, a glass, and a package of 3 glass bowls (next to the glue).


Because these are glass, I wanted to ensure that all the glue residue from the price tags was removed.  I used "Goof Off" to complete this task.


I pulled off the paper portion of the tag. I took a paper-towel sheet and poured some of the "Goof Off" liquid on it.  


I stopped a little over half-way through to show you how effective this liquid it. It completely removed all traces of the residue.


I inverted the vase and the glass.  I put the "Loctite Glass Glue" on the bottom and placed the inverted candle-holders into the glue.  You have to leave these alone for a long time to make sure that the glue adheres.  


Here is another view.


To make the lids, invert the bowls.  The instructions above suggest that you purchase glass doorknobs.  I looked at them, and they were very pretty in the store. But, they cost between $5.00 - $10.00 to purchase, and again I didn't wish to spend that type of money on these utilitarian containers. Instead, I took clear glass pebbles purchased from the Dollar Store (that you would use in a vase to hold flowers) and glued 2 on top of each other for the 'knob'.


For this 'jar', I used a goblet and placed the inverted bowl on top.  I love this one!


So there you have it.  One Apothecary jar that I purchased for $10.00 and 3 that I made for under $10.00.  

So what do you think?


Tuesday, June 10, 2014

Renewable Resource?


In my last post, I talked about Batteries and storage.  Having Batteries is one thing, but getting to recharge them is another.  Can you recharge disposable batteries...Yes!


I saw this advertised on a television network late one night when I couldn't sleep.  I decided to give it a try as it said it will recharge traditional batteries. "Hmmm" I thought, that would be wonderful if I could recharge traditional batteries.  I purchased it.  It is called the "Renu-it pro series (Professional Grade Disposable Battery Regenerator).  Although I didn't purchase this device from Amazon, it can be purchased there.  It costs about $30.00.


I like the read-out.  It lets you know if your batteries are 'bad' (meaning that they will not recharge) or if your batteries are charged.  


I like the indicator lights. I like that you can charge different sizes of batteries at the same time. Additionally, you can stack the batteries on top of each other (like AA or AAA) to charge them.  You can see the red lights on the indicator. If they are solid, they are not chargeable.  If they are flashing, the batteries is or can be charged.  Notice also that you can charge NiCD, Alkaline and NiMH batteries.  


I also have rechargeable batteries as well.  Although the still picture cannot show it, the display has a 'wave-like' motion to show that it is charging.

Things to Consider:

  • You should always inspect the batteries, particularly the Alkaline batteries for leaking.  This should be done before and after charging.  Place the batteries on tissue or paper for about an hour after charging to check for leaking. Any battery that is leaking should be disposed of.
  • I have found that the recharged 'disposable' batteries do not hold a charge as long as fresh batteries do, so keep that in mind.
  • One reviewer on Amazon suggested that you should charge your batteries when you have about 1/3 of a charge left.  You will need a meter to do this.  In his experience, you have a higher chance of charging the battery.
  • If the device you put the batteries in is fairly costly, consider using fresh batteries to avoid the chance of leaking.
  • You will save money by recharging your batteries!  This is a big deal!
You need more than Batteries in your emergency supplies. Consider getting a meter and a recharger to make the most of your battery investment.

Consider it!

Sunday, June 8, 2014

Power to the People!


One of the basic needs we all have is power.  Lets face it, we live on our devices, expect that things will light up and work, and also entertain us.  The biggest nightmare I used to have on Christmas Eve was that I forgot to get batteries for the next morning!  

I try to keep a supply of batteries on hand for everything.  I also keep a supply in case of a loss of power or when we are camping, hiking, or just out and away from the house.  My children have found my little stash and I am stocking it more than using them at this point.  I am still trying to find a solution to this little challenge, but it is not a big issue.  I am glad they come home to visit. If that means loosing a battery here or there, then I certainly come out with a win when I get to spend time with them.

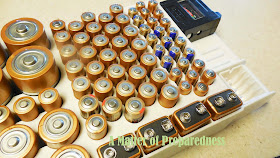
I found this Range Kleen WKT4162 82-Battery organizer with Removable Tester on Amazon. It costs just about $10.00.  (FYI, I have not received any remuneration for mentioning this product).  It holds 25 AAA Batteries, 39 AA batteries, 4 9-Volt batteries, 8 C batteries, 6 D batteries, and room for a 5-Button cell batteries (in a top swivel drawer).  That's a lot of power and a lot of options.


It comes with a battery tester.  I love this thing!  It can either be attached or removed for use.  It can check all the batteries that are stored in the tray! Watch this!


As you can see the arm moves so that you can maneuver it to meet your positive pole.  These are AA Batteries.


I had to hold the D-Cell battery in place for the photo.... (now you all know that I am double jointed in my thumb).


The 9-volt took me a minute to figure out how to use the meter.  You have to hold it by the poles, not from the top-bottom as you have seen above.


Here is a bird-eye view.  It holds a lot of batteries.  It even comes with mounting screws if you wanted to mount it to the wall.


Storage:

I traditionally purchase my batteries from the shopping club.  If you notice, they are sold at room temperature.  When I was growing up, I had several family members store their batteries in the refrigerator and state that it increases their shelf life.  In researching different manufacturers of batteries, the prevailing suggestion is to store them at room temperature.  Well, what is room temperature?  Different folks prefer their homes cooler while some prefer their homes to be warmer.  I choose to keep my in garage refrigerator. They are out of the way, and I don't run the risk that someone will spill something on them in the Garage refrigerator.  (That refrigerator is for extra produce, Rooster Seniors Sodas, and other stored items. No left-overs in there!).  

I checked the life of the Batteries (how long they hold a charge) of the Duracell Coppertop Batteries that I purchased.  I think this is just as important as having them available. Here are the particulars:

  • D-Cell:  10 years
  • C-Cell:  10 years
  • 9-Volt:  5 years
  • AA-Cell:  10 years
  • AAA-Cell:  10 years


So, check you supply.  Do you have enough for emergencies.....let alone Christmas morning!

Check out your supply today!