Wednesday, June 30, 2010

The Founding Fathers.........


(Image coutesy of www.absoluteastronomy.com)

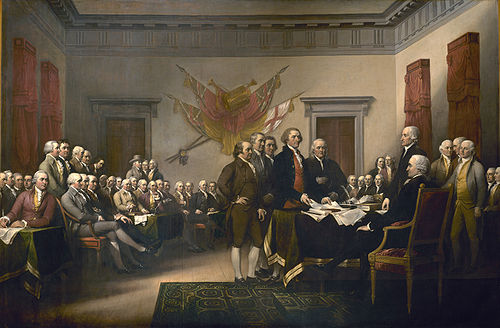
In honor of the Independence day (July 4th), which is coming, I wanted to share information about the founders of our country etc.  Take the time this week to read the US Constitution and the Declaration of Independence.  The courageous individuals who drafted these documents risked their all, and did not hide behind the cloak of political correctness.  Rather, they stood on the firm assumption that they were about their Father's work in establishing this great nation.

Let's focus on the Founding Fathers.  My thanks to Kim O for sharing her information from the research she did to prepare for her Sacrament Meeting Talk this last Sunday.

President Wilford Woodruff declared that “those men who laid the foundation of this American government were the best spirits the God of heaven could find on the face of the earth. They were choice spirits … [and] were inspired of the Lord” (in Conference Report, Apr. 1898, p. 89).

Ezra Taft Benson related this story: “Shortly after President Spencer W. Kimball became President of the Church, he assigned me to go into the vault of the St. George Temple and check the early records. As I did so, I realized the fulfillment of a dream I had had ever since learning of the visit of the Founding Fathers to the St. George Temple. I saw with my own eyes the record of the work which was done for the Founding Fathers of this great nation, beginning with George Washington. Think of it: the Founding Fathers of this nation, those great men, appeared within those sacred walls and had their vicarious work done for them.”


President Wilford Woodruff spoke of it in these words: “Before I left St. George, the spirits of the dead gathered around me, wanting to know why we did not redeem them. Said they, ‘You have had the use of the Endowment House for a number of years, and yet nothing has ever been done for us. We laid the foundation of the government you now enjoy, and we never apostatized from it, but we remained true to it and were faithful to God’ ” (The Discourses of Wilford Woodruff, sel. G. Homer Durham, Salt Lake City: Bookcraft, 1946, p. 160).

Let's teach our families about the tremendous individuals who efforts have shaped the land and life we are blessed to lead.

Tuesday, June 29, 2010

Start your July 4th Weekend off right! Ron Mann discusses God's Hand in the founding of our Country.


The Highland 15th Ward Elder's Quorum is sponsoring a Fireside with guest Speaker Ronald Mann.  This event is open to any who wish to attend.  (5222 West Country Club Drive, Highland UT)

Ron Mann, an assistant to President Reagan and Deputy Director of the Bicentennial of the US Constitution will share stories from our nations founding that you haven't heard. He will also discuss what happens to people when they go to Washington, He was responsible for helping to appoint over 1,100 senior officials while serving Reagan. Find out how many of the thoroughly vetted officials stayed true. 

Sunday, June 27, 2010

The Good Stuff......


(Image courtesy of www.odsces.org)

At this exact moment, I am listening to my Grandson share the talk he gave in Primary today.  He is 8 years old and is sharing how he came to know that the Book of Mormon was true.  His mother sent a copy of his talk for us to refer to as he shared his talk over the phone.  Grandparenting is essentially gleaning the good stuff from the grandchildren after so many years of loving and teaching their parents.  Yea for being a Grandparent!  Yea for wonderful grandchildren!  Yea for tremendous adult children!

Until We Meet Again

As this July 4th Holiday rolls around, many will celebrate the freedoms we so greatly enjoy. We have them because so many others selflessly gave their all in the pursuit of these precious liberties. In such times, the question is often asked, 'Will we live again'. See the touching words of President Monson on this issue. Also, grab a tissue...you may need one.


Saturday, June 26, 2010

It's a matter of.....Solar Cooking


It's like Christmas....in June?  Actually, I received a gift for Christmas...that I finally tried out today.  I have wanted to use it for some time, but either weather, schedule, or just forgetfulness got in the way.  Just as an introduction, I tried to use this type of cooking at Girls Camp with a pattern I found that was designed by BYU for refugees to cook with.  So, I made one.....and dragged the solar cooking device all around the campsite as the feathery clouds were interfering with ....melting the dipping chocolate for our Chocolate-covered Strawberries!


What is this?  It is my Tulsi Hybrid Solar Oven.  Yes, Hybrid.....see the power cord?  It can be plugged into a power source on "low", and "high" if you need the extra 'boost' as in the case of the feathery clouds.  My biggest concern was assuring that the Solar Cooking kept food hot enough to be safe, and not let the temperature fall below that safety zone.  This Oven can be powered by a car battery, solar panel, inverter, or just a good old outlet.  It comes looking like a suitcase with all the following things inside:

 
It comes with 4 dishes with lids that are black on top and bottom on the outside.  It also comes with a temperature gauge, and a hot pad.  In the initial picture of the unit, you can see the side panels that can be used if you want to concentrate more sunlight into the unit.


Here you can see the glass lid that lifts allowing you to place your food inside. 


I made some whole wheat dough to try cooking the bread in the device.  Note to self for next time....only put half as much dough in the pan.  You will see why later.  By the way, these are mini loaf pans.


Place your unit in direct sunlight.  I lifted the lid and placed the loaves of bread inside.


I forgot to put the temperature gauge in (it was just a few minutes)  See that the temperature is less than 100 degrees.


After 15 minutes, the temperature gauge had risen to 250 degrees Fahrenheit.


Remember that "lesson" I needed to recall?  The bread rose so high that it flattened out on the glass above it.  It still cooked, but has a funny shaped to the top.  The device states that with solar power alone, it takes 2 hours to cook the bread.


I then wanted to see how it did with a different food.  If you recalled a few weeks ago, the focus was soups and chili's.  I took one of the pints of Chili I canned and placed it into one of the smaller pans.


Into the oven it went.  I am sure it wasn't great that I opened the oven to place the chili in....but the world didn't end when I did it.  While the bread was cooking I could smell it inside my house as the window was open....it was great!


At the end of the second hour, condensation was forming on the glass lid, indicating that the food was done.  Here is the chili, it was steaming hot.


I tried to capture the temperature of the Chili, but I should have done it the moment I opened the container.  It registered just under 140 degrees after a few minutes.  You can also see the loaves of bread.  They are not 'hard' like bread sometimes is when it comes out of the oven.  It is moist and soft.


So, here is my lunch....and it was really good. 


Advertised benefits:

 The literature that comes with the unit states that is has the following benefits: 

  • There are no moving parts,
  • Saves energy and time,
  • Can be used night or day (hybrid function),
  • It is eco-friendly with no igniting fluids or flames,
  • It cooks 4-5 dishes at a time. 
  • Food doesn't burn, char, or boil over.
  • Sets up in seconds and can by used by anyone, including children or handicapped individuals
  • You use little or no oil or water to cook foods.
  • Foods are more moist as water does not evaporate away.
  • Cooks up to 4 lbs of food at a time.


Lessons learned:

1.  It does not require fuels unless you choose to use the hybrid function.

2.  You can cook in the winter and in the summer.

3.  The well is smaller than the well known "Sun Oven", so if I make bread in it, I need to use less dough so that it can cook without touching the glass lid.

4.  It is easy to set up and clean up.

5.  It is easily portable and is the size of a small-medium suitcase.


To learn more about this device, you can go to http://www.tulsisolarcooker.com/.  It is manufactured in India, but it was shipped from New York to our home.  It is compatible with our standard electric power system.

It was fun, easy, and I plan to use it when we go camping, when I feel like it, or when we have no power.  It is another option for your Emergency Preparedness plan.

Look into it!

Friday, June 25, 2010

It's a matter of making hand soap.


I know some of my neighbors well.  I can hear them say "why would you make this when you can pick it up at the store?"  Great question...and overall I agree.  However, if you were living off your supplies, and ran out of hand soap, wouldn't it be nice to know that you can make your own out of things you most likely have on hand?

I researched and tried a few things.  Here are 2 ways to do it that do not require goggles, gloves, or other protective equipment.  I do not disagree with those who enjoy soap making from individual ingredients, but the LRH is always in a hurry, and many of these approaches took a lot of time.  So, here are my 2 trials at it.

Little Red Hen's Handsoap method--Trial #1

Items needed:  A bar of soap, a 2-quart container, 1 1/2 Cups water, a rubber spatula, a hand mixer (optional), and your microwave.


Many of the recipes that I researched suggested to put in essential oils after the mixture was cooled, otherwise the oils would evaporate away.  I decided to try a bar of Caress as I like the smell, and it has moisturizers in it. These are two things I appreciate in a hand soap.


Put the soap in the container and place in the microwave.  After 2-3 minutes on high, your bar will begin to foam up.  You need the 2-quart container because it can reach the top of your bowl.


After removing the container from the microwave, put in HOT water, otherwise the soap becomes hard and doesn't dissolve in the water well.

Mix well and let the mixture cool.  The first time I did this, I used 2 cups of water, and it was too runny.  So start with 1 1/2 Cups of water and add water if you wish to achieve the desired consistency.


Little Red Hen's Handsoap method--Trial #2:

Items needed: A bar of soap (cut into chunks or grated), a 2-quart container, 1 1/2 Cups water, a rubber spatula, a hand mixer (optional), and your microwave.

Place the soap pieces/chunks into the microwave with the 1 1/2 Cups of water.  Microwave on high for about 5 minutes.  If the pieces are not melted, microwave in increments of 30 seconds until melted, or take out of the microwave and stir until pieces are melted.


Again, you can see why you need a 2 quart container as the mixture really foams up.  Remove from the microwave.  By the way, your kitchen will smell great during this part!


Use your hand blender, or mix by hand.  You will create a thick mixture. Let cool for about 10 minutes.  Add water to achieve the desired consistency you wish.


Pour warm mixture into your container via a funnel.


When I tried to dispense the liquid after a couple of hours, it was still very runny.  Here, I am dispensing the next morning and it looks great.

Lessons learned:

1.  Even though I like the fragrance of the Caress bar, the Roosters of the home think it is too feminine.
2.  Cost. 

The price of one bar of Ivory Soap would be $.50.  I made about 15 oz of hand soap from one bar.  That would work out to be $.03 per ounce when made at home.  National Brands and Store brands can cost $1.99 for 7.5 oz. That works out to be a cost of $.27 per ounce.  Making your own at home is a 111% savings. 

3.  Time:  This took in cumulative time, about 20 minutes.  You could multi-task while your mixture is in the microwave, but the total hands on time was about 10 minutes.

4.  Fragrance: If you wished to add essential oils for fragrance when the mixture was cooled, you could.


So, if you want to save money, save space on your shelf (think of the size of a bar versus bottles of liquid), or have another option should you find that you need hand soap, give this a try.

  It is really easy!

Thursday, June 24, 2010

It's a matter of Sour Cream Powder....really!

I recently installed Google Analytics on this blog.  Surprisingly, the information that I had previously posted on Shortening Powder & Butter Powder are topics that bring a lot of hits.  So, when I came across this video about Sour Cream powder, I really wanted to share it with you.  How can we survive without sour cream?


The measurements giving in the video are 1 Cup Sour Cream Powder and 1/2 Cup water.  Mix well.

Sunday, June 20, 2010

It's week #4 and the focus item is......Hand Soap!

(Image courtesy of doggyz11.files.wordpress.com)


Did I get your attention?  Guess what this week's focus item is?  Well, if you can't make a guess from the picture above, try this one.


(Image courtesy of www.washinghands.net)

And I hope you surmised that the target item is Hand Soap.  This is one of those daily use items that you would certainly miss if you didn't have it readily available to you. 

We will discuss more on this item later in the week.  So, purses ready.....let's get shopping!

Good Things to Come......Happy Father's Day

On this glorious Father's Day, and in this time of great challenge in our world, President Holland reminds us that no matter what, good things will come.  View this video, and hear his wise words.

And, make breakfast in bed for the Father of your home, call your Father or Father-in-law if you live away from them , and finally remember to thank your Heavenly Father for the blessing of the Plan of Salvation.  It guides our path in all we do, and can do.

Saturday, June 19, 2010

It's a matter of ....... Freezer Jam!

If you are new to jam-making, this is a wonderful way to start.  Watch and learn step-by-step how to make Freezer Jam.  It's delicious and simple.  It can last up to one year in your freezer!. And......you family will love it!

Thursday, June 17, 2010

Lessons from the Gulf.....

(image courtesy of nydailynews.com)

I am sure we all have been saddened by the ongoing Gulf Oil Spill Crisis.  The impact on families, the environment, and the wildlife are tremendous.  We can all argue the reasons why (regulations made BP drill so far away, BP didn't use safe practices, the government is not responding etc),  which the media is doing a fine job of transmitting.  However, there are practical lessons to be learned here.

The following comes from Survival Mom, and I think she has some important things for us all to consider not only with this situation, but others that may and will occur unexpectedly. 


Many years ago I had the opportunity to vacation, twice, in the beautiful warm waters of the Gulf of Mexico. Once, on the tiny island of St. George, off the coast of Florida, I was the only person on the wind-swept dunes looking out over the white-capped blue waters. It was heaven on earth to this desert rat. Now when I think of those same waters covered with sticky black oil and the thousands of birds and sea animals who have been affected, it is heart breaking. Add to that, the incredible losses to the families whose livelihoods depend on the various Gulf industries, and this disaster will be one of the worst our country has ever faced.

As always, there are lessons to be learned in even the most negative situations, and here are nine lessons from this one.

1.  An event hundreds of miles away can directly impact your life. Initially, those living closest to ground zero, so to speak, are the ones most impacted. However, this oil spill is having a long-term affect on the livelihoods of thousands of people, and over a period of time, thousands more will be affected in a chain reaction. In this highly inter-connected world of ours, we no longer have the luxury of saying, “Whew! I don’t have to worry about that event!” This is why it’s vital to stay up to date with current events. Threats by North Korea against South Korea and deals being made between such diverse countries as Brazil, Turkey, and Russia may very well develop into events that have repercussions a lot closer to home. Keep your eye on the news, preferably from several different sources.

2.  You cannot count on government assistance, and, in fact, the government may very well make a bad situation worse. This is happening in the Gulf, and is more likely than not to happen in an event affecting you and your family. As government agencies dilly-dally and fret over following thousands of regulations, sea life and invaluable ecosystems are being destroyed. The more self-reliant you can be, the less help you will need from government agencies bogged down with red tape and politics. Research, plan, and prepare as though you will be completely on your own because you very well may be.

3.  Sometimes it’s just easier to ask forgiveness than permission. I admit I’m a bit of a rebel on the side of common sense, and this morning I was thrilled to hear that Governor Jindal of Louisiana was moving ahead to build sandbars off the coast of his state. After weeks of waiting for permission from the federal government, he’s doing what should have been done from the start. I’m not advocating taking actions that would endanger lives, but there are times when common sense supersedes following the rules. It’s kind of like sitting at a red light early on a Sunday morning when no car is coming in any direction for at least a mile. You can sit there and wait for the green light, or just go.

4. Generic preparedness is never wasted. Extra food, bottled water, an evacuation plan, some saved cash will come in handy whether they’re preps for a hurricane, wildfire evacuation, a lay-off, or the devastation of your family’s livelihood. The beauty of preparedness is that if, for example, you prepare for a long-term power outage and, instead, you find yourself dealing with record flooding, you’re still prepared. There’s little doubt that Gulf state preppers will get through this crisis more easily than those who haven’t given preparedness any thought.


5. Financial preparedness may be the absolute most important thing you do. In this economy, I know it’s tough to hear that you should be paying off debt and saving money and buying extra food and supplies! This is the time, though, to work extra hours, start up a business that has few upfront costs, learn new skills, put old ones to work, get the kids out there earning their own “fun money”, and even (gasp!) selling some of those Big Boy Toys! In other words, this is get-serious time! The families in the Gulf who have additional streams of income and have little debt are far better off than those who depend entirely on that single source of income. Even paying off one bill or putting an extra $50 aside each month is better than doing nothing. If the only preparedness step you take is to get your finances in better shape, then do it.

6. Information during and following a disaster is vital, but be aware that you may be getting a skewed or altered version of the truth. I’ve heard reports from “eyewitnesses” in the Gulf that law enforcement officers have closed off beaches and prohibited cameras in the area. I’ve heard that beaches supposedly contaminated are, actually, as pristine as ever. Which reports are true, which are exaggerations, and who can you believe? In a crisis, it’s vital to stay alert and get your information from multiple sources. The major media outlets aren’t necessarily unbiased, but then again, they have more people and more resources to gather and report information. Still, be sure to access information from local news sources as well as national. This is when having a short-wave radio or your HAM radio license comes in handy. Accurate information can make the difference between life and death.

7. Community is everything. Already, thousands of people are volunteering to help clean up the beaches along the Gulf coast and many more will follow suit. Gulf families are banding together to pressure their government officials to provide common sense help and cut through red tape. In a crisis, the relationships we have with others become more important than ever. If you’ve ever been stranded somewhere alone, you can appreciate that fact. Facing an emergency, as well as an uncertain future, is easier with a circle of friends and family. Expand your circle of friends, make connections with each other, both online and in real life. You never know when you’ll be the one in desperate need of help or the answer to someone else’s prayer.

8. Disasters can quickly and unpredictably spiral out of control. When the initial explosion happened on the Deepwater Horizon oil rig on April 20, who could have guessed it would be one of the hottest topics weeks later? The original event in a crisis will always produce a cascade of unplanned consequences. If the crisis is dealt with quickly and decisively, those consequences can be limited and contained, to a degree. Planning ahead and considering all the “what if” questions can broaden our thinking and open our minds to alternative solutions. Once you have an idea of what could happen, you can take proactive steps in case it happens. Being prepared makes it possible to more quickly grasp the reality of a situation and then being able to slow down or stop the cascade of events.

9. Be willing to consider a variety of solutions. Part of the problem with the expanding crisis in the Gulf is that initial, common sense solutions were delayed by people without common sense. There’s never just one answer to a problem, and sometimes the best solution can come from an unlikely source. Often, my kids come up with better ideas than my own! It’s folly to blunder on in a direction just because it’s the way things have always been done.

The Gulf oil spill was predictable just by the nature of an oil rig drilling at a depth of 5000 feet some 52 miles off shore. You can bet British Petroleum had crisis plans in place, had regularly scheduled drills, and yet, the explosion happened and the situation is far from being under control. As SurvivalMoms, we should be even more diligent as we consider our family’s safety and future. Learn from the mistakes of others! Common sense rules!

A great idea with Jam.....


(image courtesy of simplyrecipies.com)

Doesn't this look good?  It looks rather fancy doesn't it?  Well, wow you family or friends with this wonderful addition to your brunch menu.  I made this with Crescent rolls, and it couldn't have been easier.  It looks like you have worked yourself to death in the kitchen to the unaware guest.

In keeping with our focus on Jam and Jelly....here is a wonderful entree that you can easily prepare.


Baked Brie Recipe  (http://www.simplyrecipes.com/)  Can be prepared in 30 minutes or less.
Ingredients

1 large sheet of puff pastry dough or 1 tube of refrigerated crescent dinner rolls

1 round or wedge of Brie cheese (do not remove rind)

Raspberry Jam, or other sweet jam

Brown sugar

1/4 cup of maple syrup

Method

1 Preheat oven to 350 degrees F.

2 On a stick-free cookie sheet, lay out the puff pastry or the crescent rolls flat; put brie round or wedge on top.

3 Spread jam on brie, fold dough over top, cutting off excess dough. Drizzle maple syrup and place a handful of brown sugar on top.

4 Bake at 350º for 25-30 minutes, pastry should be golden brown. Let cool for 10 minutes before serving.

Serve with crackers and apple slices.

This would certainly be a "splurge".  The Pastry dough can be purchased frozen, and the Jam would be on your shelf.  Brie has a short shelf life (sometimes days), so you could slip out and get your Brie just for this 'splurge'.   Who says you can't supplement your food storage with fun things? 

Wednesday, June 16, 2010

Jam.....Besides PB and J, What can I do with it?


(Image courgesy of epicurious.blogs.com)

I was really zealous last year and made many different kinds of Jams and Jellies.  I have the the belief that if Heavenly Father makes items available to you, it is incumbent upon you to be grateful and to find a way to use them.  Thus....I had a lot of Jam and Jelly. 

So, I have found several ways to use it besides on yummy PBJ sandwiches...which I still love.

Glazes:  As noted above, you can use some Jellies and some Jams as Glazes on meat before roasting.  Try Peach Jelly on a Pork Ham.....yum.

Ice Cream:  You can put a dollop on top of Ice Cream....or use some to flavor your Ice Cream when you make it from scratch.

Yogurt:  Use it to flavor plain Yogurt.  And, if/when you make your own, flavor your own Yogurt.

Cheesecake:  You can swirl them into Cheesecake batter.  They look beautiful and it will taste wonderful!  You might even consider putting some on top of a slice.

Crepes:  You could mix Jam or Jelly with Cream Cheese or Yogurt and fill a homemade Crepe with it.

Pudding:  Mix in with some Vanilla Flavored Pudding to create your own fruit flavor.

Turnovers:  Put a dollop in between your pastry dough and bake.

I'm sure there are more ideas, but consider these.  I think I gained 5 pounds just thinking about the Cheesecake idea........

Do you ever....Freecycle?


Some folks know about Freecycle and some don't.  I stumbled across this group a few years ago.  Many areas have a Freecycle groups.  Most folks that I have visited with about this often think of it as a way to give or get items for free.  Well, there is truth to this, but it is a little different from the Mission Statement of this group. 


"Our mission is to build a worldwide gifting movement that reduces waste, saves precious resources & eases the burden on our landfills while enabling our members to benefit from the strength of a larger community."


After signing up with this community, you can post for: 


The things that you "want" 
The things that you "offer"
The things that have been "received".


Some folks will offer small things like scraps of yarn or crafting supplies.  Some will offer pieces of furniture.  If you have never used this service before, you may be surprised at the number of responses you may get when you offer items.  It really reinforces to me the impact our economy has had on everyone.

What are some basic suggestions to use here?

Don't list your address in your post.  When you identify the "lucky winner",  email or call them individually.  Even though this is a helping site, you need to protect yourself and your home.  When you do arrange for someone to come and pick up the targeted items, be sure to have someone with you.  Chances are that nothing will happen, but it is always smart to beware.

Have realistic expectations.  If you are looking for an expensive Ikea-type piece of furniture....you may not get it!  However, if you have a need for a dresser, or pieces of drywall etc., you may actually be able to locate someone who is willing to give it to you.

Use good manners.  Be respectful in your responses, remember the Golden rule.  After picking up an item, send a follow-up email and thank the individual who shared with you.

Use the site for what it is intended.  Don't try to get items for free and then try to sell them.  It just isn't 'right'.

So, if you are looking to help someone, or help your self, sign up for the Freecycle group near you! 

Tuesday, June 15, 2010

Mormon Mission Biz - CNBC.com


(Image courtesy of www.mormonmissionaryprep.com)

This is a very interesting story about LDS Missionaries and success in the business world.  I love the question asked of the missionaries at the very end...I believe you will also.  This is done by CNBC and the link is below:


Mormon Mission Biz - CNBC.com

Monday, June 14, 2010

It's a matter of .....Freezer Jam....


(Image courtesy of www.thisweekfordinner.com)

In a previous post, we learned about Clear Jel and  also how to process it in a Hot Water bath.  Some prefer the Freezer method and claim that it is easier.  I have two thoughts on this, first it is easy, and secondly you need to consider how much room you have in your Freezer.  If you are trying to store enough for your family to use in a year, this could significantly impact what you can store.  However, if you would like a sweet indulgence with some in your freezer and some in the jar....go right ahead!

Here is a tried and true recipe that can be used with Strawberries, Raspberries, or Blackberries.


3 cups Sugar

1 pkg. Strawberry Kool-Aid

3 tbsp. Clear Jel

½ cup Light Karo Syrup

5 cups Fruit (uncrushed)

Mix well. Put into containers and freeze. Use flavors of Kool-Aid that compliment the fruit used.

Here's a tip!  Heat your fruit to dissolve your sugar then add Clear Gel, let it set 5 minutes, then pour into your jars. Freeze. It is that easy!!!!  (http://www.urbanhomaker.com/)

 
Try it!

Saturday, June 12, 2010

It's week #3 in June, and the target items are Jams and Jellies.


(Image courtesy of .amazingclubs.com)

It's week #3 in June, and the target items are Jams and Jellies.  It is the season for fresh strawberries and I have even seen cherries, blueberries and raspberries.

This item will count as a "sugar" in your long-term food storage staples.  This is such a wonderful thing to make and offer to your family.  If you haven't really entered the world of canning, Jam is an easy entry food.  It is one that is really difficult to 'mess up'.

I am including a link to prior posts that I have done on this topic.  You can find a lot of information here

As some of you may know, I like to use the product called "Clear Jel" as it lasts indefinitely.  I was surprised to see this at our local family owned Grocery store called Kohlers.


I usually have had to purchase this from Kitchen Kneads on Redwood road (around 7200 South) in SLC.  I have also purchased it at Allison's Pantry prior to the closure of their store front.  I haven't tried this brand, but it is certainly fairly priced.  I may get some and see if it performs like Clear Jel because this is a convenient source if it is compatible.  If you have used this product for jams and jellies, please let us all know!

More later......

Friday, June 11, 2010

It's a matter of....Condensed Soup....


Cream of Mushroom or Cream of Chicken soup are such staples in many American Kitchens.  They also can be a little costly.  So, here is a really unique option for you to consider.  I love it!

The cost of a name brand can of Cream of Mushroom soup can be as much as $1.39 a can.  So, if you decided to purchase  9 cans, it would cost you $12.51.

Enter a new star to the show.....Condensed Soup Mix.  Let's take a look at the recipe:


Condensed Soup Mix (www.Budget101.com  )


2 c Nonfat dry milk
3/4 c Cornstarch
2 tb Dried minced onion flakes
1/2 ts Pepper
1/4 c Instant chicken bouillon, or other flavor
1 t Crushed basil – optional
1 t Crushed thyme -- optional

Combine all ingredients, mixing well. Store in airtight container. This makes 3 cups of mix, the equivalent to about 9 cans of soup.


  • To use: combine 1/3 cup of mix with 1 1/4 cups of water in saucepan. Cook and stir until thickened or add mix and water to browned and drained casserole meat and cook in skillet or saucepan with other casserole ingredients or use instead of canned soup in any casserole. 


  • This mix has about 1/3 the calories and sodium as purchased condensed soup

Isn't this awesome?  I have used this for some time now and it works very well.  Let's look at the cost of making the mix......
For the Condensed Soup Mix the costs are:


2 c Nonfat dry milk -- $1.32
3/4 c Cornstarch -- $.05
2 tb Dried minced onion flakes -- $.16
1/2 ts Pepper -- $.16
1/4 c Instant chicken bouillon -- $1.09

Total Cost: $2.78 for the equivalent of 9 cans of condensed soup.
Again, isn't that awesome!  So the cost savings between the mix and the actual canned goods is $9.73.  That is a 77% savings! 

You may ask, how well does it works?  I have used it in casseroles, and soups.  My family did not know I used it and there were not any complaints.  I also like the fact that is is Non-Fat, and it uses many food storage staples.

This is something I highly recommend you try, it works very, very well.

It's a matter of....Chicken Soup.


One of my children loves Chicken Noodle Soup.  And, we have purchased plenty of premium soups to satisfy her love of this soup. 

I went to the local big box store and found the following as of 6/5/10.


As you can see from the pricing, an individual serving runs between $1.58 and $1.64 for an individual serving.

So, with the focus this week being upon soups as well, I thought I would find a recipe to can it myself.  One of the first tings that I learned was that I couldn't include one of the main ingredients that I like the best.  See the following:  Caution: Do not add noodles or other pasta, rice, flour, cream, milk or other thickening agents to home canned soups. If dried beans or peas are used, they must be fully rehydrated first.


That made be feel a little indignant!  Why can I buy commercially prepared soups with noodles and rice, but I cannot replicate it at home?  It seems that commercial canners have a specialized process that allows for the expansion of noodles and rice without turning them into a "mushy mess". 

However, I learned that I could can the rest of the soup.  Then, when it was time to serve, I can add my noodles or rice at that time.

I used the following recipe from Freshpreserving.com which is the site for Ball.  This same recipe is in the Ball Blue Book of Preserving. 


The instructions suggest that you simmer chicken and vegetables to make your own chicken broth. for about 2 hours.  The length of time was initially daunting, but as I was working from home, I didn't have to babysit it and this turned out just fine. Another thing the recipe recommends is that you use whole chickens and debone them.  In addition, the recipe states that you need to 'skim' off the fat.  Now, those are 2 things I just wasn't interested in doing.  Problem solved, I purchased chicken tenders which were already skinned and deboned!


Dice your celery


Dice the carrots


And dice the onions.


When the chicken cools, cut it into chunks.


The recipe suggests bouillon cubes.  I used this flavored base that is wonderful in soups and stews.


Place it into your jars and process for 90 minutes at 15 lbs pressure for our altitude here in the Wasatch Front.

Let's discuss time and money:

First, let's start with time.  The actual hands on-time for cutting, stirring, and ladeling into jars was minutes for each step.  The cumulative time was about 4 hours....but I didn't have to stand there and babysit!.  I cleaned, organized, and worked on my computer.

Because I used chicken tenders, I realized that I have a lot more meat in these jars than a standard canned soup.  For the Roosters of the house....that is a great thing as they like this part as much as they like the noodles that will be added later.  Because I used Chicken tenders, the cost for the meat was about $10.00.

Now, let's look at the money aspect.  I calculated that it cost me $1.53 per pint to make this at home.  I probably could have saved money by using whole chickens like it suggested,  but that would involve much more time and the necessity for me to get over my phobia of touching meat.  Not an option for me!  This proves the point that making things from scratch is not always cheaper.

So, where is the value in this?  I have the skill set to make this and preserve it. In times of challenge, that is extremely valuable.  Also, the men in my family like the fact that there is more meat in this soup.  I could reduce the amount of tenders to bring the price down, and may do that in the future.

It's easy....easy.....easy.  It's worth looking into!

Thursday, June 10, 2010

It's a matter of ...... Chili!


My son seems to like chili, but only on his terms.  That means, when the moment strikes.  Well, since we are concentrating on chili this week, I wanted to determine whether it was worth the time and resources to can my own chili for him, as he seems to like mine....when the moment strikes. 

Here is a picture of a national brand taken on 6/10/10.  The chili is on sale for $1.79 and supposedly is regularly priced at $1.99,  The LRH did peak under the tag, and it still said $1.79...but was  'regularly $1.99'.....so go figure.

I used a recipe entitled Chili Con Carne from the National Center for Home Food Preservation.  (Please see the link provided for the recipe).

The recipe begins by instructing you to soak your bean overnight.....who has time for that?  Who can remember to do that? The answer is ....certainly not me!  So, I used the quick soak method.  I brought the beans to a boil, and then turned the heat off.  Leave it for an hour.  As it turned out, on my day off, the hospital called and asked me to come in to do a specialized evaluation.  I seem to be the only one in the county who does these these types of evaluations right now.  So, I left my beans, went to the hospital, did the study, and came home.  It was about 1.5 hours in total time.


When doing this, the soaking water will look terrible.  Drain the water and wash your beans.  Here are the beans in question....in the colander.


I choose to use extra, extra lean beef as I hate to pay for something I am going to have to discard.  I also sliced my onions and put them in.  The recipe also calls for chopped peppers, but Rooster Jr. has a severe dislike for peppers, so I omitted them.


Put in all your dry seasonings.


The recipe calls for crushed or whole canned tomatoes.  This is my Tomato concoction that I make every year.  I can make spaghetti, salsa etc from it.  I will be using 2 quarts of them.


Pour the tomatoes into the meat mixture.


Incorporate the tomatoes and beans into the mixture.


After simmering for 30 minutes, place into jars and wipe the rims prior to putting on the lids and rings.


You must process these in a Pressure Canner and not in a Hot Water Bath Canner as the Chili has protein.  For Pints (at our altitude), process 75 minutes at 15 pounds of pressure.


Let the canner cool naturally, because the Chili has protein, you cannot rush this process.  Take the jars out of the canner and listen for the "pop" that let's you know they are sealed.


Now, let's talk money and time:

First, let's talk about time.  I picked  a day when I was going to be around my home most of the time.  I did not babysit this process.  I cut, cooked, bottled a few minutes at a time.  Most of the time was needed to soak (and you now know I didn't even stick around for that to occur), simmer, and process.  This is time I didn't have to spend in the kitchen, even though I would wander through to make sure everything was working as it should.  I cleaned, organized, and did work on my computer.  I even had to take my son to the Insta-care when he returned home from a High Adventure camp-out because of a little mishap he had while he was away.  I let the canner cool during that period.  (If you know my son, please don't mention this to him, he hates it when 'I let everyone know things'....he's so funny).  So, I hope you see that I didn't have to devote a tremendous amount of direct time to the process, however the cumulative process did involve hours.

Now, let's talk money.  I calculated the cost of each pint (without the cost of power, or jars/lids as I already had them) to be just under $1.00/pint.  The pint is roughly equivalent to the 15 ounce can of Chili.  The most important part of this to me was the value of knowing how to do it, knowing how to use my Food Storage Staples, and also to possibly save ~ $.79/jar. The overall savings for 10 pints is $7.90.  This is equivalent to a 55% savings.

Finally, let's discuss convenience.  My children love to open a can of soup after school, or for a quick snack.  It is also nice to have a quick meal on those nights when Dance lessons or Soccer games run really long!  It's ready and all you need to do is heat it up.

So, here is another way to stock up on one of the focus items for this week.   Pull out your Pressure Canner, or ask to borrow one from your friend or neighbor and try it!
01 09 10