Saturday, May 29, 2010

The Return of the 4th LAR.......


The LRH had the opportunity this morning to go welcome home the 4th LAR as they returned from their tour in Afghanistan. 


We had to wait around for a while.  However, news of how close these brave young Marines came fast...and digitally.  We knew exactly where they were on I-215, then Bangetor Highway, then I-15, etc as the young Marines would text their loved ones, who would then share the information with the bystanders.


Then the buses were heard and the crowd moved quickly to meet them.


Returning Marines and loved ones rushed to see each other again.


It was loud......


......and emotional with tears, hugs, and lots of embracing....


And those who gave the ultimate sacrifice were also remembered. (We learned that the unit that replaced the 4th LAR suffered 2 casualties on their first day.  Our Utah Sons, sadly,  lost 2 brave marines a few weeks ago.  We have been blessed that so many returned home safely).


This Memorial Day, take the opportunity to thank those who have served in harms way....we owe them our all.

Wednesday, May 26, 2010

BYU Virtual Tours.......


BYU has a new offering...Virtual Tours.  This week, the tour is about the Relief Society Building.  Each week, the site will focus on a different location in church history.  Some rare photos are also being shared.  Check it out....it's like taking a trip....without having to pack!

BYU Virtual Tours

It's a matter of ...First Aid and CPR training.


(Image courtesy of ww.co.thurston.wa.us)

Since our focus this week is on obtaining a First Aid Kit, the thought comes to mind....that we need to know what to do with it. After all, the training is also something that is "acquired" for the preparedness of our families.

Here is the link to our local Red Cross.  You can sign up for a course that is spread over 2 sessions to learn these basic skills.  Take your spouse and teenage children as well.  Don't be caught off-guard when that unforeseen situation arises.

The Mountain Valley Chapter course schedule is here.

Sunday, May 23, 2010

It's week #4 in May, and the target item is........a First Aid Kit.

(Image courtesy of http://lc2.boe.loga.k12.wv.us)

This week we have a non-food item to gather.  Hopefully all of you have a form of this, or at least "part" of a first aid kit.  There are many checklists on the Internet that you can access to help you put together your own, or you can always purchase kits that are already assembled.  If you are like the LRH, you have a kit, but you need to go through it and make sure that it is stocked up correctly.  People in the family help themselves to it, so I don't always know what is in there!

Here is a list from the Red Cross:


2 absorbent compress dressings (5 x 9 inches)


25 adhesive bandages (assorted sizes)


1 adhesive cloth tape (10 yards x 1 inch)


5 antibiotic ointment packets (approximately 1 gram)


5 antiseptic wipe packets


2 packets of aspirin (81 mg each)


1 blanket (space blanket)


1 breathing barrier (with one-way valve)


1 instant cold compress


2 pair of nonlatex gloves (size: large)


2 hydrocortisone ointment packets (approximately 1 gram each)


Scissors


1 roller bandage (3 inches wide)


1 roller bandage (4 inches wide)


5 sterile gauze pads (3 x 3 inches)


5 sterile gauze pads (4 x 4 inches)


Oral thermometer (non-mercury/nonglass)


2 triangular bandages


Tweezers


First aid instruction booklet

So, take inventory and see what you need to stock up on .  Don't forget to have a kit in your vehicles and in your 72 hour kits as well.  More later on this......have a fabulous day!

Urban Legends......

This week, my son had a big assignment due on Urban Legends.  These are tales that are either told or passed around the Internet.  Often, there is some factual basis to them, but most are not credible.  Some can be very entertaining as well. 

As you know, our topic of focus for this past week has been on Butter.  We have discussed butter as a powder, and also tips on freezing butter. 


(Image courtesy of http://farm4.static.flicker.com)

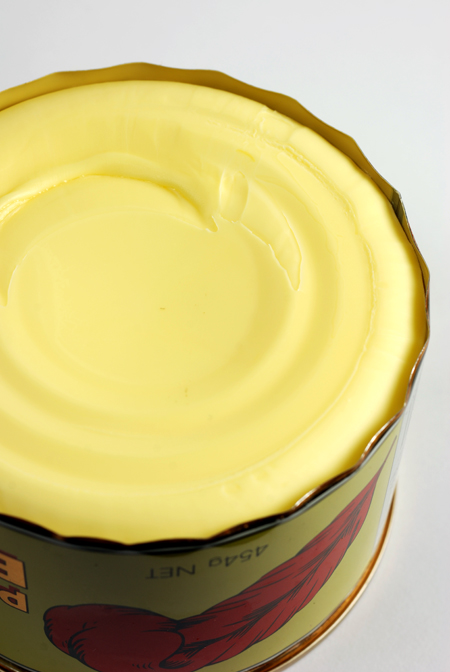
Today we are going to talk about canned butter.  The picture above features Red Feather brand canned butter.  The LRH has some of this in her storage.  We have tried it, and my family was pleasantly surprised with it's taste.  Seeing that it came from a can was concerning to them, but once they had tasted it, it was placed on the "it's okay" list for them.  You can purchase this brand from Macey's, Alpine Food Storage, MREdepot.com, and other online businesses.  It runs around $4.00 per can, and reportedly will last ~20 years.

Here is where the Urban Legend comes into play.  If you search the Internet, you will find many sites that give directions to "can" your own butter in canning jars.  It usually includes heating your jars in the oven, melting butter, pouring it into the jars, putting on the lids and rings, and allowing the jar to seal on it's own.  Sounds simple enough doesn't it?  The question then becomes.........."is it safe?".  The LRH has a dear family member who uses this method and has not had any negative effects.  She stated that she used her last jar recently and is getting ready to do another batch.

The USDA provides guidelines for canning.  They have specifically stated the following regarding this form of canned butter.  The major points are that this is a low-acid food and that it is not truly being canned.  This was concerning for the LRH...who loves to find unique ways to prepare.  So, I continued my research and found the following information from Prepare University.org.  This method provides for Pressure canning....which addresses the botulism question.  They state that the USDA has "such a procedure for canning fat-containing broth and soup. That procedure calls for a 20-minute canning time at the pressure recommended for 2000ft elevation"    The LRH looked at recipes from the USDA and from the Ball Canning book for broths and some soups.  The guidelines were often pressuring for 20-25 minutes.

So....where are we going with all of this?  To experiment on the "word".  I tried the procedure suggested by Prepare University (with standard sanitary procedures which I will point out) and here is the pictorial tour:


Take 7 lbs of butter.  I found that I could fit it all on my large cookie sheet.  The instructions say to let the butter become the consistency of pancake batter...which was taking a long time.  You all know by now that the LRH is not always a patient person.  So the instructions suggested the use of an oven or microwave to help soften, but not melt the butter.


So, I turned my oven to 250 degrees Fahrenheit.  I placed the butter into the oven, but saw that it was melting.  I then turned the oven off, propped the door open for a few minutes, then closed the door again.  This seemed to work.


This looks odd, I know.  But I used my 'clean' finger to test the consistency of the butter until it was right. 


In the meantime, I sterilized my jars in the dishwasher.


Place your canning funnel in your jar.  The instructions tell you to use 8 pint jars.  Of course, I wanted to do something different, so I used half-pint jars as they are equivalent to one cup.


Slide the softened butter through the funnel into the jar.


You can see how soft the butter is and that it easily comes off the cookie sheet with a rubber spatula.


When the butter was in the jar, I noticed air pockets, which is traditionally is frowned upon in canning.  So I used a long, thin rubber spatula and pushed the product into the jar.  I did this not only on the sides, but through the middle as well.  I was able to put more butter into the jars doing this.


It is very important to have a clean surface on the jar rim.  I used my microfiber cloth initially on this 'rough' side to wipe the rim and the first 1/2 inch inside and out.  This side of the cloth removed any lumps of butter, but still left a residual slick surface that could impede the jar sealing correctly. 


I then used the other side and repeated the same process to ensure the rim was clear and clean.


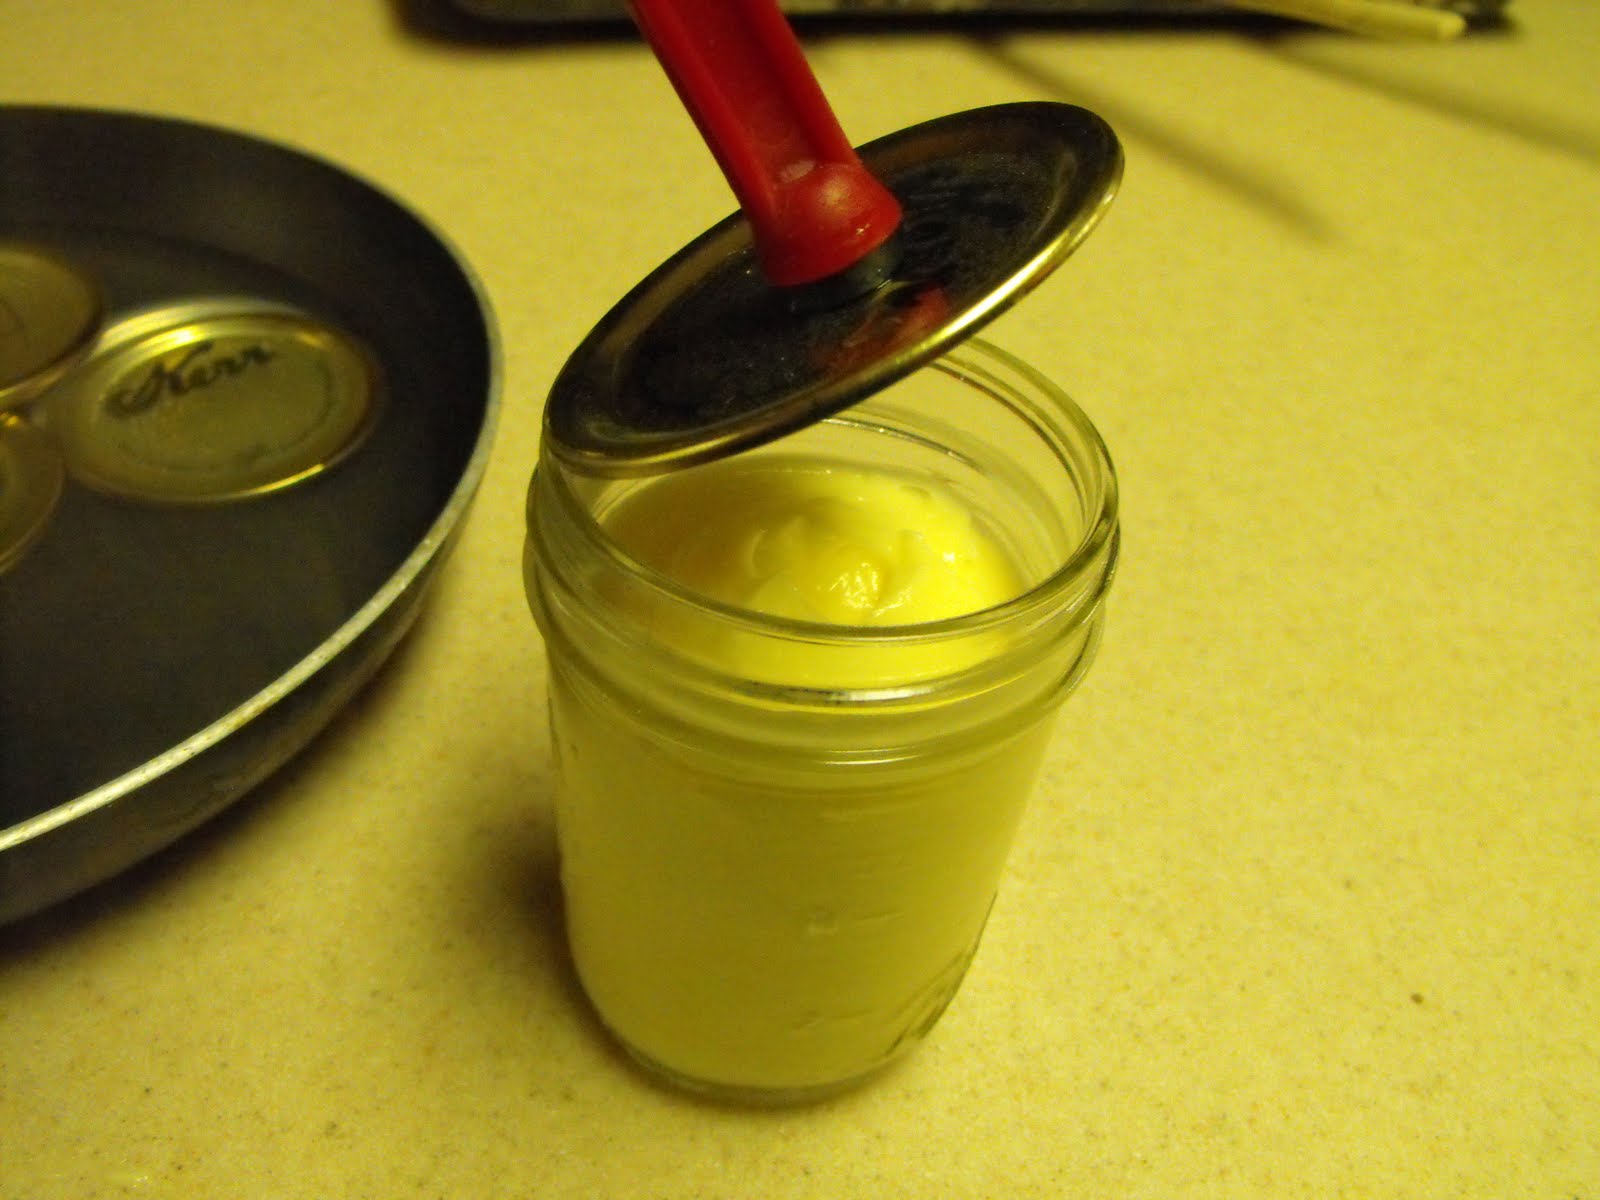
I then place a sterilized lid (which had been brought to a boil in a pan of water) on top of the jar and placed a ring on the jar.


After placing the jars into my pressure-cooker canner, I let it vent (steam 'shoot' out) for 10 minutes and then pressured them for 20 minutes at 15 lbs pressure due to my altitude.  This is what the jars looked like after they came out of the canner.  The jars began to 'pop' and seal almost as soon as I took them out of the canner.


The instructions say to shake the bottles every 45 minutes until they set up.  This is what they look like after shaking.  I found that I had to do this several times.


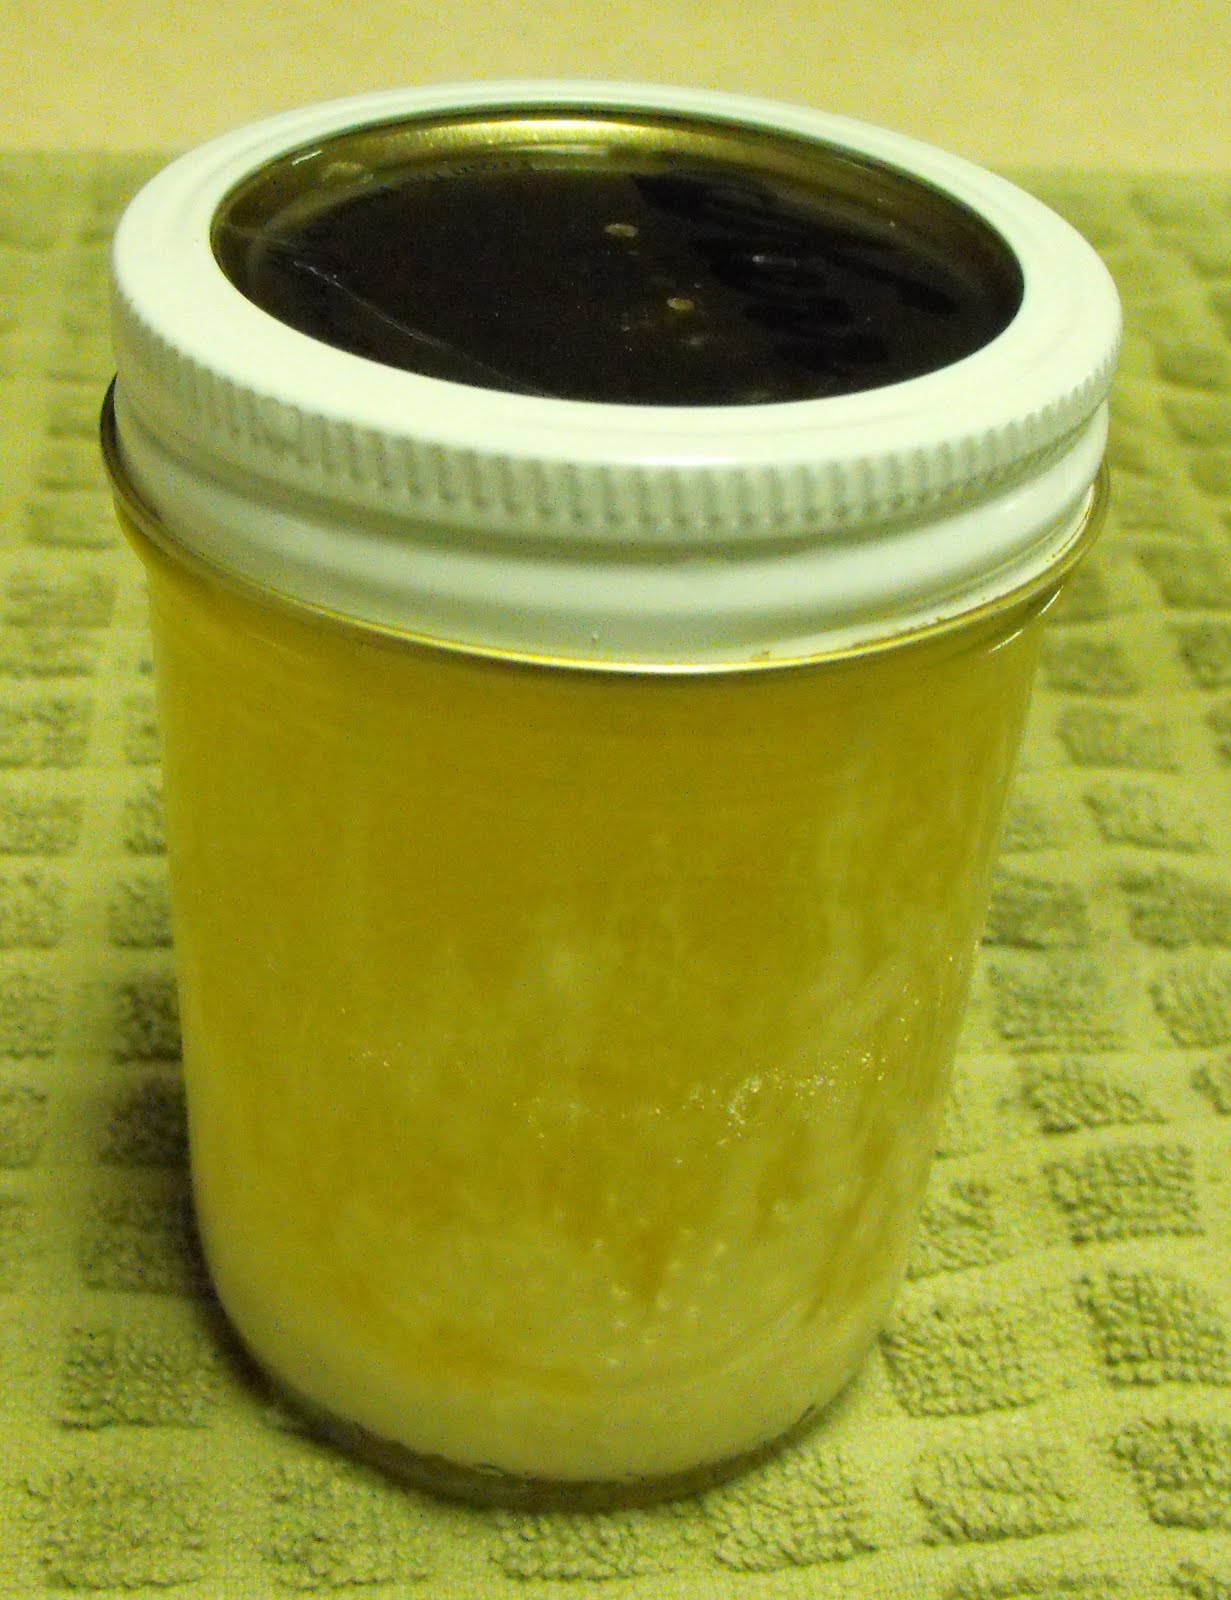
This is the end result after the butter sets.


So, what do you think?  The author from Prepare University quotes an unnamed source who stated the following:   I have read Internet recipes for oven-canning and water-bath-canning margarine and butter. I’ve worked in public health and food safety too long to trust any recipe that can’t be expected to kill botulism. While this recipe doesn’t have USDA approval, I feel it is sufficient to kill botulism spores.

The author of the method, and my family member, stated that the butter will be a bit grainy.  The purpose isn't really to spread on bread, but  to use in cooking in things like Alfredo sauces etc.  My family member stated that it makes really good honey butter as well.

So, make your own choice.  I personally feel more comfortable with the pressure-canner method as it really does address the concerns made by the USDA.  Please know that the cumulative process took hours, but only a few minutes at a time to put into jars, to shake, etc.  You also need to use your butter, reportedly, in 6-9 months.  If you are rotating your supplies, this would be doable. 

So what is the cost to make this?  As noted at the beginning, I stated that the Red Feather brand costs about $4.00 a can, which is just larger than a 1 Cup measure.  Using this method, I canned 1 Cup of butter for just under $1.00. 

The final benefit to this is that you would have butter if you lost your power.  If you had Butter Powder, this would also be true.  So....make a decision that works for your family.

Saturday, May 22, 2010

Registering to vote for upcoming Primary Elections......ASAP!


In Utah County, we have several important races that will be decided in the upcoming Primary Election on June 22, 2010. Some are local races, but Federal Races are also being decided that day for the 2 major parties. 

If you haven't registered to vote, not matter who you favor, please register ASAP.  You need to do this quickly!  It is an honor and a priviledge to vote...so please make this a priority for you, your family, friends, and neighbors.  Here is the information to help you below:

Deadline for Mail-in Registration: Monday, May 24, 2010


Deadline for In-Person Registration: June 7, 2010 (Utah County Elections Office in Provo).

If you have moved since the last election, you need to re-register.

To register, complete a voter registration form and mail it to the Utah County Clerk's office. You can check on your registration status or download a registration form at the Lt. Gov's website: elections.utah.gov.

Friday, May 21, 2010

It's a Matter of Freezing......Butter


Today we are talking about freezing butter.  This is yet another way to have Butter in your long-term storage. 

I don't know about you, but I hate things falling over in my freezer.  The boxes that butter traditionally come in are slick, and so they are often the first to slide or fall out of your freezer.  It can be painful when the boxes are frozen solid.  So, here is a solution I use, and it keeps things organized...and I can tell at a glance how much butter I have on hand.


This is a storage box for sweaters.  It is clear and long.  It fits well on my Freezer Shelf.


As you can see, I have taken the individual cubes out of the original packing and placed them into the container.  I can fit 38 cubes, or 9 and a half boxes of butter into this container.  Another reason to put them into a container like this is it does not allow the butter to absorb other odors from surrounding foods.  Some websites recommend wrapping each cube in foil to avoid absorbing other aromas from surrounding food.  With this method, which I have done for years, I have not had any issues with absorption of flavors...and my son stores his Otterpops right by the butter!


Finally, I put a label on it so the Roosters in the house can see it.  It's amazing that they could ask questions like "What's in the box Mom?" without a label. 

How long will butter last in the freezer?  Sources vary, but most say 6-9 months.   To thaw, put in the refrigerator...most likely over night.


Sources:  http://www.baking911.com/pantry/storage_ingredients.htm#dairy, http://www.tillamookcheese.com/FAQS/Butter_Questions.aspx,

Wednesday, May 19, 2010

It's a matter of ...... Butter Powder


(Image courtesy of www.shelfreliance.com)

The focus item this week is Butter.  Today, we will discuss "Butter Powder" as an option for your long term storage.  As you can see above, it does come in cans.  Here are some facts to know and consider about this item:

This information is from Honeyville Food Products.

It may be used as a one-to-one replacement in all butter applications including bakery goods, breads, cookies, cakes, muffins, sauces, and toppings.

Butter powder requires no refrigeration and is ideal for camping, travel, and long-term food storage. 
This product may be stored for up to 12 months opened, and 3 to 5 years in airtight sealed cans. 
Once the powdered butter is rehydrated it should be refrigerated and used within 4 days. 
It can be used in a variety of applications including: baked goods, breads, cookies, cakes, muffins, sauces, toppings and more. 
Mixing instructions:  Add 4 level TBSP powdered butter to 1 tsp warm water to replace 4 tablespoons of fresh butter. Mix well. The texture and flavor can change with more or less water. For larger batches, add 9 parts powdered butter to 1 part water.

Emergency Essentials offers this information: 


When used in baking, it is not necessary to reconstitute: Simply add it to your dry ingredients and increase the liquid. Butter Powder also works great to make your own honey butter and herb-flavored butters.

Each #10 can makes approximately 192 one-Tbps servings

Add a small amount of vegetable oil for an even smoother texture and to enhance flavor.
If you do open the can, you can repackage the powder into jars and vacuum seal with a Food Saver or with Oxygen Absorbers to protect this food.  Consider putting the jars into lunch bags to keep light away from it as well.

You can purchase this item from:

Emergency Essentials:  http://www.beprepared.com/
You can even find it at on-line auctions.


It can be used when you make your own mixes as well.  Give it a try!

    Sunday, May 16, 2010

    It's week #3 of May, and the focus item is............Butter

    (Image courtesy of widipedia.org)

    I hope you not only learned more about Sprouting after last week, but also really tried it.  If you did, you found that it was very, very easy to do.

    This week, the focus item is Butter.  It not only comes in a refrigerated form, but also in a canned and powdered form.  Watch the blog for more information on butter, and ways to store it to make it convenient to use.

    Check your current inventory, determine how much you will need for a year, and let's get busy!

    Friday, May 14, 2010

    My little inexpensive discovery.......

    Those who have followed this blog for a few months may remember this little "discovery", but knowing our focus item is sprouting...I will resurrect it once again.


    Well, Strawberry season is upon us, and I love seeing those full and half-flat offerings!  I love fresh strawberries, but also like to make jam.  Why are we discussing this?  Because I have discovered that those little plastic containers that the berries come in is a great and inexpensive way to sprout. 


    Here is an empty container from some berries had previously purchased.


    Fold a paper towel in the shape of the bottom of the container.


    Moisten the paper towel with water.


    Pour your soaked seeds into the container.  Let the water rush out of the weep holes.  (Do this over the sink).  Close the lid, and pull off the sticker so that light can get in when you are ready to expose the seedlings to light.

    Leave on the plate and cover.  As noted in previous posts, rinse the seeds 2-4 times a day....right in the container.  If the seeds are small (like Alfalfa), just drop water off your fingers on the seeds).   When the sprouts are established, remove the towel and place in the sunlight.  Continue to rinse until you are ready to eat!

    Now these "trays" do not cost a lot.  I have even sprouted in these containers and given them away as part of a gift.  They also are not "Dishwasher safe"....you just can't win sometimes.

    Wednesday, May 12, 2010

    More on Sprouting.........

    Well, how is your sprouting coming?  I hope you have taken the 30 seconds to a minute to begin this process!  If not, start RIGHT NOW.  It is easy, and you will have success.....it's hard not to.

    I often hear comments such as "You make it all look so easy".  Soooooo not.  I just don't show you all my disasters.  However, today you will see one of my mistakes....so that you can learn what not to do.  We have seen that you can spout in a canning jar.  There are also several commercial Sprouting trays you can purchase.  Let's take a look.....


    Here is a readily available type of sprouting tray. It comes with 2 trays that can nest together.  However, this is not how they come.  Yes, this is one of my little catastrophes.  Why? because most commercially made sprouting trays......


    are not.....


    Dishwasher safe!   So, this really is not a usable tray for me any longer.  Thankfully it is very inexpensive (usually under $15.00).

    Let's look at another one from "Sproutmaster"...which is also not Dishwasher safe.

    You can see that it has perforation along the bottom, like the above try does.  However, the tray is very study, and you can put a divider in (see above) to sprout two types of things instead on one in a single tray if you like.


    After soaking your seeds, pour the water and the seeds directly into the tray.  The water will rush out the bottom and your seeds will stay in the tray.


    Rinse your seeds, place the tray on one of the "lids"


     Place the other lid on top.


    You can also stack them.  If you look closely, there are really 3 "lids" here.  One on the bottom, one in the middle, and one on top.

    The Sproutmaster costs over $10.00 a tray, and you usually can purchase them in packs of 2-3 trays.  Again, they are not dishwasher-safe, so clean them by hand.  I soak mine in hot soapy water, and use a brush to clean them after they soak.  I also let them air dry.

    There are many other trays you can purchase.  Some even come with a pump to automatically spray water over them.  So, the choice is yours.  No matter what, try sprouting, don't wait.  Do it RIGHT NOW!

    Tuesday, May 11, 2010

    Where do I get seeds to sprout?

    Yes, another great question.  Here are some of the choices, and I will save my favorite for last.


    These are actually from my Food Storage.  As you can see, some come in bottles, some in pouches, and some in bags.


    These come in Zip-lock Mylar bags.  This is the variety that you get from Emergency Essentials (http://www.beprepared.com/).


    Here are other ways to purchase them.  On the top, these are seeds in little bags that are often hanging in indiscreet places within a Health Food store.  I have found them in the produce section, sometimes on an end cap, and other times in a place that appears random to me.  You can also see Lentils and Beans....in the bag from the grocery Store.


    Doesn't this look like a mess?  However, this is not only the least expensive,  but also my favorite way to purchase seeds.  Please know that I don't store them this way, but I wanted to make a point here.  These are seeds from....are you ready.....the bulk aisle in the Health Food Store.  They often have bins that you can dispense yourself.  After you get the amount you want, you write a number on the little twist-tie and that's it. Take it to the check-out counter and purchase the seeds.  This is not just a Utah thing. I have traveled to other states and purposely looked for this option in Health Food Stores....and the bulk bins have consistently been in each store.

    Let me just tell you, this is the least expensive way to get your seeds.  If you compare ounce for ounce to most of the bottled and bagged items, these are considerably less.  Not everything comes in bulk, so this is why I have other options as well. 

    One other piece of information, all of the stores that I have "checked out" do not pack these seeds with Oxygen Absorbers. There is a bit of controversy in the "food storage world" about using Oxygen Absorbers with sprouting seeds.  I have talked with the owners or management of 3 different producers of Sprouting seeds. They all consistently have stated that they either pack their seeds in Diatomaceous Earth or nothing at all.  They state that the Oxygen Absorbers can kill the germ of the seed, and thus it will not sprout.  So, for those who disagree, that is fine.  I have chosen to heed the advice of these professional seed producers. In the event of an emergency, I choose not to gamble as to whether my seeds will sprout of not.  This is the choice I have made. 


    In the bottle/bag form I have Radish and Broccoli seeds, Fenugreek, etc.  If I had to make a salad just from sprouts, I would love these other flavors in it...wouldn't you?  So, make a trip, and see how every inexpensive it is to purchase from the bulk bins and to learn about other options that are available in your area.  Also, consider getting a wide variety, man cannot live by one sprouting seed alone!
    01 09 10